background image

2

-If damage to any component is detected, DO NOT operate until repaired. 

If rusting occurs, it is recommended to use a steel brush, followed by a spray 
coating of high temperature anti-rust paint. 
To keep the bowl, grate and mesh lid from rusting, it is recommended to apply a 
coat of high temperature primer (such as rustoleum or similar brands) before use. 
Ensure the fire pit has completely cooled down before placing a cover or storing. 

Assembly instructions 
Estimated assembly time: 10 minutes. 
Ensure hardware is not too tight!

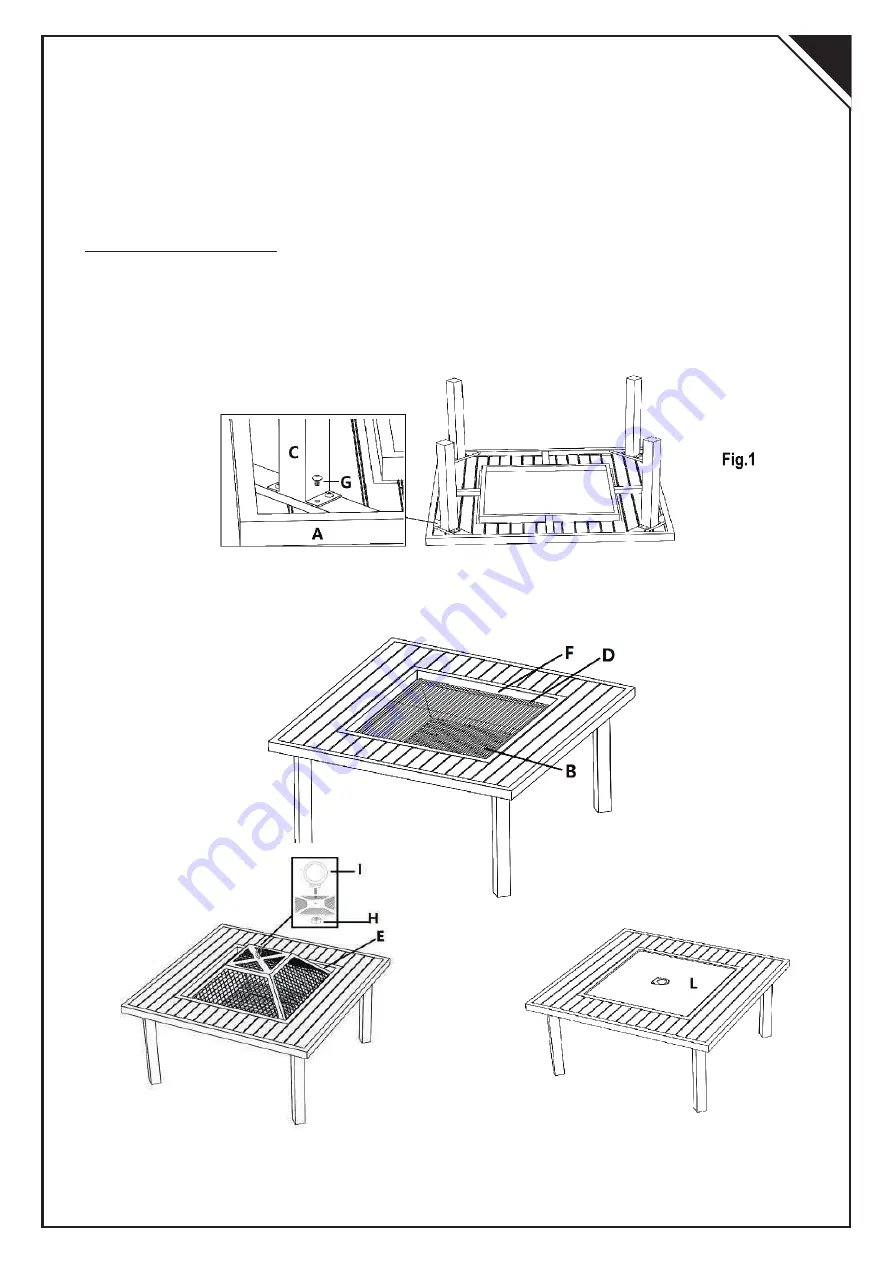
Step 1: Place parts on a smooth and even surface. Attach the legs (C) to the 
tabletop using the bolt (G). Tighten all hardware accordingly using the provided 
Allen wrench (J). Ensure all pieces are securely in place. 

Step 2: Flip the assembled frame so it stands securely on a flat surface. Place the 
fire bowl (F) into the centre of the tabletop (A) and put the iron gate (B) into the fire 
bowl (F). Attach the lid ring (I) onto the mesh lid (E) using the nut (H). Place the 
assembled mesh lid over the fire bowl (F) (Fig. 2 & 3). 

Step 3: Table: Take away the 
mesh lid (E) and place the table 
lid (L) onto the fire bowl (F). 

Your FIRE PIT is ready for use!

Your Table is ready for use!

FIG.3

EN

Summary of Contents for 842-270

Page 1: ...ASSEMBLY INSTRUCTION MANUAL IMPORTANT RETAIN FOR FUTURE REFERENCE READ CAREFULLY INbzb044_DE INbzb044_US_842 270 ...

Page 2: ...objects DO NOT use near flammable or combustible objects or materials Only a CHROMED PLATED COOKING GRID not provided is intended for cooking The log grate is NOT for cooking purposes Operation instructions Place logs on the grate and light with a match DO NOT overload the logs Use the provided poker when handling Do not use water to extinguish the fire this is dangerous and can cause damage to the ...

Page 3: ...nutes Ensure hardware is not too tight Step 1 Place parts on a smooth and even surface Attach the legs C to the tabletop using the bolt G Tighten all hardware accordingly using the provided Allen wrench J Ensure all pieces are securely in place Step 2 Flip the assembled frame so it stands securely on a flat surface Place the fire bowl F into the centre of the tabletop A and put the iron gate B into ...

Page 4: ...eeignet Verbrennen Sie KEINE Kohle Blätter oder andere brennbare Materialien in der Feuerstelle Halten Sie Kinder und Haustiere von der Feuerstelle fern Diese Feuerstelle wird extrem heiß berühren Sie sie niemals mit bloßen Händen wenn sie brennt ist Lassen Sie eine brennende Feuerstelle niemals unbeaufsichtigt stellen Sie sicher dass das Feuer vollständig erloschen ist bevor Sie sie verlassen Hal...

Page 5: ...lständig erloschen ist Überprüfen Sie alle Teile um sicherzustellen dass sie sicher sind Überprüfen Sie die Bauteile auf Anzeichen von Schäden oder Rost Wenn ein Bauteil beschädigt ist darf es NICHT in Betrieb genommen werden bevor es repariert ist Falls Rost auftritt empfiehlt es sich eine Stahlbürste zu verwenden und anschließend einen Sprühanstrich mit Hochtemperatur Rostschutzfarbe aufzutragen ...

Page 6: ...5 DE Schritt 3 Tisch Nehmen Sie den Netzdeckel E ab und setzen Sie den Tischdeckel L auf die Feuerschale F Ihre FEUERSTELLE ist nun einsatzbereit Ihr Tisch ist nun einsatzbereit Abb 3 Abb 2 ...

Reviews: