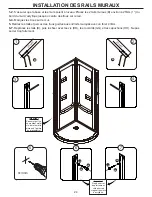
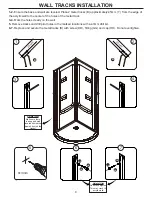
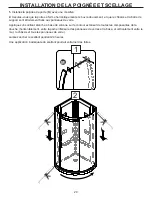
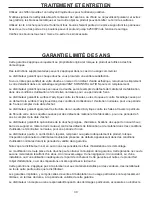
background image

23

Placoplâtre

1-3.

 Placez les murs d’acrylique et la base sur le mur et mettre le tout à niveau.
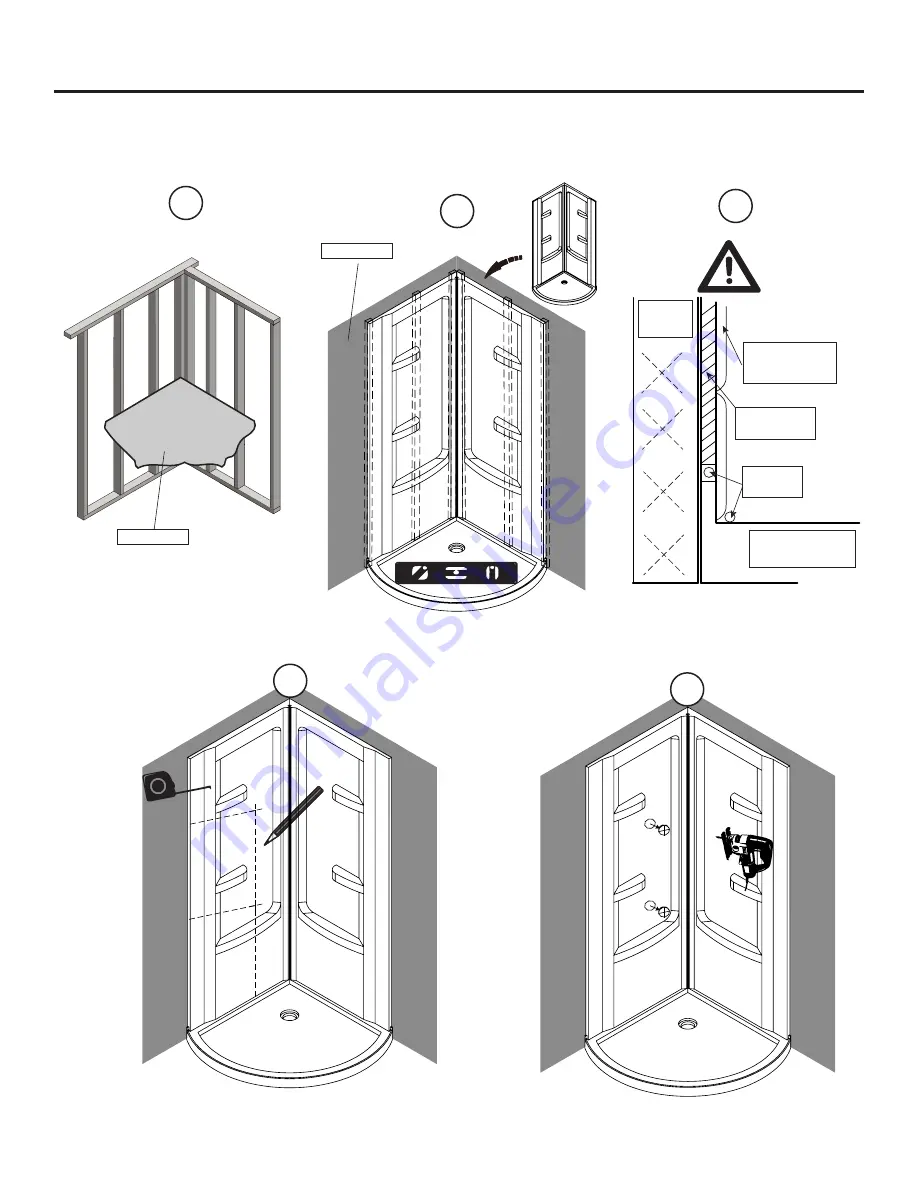
4-5. 

Mesurez la position désirée de la poignée et de la tête de douche, puis percez les trous adéquat avec une 

scie sauteuse.

1

3

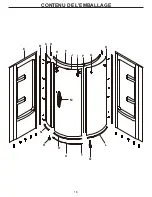
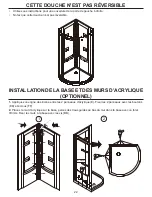
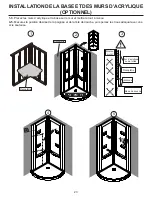
INSTALLATION DE LA BASE ET DES MURS D’ACRYLIQUE 

(OPTIONNEL)

Mur d’acrylique 

ou de tuiles

Montant

mural

Placoplâtre

Silicone

Base de douche

Bride

2

Placoplâtre

4

5

Summary of Contents for CAICOS

Page 1: ...Canada Purchase date _________________________ Product Tracking Reference ________________________ Questions problems missing parts Before returning to your retailer call our customer service departme...

Page 2: ...6 PREPARATION 6 THIS SHOWER IS NOTREVERSIBILITY 7 BASE AND ACRYLIC WALL INSTALLATION OPTIONAL 8 WALL TRACKS INSTALLATION 9 FIXED PANELS INSTALLATION 10 SUPPORT BAR INSTALLATION 12 DOOR PANEL INSTALLA...

Page 3: ...3 PACKAGE CONTENT B D F H I M T U Q O N G C J L K R E P...

Page 4: ...pegs 2 99SWE3107 WM J Door panel 1 99SGD0022 WM K Fixed glass panel Large 1 99SG10020 WM L Fixed panel s bottom seal strip Long 1 99SRU0078 WM M Door handle 1 99SHA1024 WM N Fixed panel s bottom seal...

Page 5: ...llen key 2 5mm 5mm Ratchet 5mm Bit socket Drill with ceramic tile bits 3mm 1 8 FF EE DD CC BB AA Cap 14 2 extra GG Clip 1x Screw ST4x12mm 6 2 extra HH II Screw ST4x15mm 10 2 extra JJ Screw ST4x20mm 2...

Page 6: ...with water damage CAUTION Carefully remove product from packaging and keep packaging until installation is complete Inspect all parts for damage if there is damage to the unit prior to installation p...

Page 7: ...IS NOT REVERSIBLE BASE AND ACRYLIC WALL INSTALLATION OPTIONAL 1 EE FF 2 3mm BB 1 Using silicone install the 2 acrylic walls E together Secure the 2 walls with bolt EE and nut FF 2 Place the acrylic wa...

Page 8: ...he wall and level it 4 5 Measure the position of the tap handle and the shower head make the hole using a box saw BASE AND ACRYLIC WALL INSTALLATION OPTIONAL 1 2 Acrylic or tile wall Studs Drywall Sil...

Page 9: ...ove tracks and drill pilot holes in the marked locations with a 3mm drill bit 6 7 Replace and secure the metal tracks B with screw DD fitting GG and cap HH Do not overtighten WALL TRACKS INSTALLATION...

Page 10: ...port bar F onto the fixed glass panels C and K using the brackets G and level it 7 8 Smoothly slide the fixed panel s support bracket R at the bottom of the fixed panel C and the guide Q at the bottom...

Page 11: ...eplace the fixed glass panels C and K into the 2 wall tracks B Note The wall tracks B allow you to adjust the position of the fixed glass panels C and K Adjusting the depth and or giving the fixed pan...

Page 12: ...to strongly tighten the bolts 4 Drill the 2 wall metal tracks B on 3 positions top middle and bottom with a 3mm drill bit Level the panels C and K 5 Fix the 2 fixed glass panels C and K with the fitt...

Page 13: ...n the door glass panel J Use a ratchet to strongly tighten the bolts 8 9 Install the 3 glass panels seal strips P 10 11 Position the 2 roller stoppers D in order to block the door panel J from hitting...

Page 14: ...s panels and the frame as well as the support bar Apply a clear silicone water sealant around the outside perimeter of any fixed shower components horizontally between bottom of fixed glass panel and...

Page 15: ...ase date Distributor further warrants the structure of the acrylic shell against loss of water through fiberglass laminate of the acrylic body as a result of defect in materials and workmanship for a...

Page 16: ...Date de l achat _______________________ Num roder f renceduproduit ______________________ Questions probl mes ou pi ces manquantes Avant de retourner le produit votre d taillant contactez notre servi...

Page 17: ...E N EST PAS DOUCHE EST R VERSIBLE 7 INSTALLATION DE LA BASE ET DES MURS D ACRYLIQUE OPTIONNEL 8 INSTALLATION DES RAILS MURAUX 9 INSTALLATION DES PANNEAUX FIXES 10 INSTALLATION DE LA BARRE DE SUPPORT 1...

Page 18: ...18 CONTENU DE L EMBALLAGE B D F H I M T U Q O N G C J L K R E P...

Page 19: ...9SWE3107 WM J Panneau de la porte 1 99SGD0022 WM K Panneau fixe Grand 1 99SG10020 WM L Joint d tanch it du bas du panneau fixe Long 1 99SRU0078 WM M Poign e de porte 1 99SHA1024 WM N Joint d tanch it...

Page 20: ...2 5mm 5mm Cl rochet 5mm Bit socket Perceuse avec forets c ramique 3mm 1 8 FF EE DD CC BB AA Capuchon 14 2 extra GG Clip 1x Vis ST4x12mm 6 2 extra HH II Vis ST4x15mm 10 2 extra JJ Vis ST4x20mm 2 1 extr...

Page 21: ...ous exposerez des dommages caus s par les fuites d eau ATTENTION Sortir le produit de son emballage avec soin et le conserver jusqu ce que l installation soit compl t e Inspectez toutes les pi ces S i...

Page 22: ...SIBLE INSTALLATION DE LABASE ET DES MURS D ACRYLIQUE OPTIONNEL 1 EE FF 2 3mm BB 1 Appliquez une ligne de silicone entre les 2 panneaux d acrylique E Fixer les 2 panneaux avec les boulons EE et crous F...

Page 23: ...eau 4 5 Mesurez la position d sir e de la poign e et de la t te de douche puis percez les trous ad quat avec une scie sauteuse 1 3 INSTALLATION DE LABASE ET DES MURS D ACRYLIQUE OPTIONNEL Mur d acryli...

Page 24: ...us guides aux endroits marqu s avec un foret 3mm 6 7 Replacez les rails B puis les fixer avec les vis DD les raccords GG et les capuchons HH Ne pas serrer trop fortement INSTALLATION DES RAILS MURAUX...

Page 25: ...t es D sur la barre de support F 5 6 Sans trop serrer installez la basse F sur les panneaux fixes C K en utilisant les raccords G S assurer que tout est niveau 7 8 Glissez le support du panneau fixe R...

Page 26: ...ez les panneaux fixes C K dans les 2 rails muraux B Note Les rails muraux B permettent d ajuster la position des panneaux fixes C K Ajuster la profondeur ou et donner un l ger angle au panneau permet...

Page 27: ...afin de fortement serrer les boulons 4 Percez les 2 rails muraux B en 3 positions haut milieu et bas avec un foret 3mm Mettre niveau les panneaux 5 Fixez les 2 panneaux fixes C K avec les raccords GG...

Page 28: ...auti sauts I sur la porte J Utilisez une cl rochet afin de serrer fortement 8 9 Installez les 3 joints d tanch it P 10 11 Positionnez les 2 but es D afin qu ils permettent d emp cher que la porte ne s...

Page 29: ...oitement fix s aux panneaux de verre Appliquez un scellant tanche base de silicone sur le contour ext rieur de toutes les composantes de la douche horizontalement entre la partie inf rieure des pannea...

Page 30: ...date d achat Le distributeur garantit galement la structure de la coquille d acrylique contre les fuites travers la pellicule de fibre de verre de la coquille caus es par des d fauts de mat riel et d...

Reviews: