12/2011 ovedecors.com
OWS-103
11
.
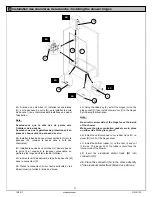
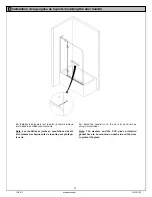
4A. À l’aide d’une clé Allen (7), Installez les charnières
(H) sur le panneau de verre (D), puis installez la porte
de douche (I) aux charnières déjà installées en suivant
l’illustration.
Note :
Assurez-vous que le côté des vis pointe vers
l’intérieur de la douche.
Assurez-vous que la garniture de protection soit en
place de chaque côté du panneau de verre.
4B. Installez la bande de caoutchouc verticale (G) sur le
panneau (D) (coupez la bande dans le coté des
charnières).
4C. Installez la bande de caoutchouc (L) dans le bas de
la porte (I) et coupez à la longueur convenable. La
partie la plus longue doit faire face à l’intérieur.
4D. Insérez le rail d’aluminium de la porte de douche (M)
dans le connecteur (K).
4E. Placez le connecteur (N) sur l’autre extrémité du rail
d’aluminium () et collez à l’aide du silicone.
4
A. Using the Allen key (9), install the hinges (H) on the
glass panel (D) then install shower door (I) to the hinges
by following the illustration.
Note :
Be sure the screw side of the hinge faces the inside
of the shower.
Make sure the glass protection gaskets are in place
on either side of the glass panel.
4B. Install the vertical shower door rubber track (G) on
panel (D) (cut it at the hinges area).
4C. Install the bottom rubber (L) on the door (I) and cut
it to size. The longer lip of the rubber should face the
interior side of the shower.
4D. Insert the a
luminum metal track (M) into
connector (K).
4E. Place the connector (N) in the other extremity
of the aluminum metal track (M) and use silicone.
4.
Installation des charnières de la douche
/ Installing the shower hinges
4A
I
H
G
4B
4C
N
M
L
4D
4E
D


