background image


12/2011 ovedecors.com 

OWS-103 

12


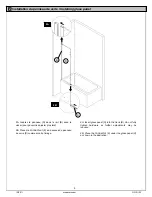
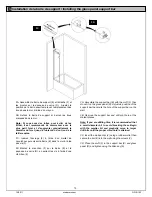
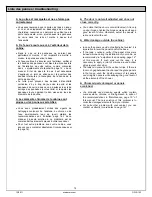
5A. Vérifiez que la porte s’ouvre et se ferme aisément.  
Faire les ajustements nécessaires du panneau (D) en 
modifiant le jeu A pour faire sortir ou entrer le panneau 
de verre dans le rail d’aluminium. 
 
5B. Assemblez le panneau (D) avec le rail (B) à l’aide 
des vis (1), en plaçant les plaques et les capuchons 
décoratifs (5) (tel qu’illustré ci-dessus).  
 
5C. Montez le couvercle décoratif (C) sur le rail (B). 


5A. Verify the level and ensure that the door opens and 
closes properly. Adjust if necessary the panel (D) by 
increasing or reducing the gap A.  
 
5B. Assemble the panel (D) with the track (B) by using 
the screws (1) and placing the fitting and the decorative 
caps (5) as shown in the illustration.  

 
5C. Assemble the decorative cap (C) on the track (B). 
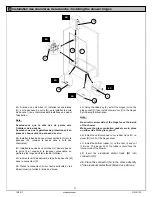


 5.

 Installation des vis du rail 

/ Installing the track screws

 B 

5C

5A 

Summary of Contents for OWS-103

Page 1: ...UIDE D INSTALLATION ET D UTILISATION INSTALLATION AND USER S GUIDE Dimensions LXH 1026 mm x 1397 mm WxH 40 in x 55 in Cet article n est plus garanti si installé avec un défaut visuel évident The warranty will be void if this item is installed with obvious visual defects ...

Page 2: ...cune pièce n est endommagée en cas de dommages avant l installation communiquez avec votre détaillant Consultez le Code du bâtiment et les normes de conformité locales concernant l installation TABLE OF CONTENTS General instructions 2 Important 2 Before you begin 2 Hardware list 3 Required tools 4 OWS 103 bath panels parts 5 Shower reversibility 7 Installation of the metal track 8 Installation of ...

Page 3: ...po 1 1 8 inch screw Philips round head 3 3 Vis Philips à tête plate de 2 po 2 inch screw Philips flat head 2 4 Cheville murale Wall plug 5 5 Bague et capuchon décoratifs en plastique Plastic decorative ring and cap 5 6 Clé Allen BTR de 2 5 mm petite 2 5 mm Allen key small 1 7 Clé Allen BTR de 4 mm grande 4 mm Allen key Big 1 4 2 3 1 5 7 6 Liste de quincaillerie Hardware list ...

Page 4: ...n caoutchouc Rubber mallet Ruban à mesurer Tape measure Niveau Level Clé ajustable Adjustable tool Crayon Pencil Couteau exacto Heavy duty cutter Plus Toile en tissu pour protéger la base de la douche durant l installation Fabric Drop Cloth to protect shower base while installing Outillage requis Required tools Lunettes de sécurité Safety glasses ...

Page 5: ...12 2011 ovedecors com OWS 103 5 Parties des panneaux OWS 103 OWS 103 panels parts ...

Page 6: ... de caoutchouc de la porte de la douche Vertical shower door rubber track 1 H Charnière de la porte de la douche Shower hinge 2 I Porte de la douche Shower door 1 J Poignée de la porte de la douche Handle for the shower door 1 K Connecteur en PVC 180 o Gauche 180o PVC Connector Left 1 L Bande de caoutchouc du bas de la porte de la douche Bottom door rubber track 1 M Rail d aluminium pour la porte ...

Page 7: ...ir This instruction is drawn up for an opening from the right to the left see illustration B For an opening from the left to the right see illustration A Use the same instructions but switch around the panels D and I and its aluminum track B mirror effect Réversibilité des panneaux de bain Panels reversibility Ouverture de gauche à droite Left to right opening Ouverture de droite à gauche Right to...

Page 8: ...ez le rail B en place et vissez le bien au mur à l aide des vis 2 1A Place the track B at approximately 1 1 4 inch 30 mm from the edge of the bath see image Reminder for an opening from to the left to the right the rail B has to be mounted on the right side 1B Once track is leveled mark the holes of the frame clearly on the wall or tiles 1C Temporary removes the frame and drill pilot holes at the ...

Page 9: ...ez le connecteur K en dessous du panneau de verre D comme montre l image 2A Insert glass panel D into the track B Do not fully tighten hardware as further adjustments may be required 2B Place the Connector K under the glass panel D as shown in the illustration 2 Installation du panneau de verre Installing glass panel B 2B D 2A K ...

Page 10: ...Montez le manchon F sur la barre E et le panneau de verre D en serrant les vis à l aide d une clé Allen 6 3A Assemble the support bar E with the muff F then mount it on the glass panel D Adjust de position of the support bar then mark the hole of the support bar on the wall 3B Remove the support bar and drill pilot hole at the market places Note If you are drilling tiles it is recommended that a s...

Page 11: ... M dans le connecteur K 4E Placez le connecteur N sur l autre extrémité du rail d aluminium et collez à l aide du silicone 4A Using the Allen key 9 install the hinges H on the glass panel D then install shower door I to the hinges by following the illustration Note Be sure the screw side of the hinge faces the inside of the shower Make sure the glass protection gaskets are in place on either side ...

Page 12: ...aques et les capuchons décoratifs 5 tel qu illustré ci dessus 5C Montez le couvercle décoratif C sur le rail B 5A Verify the level and ensure that the door opens and closes properly Adjust if necessary the panel D by increasing or reducing the gap A 5B Assemble the panel D with the track B by using the screws 1 and placing the fitting and the decorative caps 5 as shown in the illustration 5C Assem...

Page 13: ...et joints en caoutchouc doivent être montés de chaque coté de la porte pour protéger le verre 6A Install the handle J on the door I as shown by using a screwdriver Note The washers and the PVC glass protection gasket have to be mounted on each side on the door to protect the glass 6 Installation de la poignée de la porte Installing the door handle ...

Page 14: ...her le scellant pendant 24h L application inadéquate du scellant à base de silicone peut entraîner des fuites lors de l utilisation de la douche Ensure that the door closes tight and opens smoothly and there is a tight connection between the side glass panels and the frames as well as the support bars Apply a clear silicone water sealant around the inside and the outside perimeter of any fixed sho...

Page 15: ...avel malgré les recommandations en Entretien page 16 de ce manuel La seule solution à ce problème est de commander les éléments piqués à votre revendeur Pour tout autre problème avec votre cabine vous pouvez nous contacter directement coordonnées sur la page 16 The door is not well adjusted and does not close correctly You notice that the door is not well leveled if it is only on door hinges tight...

Page 16: ...e et un détersif liquide doux Ne jamais utiliser de nettoyants abrasifs contenant de l acétone du chlore ou de l eau ammoniacale eau de javel grattoirs brosses métalliques ni autres objets ou produits pouvant égratigner ou ternir les surfaces Consumer responsibilities OVE DECORS Shower Products will remain beautiful for many years if you properly care for them Some of the waterproofed plastic stri...

Page 17: ...teur ou par toute partie autre que OVE DECORS Les garanties tacites incluant la qualité marchande ou l utilisation pour un usage particulier sont expressément limitées à la durée de cette garantie OVE DECORS décline toute responsabilité pour dommage particulier accidentel ou indirect Limited 5 years warranty This warranty extends only to the original owner lend user for personal household use only...

Page 18: ...ence SIÈGE SOCIAL HEAD OFFICE 2800 Etienne Lenoir Laval Québec H7R 0A3 Canada Service à la clientèle Customer service Tel 1 866 839 2888 17 Fax 1 866 922 9990 www ovedecors com CONSERVEZ CES INFORMATIONS KEEP THIS INFORMATION Date d achat Purchase date Suivi et Référence du Produit Product Tracking Reference ...

Reviews: