Form No. OVS16M_LC-0719
8
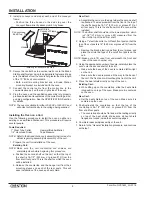
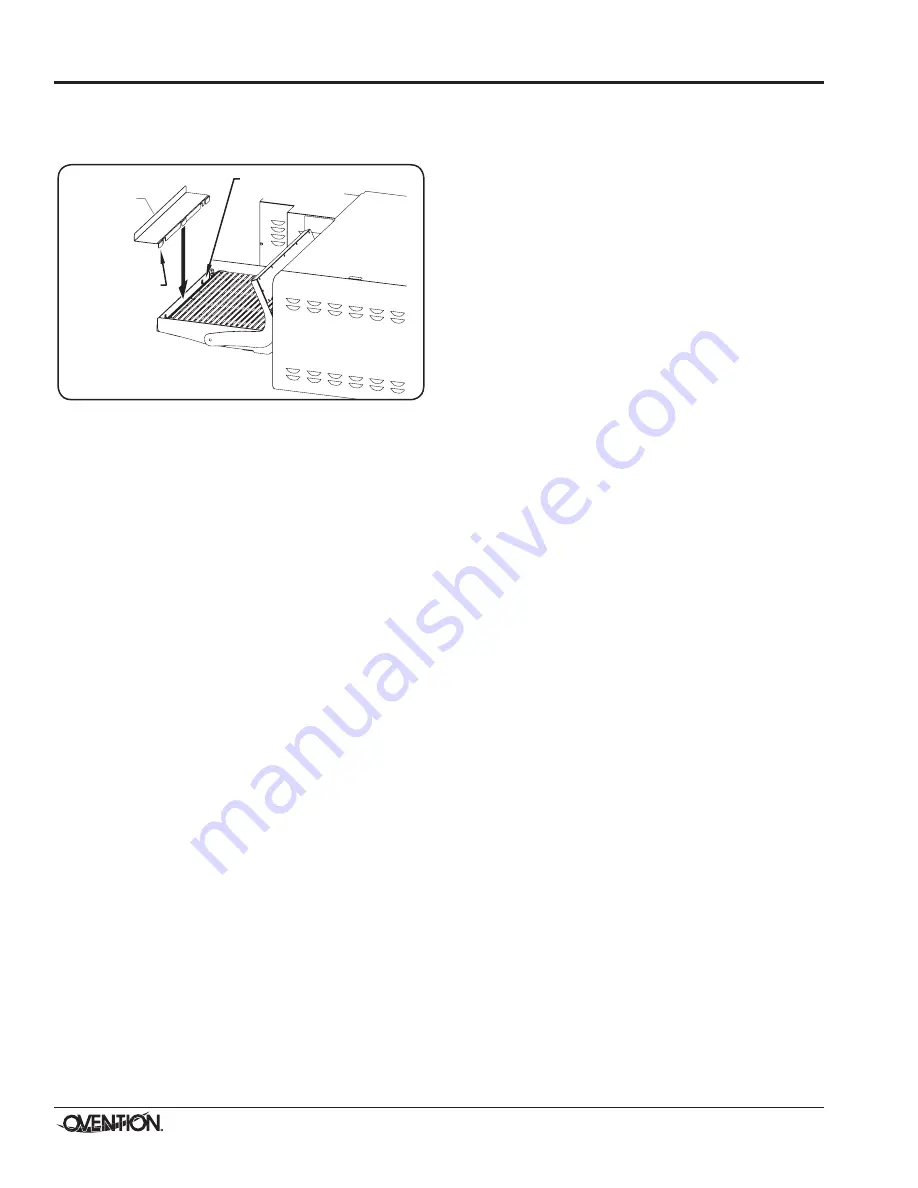
9. Install a conveyor end stop at each end of the conveyor
frame.
• Position the three hooks on the end stop over the
conveyor frame directly above crumb tray hooks.
Left-Side
Conveyor Frame
Hook
Conveyor
End Stop
Installing a Conveyor End Stop
10. Secure the control box to a vertical wall or onto the Bread
Station shelf system using the appropriate fasteners. Make
sure the distance from the oven is not greater than the length
of the 10′ (304 cm) control cable.
• Both a wall mounting bracket and a Bread Station
mounting bracket are included with the oven.
11. Connect the control cable from the control box to the
communication port on the rear, right side of the oven.
12. Plug the oven and the ventilation assembly into properly
grounded electrical receptacles of the correct voltage, size,
and plug configuration. See the SPECIFICATIONS section
for details.
NOTE: The oven is suitable for either 208 VAC or 240 VAC and
will adjust automatically to the voltage being supplied.
Installing the Oven on a Cart
Use the following procedure to install the oven on either an
existing or a new Bread Station cart. This procedure will require
several people.
Tools Required
1″ Steel Tube Cutter
Hammer/Rubber Mallet
1/4″ Hex Head Driver
Tape Measure
NOTE: Refer to the Bread Station cart assembly instructions for
details regarding assembly/disassembly of the cart.
1. Prepare the cart for installation of the oven.
Existing Cart:
NOTE: Make sure the cart countertop and shelves are
completely clear before beginning this procedure.
a. Position the second shelf on the cart so that the top of
the shelf is 16-1/2″ (503 mm, or groove #12) from the
floor at all four posts. This is the shelf on which the oven
will be installed.
b. Release the countertop and the hanger rail from their
mounting sleeves on each of the rear posts. This will
ease installation of the oven and heat shield.
INSTALLATION
New Cart:
a. Assemble the cart up to the point where the second shelf
is attached. The measurement from the floor to the top of
the shelf should be 16-1/2″ [503 mm, or groove #12) at
all four posts. This is the shelf on which the oven will be
installed.
NOTE: The bottom shelf should be in the lowest position, which
is 8-1/2″ (216 mm, or groove #4) measured from the
floor to the top of the bottom shelf .
2. Using a 1″ steel tube cutter, cut off each front post so that the
top of the cut posts is 18″ (549 mm, or groove #14) from the
floor.
• Remove the black, plastic caps from the cut pieces, and
place them into the tops of the cutoff front posts on the
cart.
NOTE: Make sure to lift oven from underneath the front and
rear of the oven chamber only.
3. Using the appropriate number of people, carefully place the
oven onto the second shelf of the cart.
• Make sure the base of the oven is centered left-to-right
on the cart.
• Make sure the oven is placed all the way to the back of
the cart. The front door will overhang the front of the cart.
4. Place the heat shield directly on top of the oven.
Existing Cart:
a. While lifting up on the countertop, slide the heat shield
into position on top of the oven. Make sure it is centered
on the oven.
New Cart:
a. Set the heat shield on top of the oven. Make sure it is
centered on the oven.
6. Position/install the countertop so that the top of the
countertop is 36-1/2″ (927 mm, or groove #31) from the
floor at all four posts.
• The countertop should be flat and will be resting directly
on top of the heat shield. Make sure all heat shield
flanges are tucked inside the countertop edges.
6. Complete reassembly/assembly of the cart.
7. Return to the “General” installation procedure, and continue
with step 7.


