About This Guide
This guide shows you how to install your Snap Server 500 series or 600 series in a rack and connect the
server to your network. The instructions consist of 5 steps:
Step 1: Verify the contents of your shipping package.
•
Step 2: Install the server in the rack.
•
Step 3: Connect power and network cables.
•
Step 4: Power on the Snap Server.
•
Step 5: Connect to the Snap Server for the first time.
•
Step 1: Verify the Contents of the Shipping Package
Before you begin installation, check to make sure you have all the hardware components required for your
system.
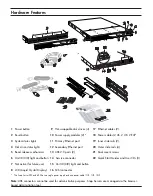
Check the contents of your Ship Kit to make sure you have all the components described in the
•
Hardware
Features section.
Gather any optional components that you need to complete your system (described below in the
•
Optional
Hardware Components table).
Optional Hardware Components
Component
Description
Tape Backup Device(s)
and Cables
To attach a tape device via a SCSI connection to the Snap Server, you need a
68-pin VHDCI cable. For a list of compatible backup solutions, see the Support
section of the Snap Server Web site. To attach a tape device via USB, you need a
USB 2.0 cable.
Power Supply Upgrade The Snap Server 520 and 620 can be upgraded to a second power supply. The
Snap Server 650 comes with dual power supplies.
APC-brand UPS devices Snap Servers are designed to work with a USB- or network-based APC-brand
UPS. Visit the APC Web site for a list of APC models to use with your Snap Server.
SAS HBA Upgrade
The Snap Server 520 and 620 can be upgraded to include a SAS HBA to attach
to an expansion array. The Snap Server 650 comes equipped with a SAS HBA.
Dual-Gigabit Ethernet
PCI Adapter
The Snap Server 520, 620, and 650 can be upgraded to 4 Ethernet Ports with
the installation of a dual-gigabit Ethernet Adapter.
Memory Upgrades
Memory upgrades are available for the Snap Server 520, 620, and 650. You
can add memory up to 4 GB. However, you cannot install DIMMs of different
capacity on the same server. When adding memory to the Snap Server 650, you
must mirror the upgrade across both DIMM banks (for example, if you add an
additional 1 GB DIMM to one DIMM bank, you must mirror that addition in the
second DIMM bank).


