
10400557-002
©2014 Overland Storage, Inc.
Page 3 of 5
Optional Sliding Rail Kit Instructions
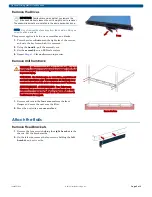
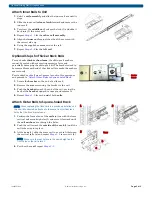
Attach Inner Rails to Unit
1.
Select a
rail assembly
and slide the inner rail out until it
stops.
2.
Slide the inner rail
release latch
forward and remove the
inner rail.
3.
To retract the
middle rail
, release the lock (1) and slide it
back into (2) the outer rail.
4.
Repeat
for the
other rail assembly
.
5.
Align the
inner rail
against the side of the server with
the correct side up.
6.
Using the supplied
screws
, secure the rail.
7.
Repeat
for the
left rail
.
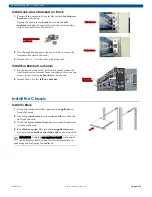
Optional Steps for Thicker Rack Rails
For rack rails
thicker than 3mm
, the sliding rail anchors
cannot be seated without exerting excessive force and
potentially damaging the sliding rail kit.The brackets need to
be removed from each end of the slide rails to make the anchors
seat securely.
For standard rack rail sizes 3mm or less, skip this procedure
and proceed to
“Attach Outer Rails to Square-holed Rack.”
1.
Locate the
bracket
on the end of a slide rail.
2.
Remove the
screw
securing the bracket to the rail.
3.
Push the
bracket
toward the end of the rail, prying the
back of the
bracket
upward to unseat and remove it.
4.
Repeat
for each
end
of both
rails
.
Attach Outer Rails to Square-holed Rack
NOTE: When replacing the fixed rails in a previously installed unit,
the new rails should be attached to the same front vertical rack
holes that the fixed bracket used.
1.
Position the front of one of the
rails
in line with the front
vertical rail mounting holes (1) and move it forward until
the
rail anchors
are through the holes.
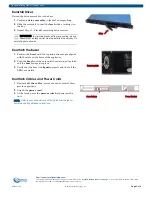
2.
Push the rail toward the
outside of the rack
(2) until the
rail locks snap into place.
3.
At the
rear
(3), slide the outer rail in or out to fit between
the vertical rails (a) and repeat
to secure it (b).
NOTE: Make sure the rear holes are the same height as the
front holes so the rail is level.
4.
For the other
rail
, repeat
.
Center
Screw
1
2
Rear
a
b
3