background image

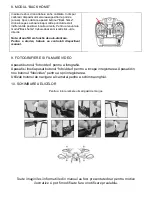
6. CONTROLUL ZBORULUI 

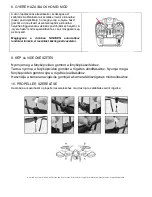
Apasati butonul de start/aterizare pentru a porni motoarele. 
Apasati acelasi buton pentru aterizare. 

Auto-aterizarea poate fi utilizata numai in cazul in care drona se 

afla la o inaltime mai mica de 20 de metri de sol. Utilizand functia la o inaltime mai mare de 20 de metri, 
drona este in pericol sa cada de la o inaltime considerabila si sa sufere daune. 

Pentru a opri motoarele, apasati si tineti apasat butonul de “start/aterizare” pentru 3-5 secunde. 
LED-ul dronei incepe sa clipeasca atunci cand energia bateriei este scazuta. La scurt timp, drona aterizeaza 
automat (asigurati-va ca duceti drona catre un loc de aterizare in conditii de siguranta in momentul in care 
primiti un semnal de baterie slaba). 

ATENTIE: Nu tineti apasat butonul de start/aterizare in timpul zborului! Nerespectarea acestei 
instructiuni poate cauza caderea dronei de la o inaltime mare, provocand daune si rezultand 
posibilitatea de a te accidenta pe tine sau pe altii.


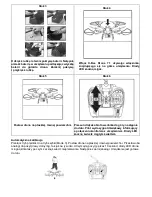
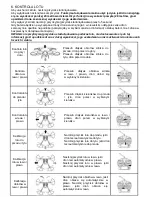
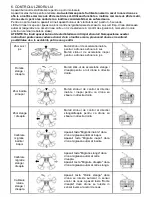
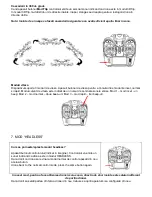
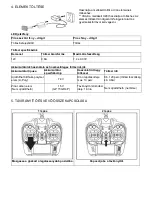
Zbor sus / 

jos


Rotatie 

stanga / 

dreapta


Zbor inainte 

si inapoi


Zbor stanga 

/ dreapta


Calibrare 

migratie 

inainte / 

inapoi


Calibrare 

migratie 
stanga / 

dreapta


Calibrare 

rotatie 

stanga / 

dreapta


Mutati stick-ul de acceleratie inainte 
pentru ca drona sa zboare in sus 
Mutati stick-ul de acceleratie inapoi 
pentru ca drona sa zboare in jos.


Mutati stick-ul de acceleratie stanga / 
dreapta pentru a roti drona in directia 
dorita.


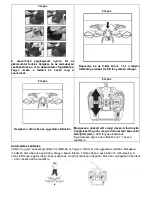
Mutati stick-ul de control al directiei 
inainte / inapoi pentru ca drona sa 
zboare in directia dorita.


Mutati  stick-ul de control al directiei 
stanga/dreapta pentru ca drona sa 
zboare in directia dorita.


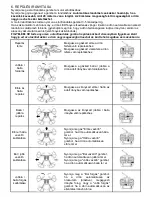
Apasati tasta "Migratie inainte" daca 
drona migreaza automat inapoi. 
Apasati tasta "Migratie inapoi" daca 
drona migreaza automat inainte.


Apasati tasta "Migratie stanga" daca 
drona migreaza automat catre 
dreapta. 
Apasati tasta "Migratie dreapta" daca 
drona migreaza automat catre stanga.


Apasati tasta "Rotire stanga" daca 
drona se roteste automat in sensul 
acelor de ceas. Apasati tasta "Rotire 
dreapta" daca drona se roteste in 
sensul invers al acelor de ceas.


Summary of Contents for X-Bee Drone 7.1

Page 1: ......

Page 2: ...amage the transmitter PLEASE DISPOSE USED BATTERIES ACCORDING TO LOCAL REGULATIONS IN SPECIAL RECYCLE SPOTS SAFETY NOTES FOR LI POLYMER BATTERIES Li Polymer batteries have higher operational risks when compared to ones of other types Therefore using them it is imperative to follow proper operational guidelines The manufacturer and dealers assume no liability for any damage caused by improper usage...

Page 3: ...nstalled according to correct polarity DO NOT MIX THE BATTERIES OF DIFFERENT TYPES Throttle stick Right left migration key Right left migration key Direction control stick Back Home button Headless mode 3D flip button Lights button Start landing button press and hold for 3 seconds to stop the engines Speed mode button Photo video button Camera navigation button Power on off key Forward backward mi...

Page 4: ...A 7 4 0 03V Battery usage and charge duration reference Battery type Battery specification Single charge working time Charging time Rechargeable lithium polymer Li Poly battery 7 4V Drone flight time up to 10 minutes About 120 minutes charging current approx 0 6A Zinc carbon battery Non rechargeable 1 5V GP 15G R4P Controller transmitter operation time 18 hours Non rechargeable do not charge 5 TRA...

Page 5: ...urface Step 6 Move the throttle stick forward and then backward The controller emits the sound indicating that the connection with the drone has been established The LEDs start to glow steadily indicating that Auto calibration Switch the speed mode to fast Mode 3 Place the drone on a flat and even surface Move both sticks to the lower left corner positions as shown in the picture Hold these positi...

Page 6: ...ry to you and others Flying up down Rotating left right Flying forward and backward Flying left right Forward backward migration calibration Left right migration calibration Left right rotate calibration Move the throttle stick forward to fly the drone up Move the throttle stick backward to fly the drone down Move the throttle stick left right to rotate the drone in a given direction Move the dire...

Page 7: ...ast mode The current speed mode is indicated by a number of the beep sounds Mode 1 slow mode one beep Mode 2 normal mode two beeps Mode 3 fast mode three beeps 7 HEADLESS MODE How to turn on off the headless mode Press the controller s button indicated in the picture The controller beeps indicating that the drone is in the HEADLESS mode If you want to switch your drone back to the normal control m...

Page 8: ...land function In order to land it you need to control the device manually 9 TAKING PICTURES AND SHOOTING VIDEOS Press the photo video button to take a photo Press and hold the photo video button to start recording Press the photo video button again to stop recording Use the camera navigation button to change the camera angle 10 PROPELLER REPLACEMENT In order to replace the propellers follow the st...

Page 9: ...Polski ...

Page 10: ...LEŻY UTYLIZOWAĆ ZGODNIE Z LOKALNYMI PRZEPISAMI W PRZEZNACZONYCH DO TEGO MIEJSCACH ZALECENIA DOTYCZĄCE BATERII LITOWO POLIMEROWYCH W porównaniu z bateriami innego typu baterie litowo polimerowe obciążone są większym ryzykiem wystąpienia zdarzeń niepożądanych Bardzo ważne jest więc w ich przypadku przestrzeganie wszystkich wytycznych operacyjnych Producent i sprzedawca nie ponoszą żadnej odpowiedzia...

Page 11: ...laryzacji NIE NALEŻY ŁĄCZYĆ ZE SOBĄ BATERII RÓŻNEGO TYPU Drążek obrotów silnika I rotacji Przycisk obrotów w lewo w prawo Przycisk lotu w lewo w prawo Drążek kierunków Przycisk Back Home Tryb Headless Przycisk akrobacji Przycisk podświetlenia Przycisk startu lądowania przytrzymaj 3 sekundy aby zatrzymać silniki Przycisk zmiany prędkości Przycisk zdjęcia wiedo Przycisk sterowania kamerą Włącznik Pr...

Page 12: ...i Wejście Prąd ładowania Maksymalne napięcie 12V 0 6A 7 4 0 03V Zależności pomiędzy typem baterii czasem pracy na jednym cyklu oraz długością ładowania Typ baterii Specyfikacja baterii Czas pracy Czas ładowania Akumulator litowo polimerowy Li Poly 7 4V Czas lotu drona do 10 minut Około 120 minut przy prądzie ładowania ok 0 6A Bateria cynkowo węglowa jednorazowa 1 5V GP 15G R4P Czas pracy kontroler...

Page 13: ...k 6 Przesuń drążek obrotów silnika do góry następnie do dołu Pilot wyda sygnał dźwiękowy informujący o połączeniu kontrolera z urządzeniem Diody LED zaczną świecić ciągłym światłem Automatyczna kalibracja Przełącz tryb prędkości na tryb szybki Mode 3 Postaw drona na płaskiej i równej powierzchni Przestaw oba analogi do pozycji lewy dolny róg tak jak na rysunku Utrzymaj tą pozycję przez 10 sekund d...

Page 14: ...ości zranienia osób trzecich i siebie Kontrola lotu do góry dołu Kontrola obrotu w lewo prawo Kontrola lotu do przodu tyłu Kontrola lotu w lewo prawo Kalibracja lotu do przodu tyłu Kalibracja lotu w lewo prawo Kalibracja obrotów w lewo prawo Przesuń drążek obrotów silnika do przodu dron poleci do góry Przesuń drążek obrotów silnika do tyłu dron poleci do dołu Przesuń drążek obrotów silnika w lewo ...

Page 15: ...ości lotu aby przełączać pomiędzy trybem wolnym zwykłym i szybkim O tym który tryb jest aktywowany informuje nas ilość sygnałów dźwiękowych Mode 1 tryb wolny jeden sygnał dźwiękowy Mode 2 tryb zwykły dwa sygnały dźwiękowe Mode 3 tryb szybki trzy sygnały dźwiękowe 7 TRYB HEADLESS Jak włączyć wyłączyć funkcję HEADLESS Naciśnij przycisk na kontrolerze jak na zdjęciu Kontroler będzie wydawał dźwięk oz...

Page 16: ...rządzenie nie ląduje automatycznie i podczas wykonywania tego polecenia należy kontrolować lot 9 NAGRYWANIE I ROBIENIE ZDJĘĆ Naciśnij przycisk zdjęcia wideo aby wykonać zdjęcie Naciśnij i przytrzymaj przycisk zdjęcia wideo aby nagrać film Aby zakończyć nagrywanie naciśnij przycisk zdjęcia wideo ponownie Aby zmienić kąt pochylenia kamery należy użyć przycisku sterowania kamerą 10 WYMIANA ŚMIGIEŁ Ab...

Page 17: ...Romana ...

Page 18: ...teti bateriile pentru a evita scurgerea care poate afecta transmitatorul VA RUGAM SA ELIMINATI BATERIILE EPUIZATE IN CONFORMITATE CU LEGILE SI ORDONANTELE LOCALE NOTA DE SIGURANTA PENTRU BATERIILE LI POLYMER Bateriile Li Polymer au risc operational ridicat in comparatie cu alte baterii astfel este imperativ sa urmati corect ghidul operational Producatorii si dealerii nu isi asuma nicio responsabil...

Page 19: ... corect in conformitate cu polaritatea corecta NU AMESTECATI BATERII DE DIFERITE TIPURI Stick de acceleratie Tasta migratie dreapta stanga Tasta migratie dreapta stanga Stick de control al directiei Buton revenire acasa Mod Headless Buton 3D flip Buton lumini Start buton de aterizare apasati si tineti apasat 3 secunde pentru a opri motoarele Buton mod viteza Buton foto video Buton camera Tasta por...

Page 20: ...12V 0 6A 7 4 0 03V Utilizarea si durata de incarcare a bateriei Tip baterie Specificatii baterie Timp de lucru la o singura incarcare Timpul de incarcare Baterie reincarcabila lithium polymer Li Poly 7 4V Timpul de zbor al dronei pana la 10 minute Aproximativ 120 de minute curent de incarcare aprox 0 6A Baterie Zinc carbon Non reincarcabila 1 5V GP 15G R4P Controlor transmitator timpul de operare ...

Page 21: ... o suprafata plana Pasul 6 Duceti stick ul de acceleratie inainte si apoi inapoi Controlorul emite un semnal sonor indicand ca conexiunea cu drona a fost stabilita LED urile incep sa straluceasca in mod constant Auto calibrare Comutati modul de viteza la rapid Modul 3 Plasati drona pe o suprafata plana Mutati ambele stick uri la pozitia din coltul stanga jos precum in imagine Mentineti aceste pozi...

Page 22: ...osibilitatea de a te accidenta pe tine sau pe altii Zbor sus jos Rotatie stanga dreapta Zbor inainte si inapoi Zbor stanga dreapta Calibrare migratie inainte inapoi Calibrare migratie stanga dreapta Calibrare rotatie stanga dreapta Mutati stick ul de acceleratie inainte pentru ca drona sa zboare in sus Mutati stick ul de acceleratie inapoi pentru ca drona sa zboare in jos Mutati stick ul de accele...

Page 23: ...de viteza este indicat de un numar de semnale sonore emise Mod 1 mod incet un beep Mod 2 mod normal doua beep uri Mod 3 mod rapid trei beep uri 7 MOD HEADLESS Cum se porneste opreste modul headless Apasati butonul controlorului indicat in imagine Controlorul va emite un sunet indicand ca drona este in modul HEADLESS Daca doriti ca drona sa revina la modul normal de control apasati din nou acelasi ...

Page 24: ...e de auto aterizare Pentru a ateriza trebuie sa controlati dispozitivul manual 9 FOTOGRAFIERE SI FILMARE VIDEO Apasati butonul foto video pentru a fotografia Apasati si tineti apasat butonul foto video pentru a incepe inregistrarea Apasati din nou butonul foto video pentru a opri inregistrarea Utilizati butonul de navigare al camerei pentru a schimba unghiul 10 SCHIMBAREA ELICELOR Pentru a inlocui...

Page 25: ...Magyar ...

Page 26: ... a készüléket vegye ki az elemeket a távirányítóból annak érdekében hogy kerülje a vevőegység sérülését KÉRJÜK HOGY A LEMERÜLT ELEMEK A TÖRVÉNYI ELŐÍRÁSOKNAK MEGFELELŐEN HELYEZZE EL BIZTONSÁGI FIGYELMEZTETÉSEK LI POLYMER AKKUMULÁTOR ESETÉN A Li Polymer elemeknek magasabb a működési kockázatuk mint más elemeknek ezért kérjük hogy fokozottan ügyeljen annak használatakor Gyártó és forgalmazó nem váll...

Page 27: ...tartóba Ügyeljen a megfelelő polaritásra NE KEVERJEN KÜLÖNBÖZŐ TÍPUSÚ ELEMEKET Gázkar Bal jobb vezérlő gomb Bal jobb vezérlő gomb Iránykar Gyere haza gomb Headless mód 3D flip gomb Fény gomb Start landoló gomb tartsa nyomva 3 másodpercig a motor leállításához Sebseség mód gomb Kép video gomb Kamera navigációs gomb Be ki kapcsoló gomb Előre hátra vezérlő gomb ...

Page 28: ... Maximális feszültség 12V 0 6A 7 4 0 03V Akkumulátorok használata és hozzávetőleges töltési idejük Akkumulátor típusa Akkumulátor specifikációja Használati idő egy töltéssel Töltési idő Újratölthető lithium polymer elem Li Poly 7 4V Drón repülési ideje max 10 perc Kb 120 perc töltési feszültség kb 0 6A Zinc carbon elem Nem újratölthető 1 5V GP 15G R4P Távirányító működési ideje 18 óra Nem újratölt...

Page 29: ...assa a gázkart előre majd vissza A távirányító hangjelzést fog adni majd a drónnal való kapcsolat létrejöttét jelzi A LED fények elkezdenek folyamatosan égni és az X Bee Drone 7 1 kész a repülésre Automatikus kalibrálás Váltson a gyors sebességmódba 3 mód Mode 3 Tegye a drónt sima és egyenletes felületre Mozgassa mindkettő kart a bal alsó pozícióba ahogy a képen látható Tartsa ebben a pozícióban 1...

Page 30: ... leeshet és kárt tehet magában és másokban is Repülés fel le Jobbra balra fordulás Előre és hátra repülés Balra jobbra repülés Előre hátra vezérlő kalibrálása Bal jobb vezérlő kalibrálása Jobbra balra forgás kalibrálása Mozgassa a gázkart előre a drón felfelé való reptetéséhez Mozgassa a gázkart visszafelé a drón lefelé való reptetéséhez Mozgassa a gázkart balra jobbra a drón adott irányba való fo...

Page 31: ...ódot a beep hangok száma jelzi 1 mód lassú egy beep hang 2 mód gyors mód kettő beep hang 3 mód 3D flip mód három beep hang 7 HEADLESS MÓD Hogyan kell be ki kapcsolni a headless módot Nyomja meg a képen látható gombot a távirányítón és tartsa nyomva 3 másodpercig míg egy beep hangot nem hall A távirányító hangot ad ki minden 3 másodpercben majd jelzi hogy a drón HEADLESS módban van Ha vissza szeret...

Page 32: ...automatikus landolási funkció A leszállást kézileg kell vezérelni 9 KÉP és VIDEÓKÉSZÍTÉS Nyomja meg a fénykép videó gombot a fényképkészítéshez Tartsa nyomva a fénykép videó gombot a rögzítés elindításához Nyomja meg a fénykép videó gombot újra a rögzítés leállításához Használja a kamera navigációs gombját a kamera látószögének módosításához 10 PROPELLER SZERELÉSE Használja a csavarhúzót a propell...

Page 33: ...ollowing directives R TTE Directive 1999 5 EC EMC Directive 2004 108 EC Low Voltage Directive 2006 95 EC RoHS Directive 2011 65 EU The following harmonized standards have been applied Safety and Health EN 62479 2010 EN 60950 1 2006 A11 2009 A1 2010 A12 2011 A2 2013 EMC EN 301 489 1 V 1 9 2 2011 09 EN 301 489 17 V 2 2 1 2012 09 RF Spectrum Efficiency EN 300 328 V1 8 1 2012 06 Representative BrandLi...

Page 34: ......

Reviews: