background image

EN

1. 

Use a screwdriver to open the battery compartment cover.

2. 

Remove the battery compartment cover. Place four AA batteries in the 

compartment (not included). 

3. 

Close the battery cover and tighten it with a screw.

Note:
a) 

 When installing the batteries, make sure that they are correctly aligned 

with the polarity marks (+ -) on the bottom of the battery compartment. Do 
NOT put the batteries in a reverse way.

b) 

Do NOT mix different kinds of batteries or old ones with the new ones.

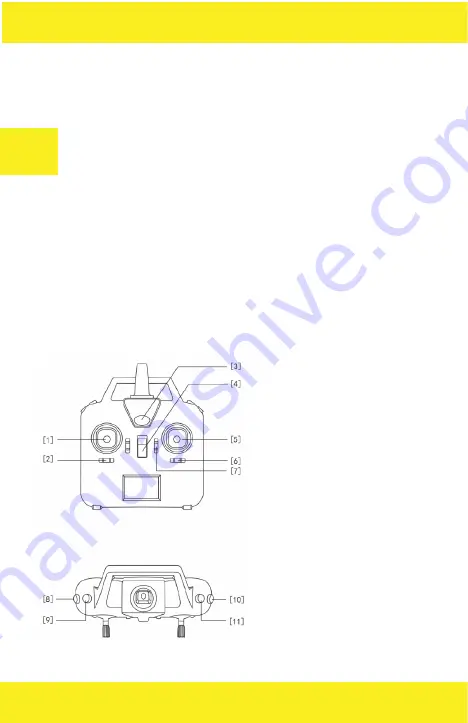
Remote control functions

[1] left stick
[2] direction trimmer
[3] Power LED
[4] Power button
[5] Right stick
[6] Flying left / right trimmer
[7] Flying forward / backward trimmer 
(remote control calibration button)

[8] Speed levels
[9] Unlocking / locking the engine
[10] Unassigned button
[11] 360 flips

Summary of Contents for X-bee drone 8.0

Page 1: ...User Manual Instrukcja obsługi RO PL EN HU ...

Page 2: ...www overmax pl ...

Page 3: ...re w przypadku połknięcia mogą doprowadzić do zadławienia lub innych poważnych obrażeń Po rozpakowaniu produktu wszelkie elementy opakowania należy trzymać poza zasięgiem dzieci Należy regularnie sprawdzać ładowarkę przewody wtyczki obudowy oraz inne elementy urządzenia W przypadku wykrycia jakichkolwiek uszkodzeń należy natychmiast zaprzestać jego użytkowania dopóki nie zostanie ono naprawione Uż...

Page 4: ...uchomych części urządzenia Nie należy dopuszczać do wstrząsów ani upuszczenia drona oraz pilota Produkt należy czyścić za pomocą miękkiej i suchej szmatki Obowiązkiem użytkowników jest zadbanie o to by produkt był bezpieczny zarówno dla nich jak i dla otoczenia Zarówno producent importer jak i dystrybutor nie ponoszą żadnej odpowiedzialności za korzystanie z niniejszego produktu ani ewentualne szk...

Page 5: ...oraz odpowiednią stroną dokładnie tak jak pokazano na powyższym rysunku Niewłaściwy montaż może spowodować uszkodzenie urządzenia lub jego nieprawidłową pracę Do odkręcenia śmigieł użyj załączonego do zestawu klucza Nałóż osłonki w odpowiadające im otwory i dokręć śrubki Nałóż płozy podwozia w odpowiadające im otwory i dokręć śrubki ...

Page 6: ...A Ładowanie powinno odbywać się zawsze pod nadzorem osoby dorosłej W przypadku wystąpienia jakichkolwiek niepokojących objawów należy przerwać ładowanie tak by nie dopuścić do uszkodzenia baterii oraz jej zapalenia B Nie należy umieszczać baterii w pobliżu źródeł ognia substancji wybu chowych łatwopalnych itp Jeśli w dowolnym momencie ładowania lub używania bateria zacznie nadmiernie się nagrzewać...

Page 7: ...wego ani innych substancji łatwopalnych G Komponenty zestawu wykonane są z tworzyw sztucznych oraz elementów elektronicznych Ponadto korzystają również z baterii dlatego też nie należy wyrzucać ich do zwykłego pojemnika na śmieci Każdy z elementów zestawu należy utylizować zgodnie z lokalnymi przepisami w przeznaczonych do tego celu miejscach Przygotowanie do użycia drona Instalacja baterii Wsuń b...

Page 8: ... prawidłowe usta wienie zgodne z oznaczeniami polaryzacji na dnie komory NIE należy wkładać ich odwrotnie b Nie należy mieszać ze sobą baterii różnych rodzajów marek ani baterii starych zużytych z nowymi Schemat funkcji pilota 1 lewy analog 2 trymer kierunkowy 3 dioda zasilania 4 włącznik 5 prawy analog 6 trymer lotu lewo prawo 7 trymer lotu przód tył przycisk kalibracji pilota 8 zmiana prędkości ...

Page 9: ... UWAGA Wszystkie piloty zostały skalibrowane podczas produkcji Kalibracje należy przeprowadzić tylko wtedy kiedy dron nie reaguje na ko mendy analogów Kalibracja pilota Włącz pilot Przesuń przycisk kalibracji pilota w dół i przytrzymaj go przez 3 sekundy pilot wyda trzy sygnały dźwiękowe Zatocz lewym oraz prawym analogiem minimum dwa pełne koła Przesuń przycisk kalibracji pilota po nownie w dół i ...

Page 10: ...silania drona Dron wyda sygnał dźwiękowy a diody zaczną świecić światłem stałym co będzie świad czyło o zakończeniu procesu synchronizacji UWAGA Podczas procesu synchronizacji nie należy zmieniać pozycji ani po łożenia drona Kalibracja silników drona Po prawidłowej synchronizacji nadajnika z odbiornikiem należy skalibrować silniki drona UWAGA czynność tę należy wykonać po każdym włączeniu drona Ni...

Page 11: ...ążek obrotów silnika aby dron wzbił się w powietrze 2 Po wylądowaniu ustaw lewy analog obrotów do najniższej pozycji na stępnie naciśnij i przytrzymaj przycisk odblokowanie blokowanie silników do momentu wyłączenia się silników Kontrola lotu drona Przesuń drążek obrotów silnika w górę aby dron wzbił się w górę Przesuń drążek obrotów silnika w dół aby dron zaczął opadać ...

Page 12: ...aby dron leciał do przodu Przesuń drążek kierunków w dół aby dron leciał do tyłu Przesuń drążek kierunków w lewo aby dron leciał w wybranym kierunku Przesuń drążek kierunków w prawo aby dron leciał w wybranym kierunku Wciśnij i przytrzymaj przycisk akrobacji następnie przesuń drążek kierun ków w górę dół lewo lub prawo aby wykonać w wybranym kierunku akro bację ...

Page 13: ...wysokości 30cm nad ziemią dron może wpaść w turbulencje wywoływane przez własne śmigła Zjawisko to związane jest z działającą na niego siłą grawitacji oraz siłą wiatru wytworzoną przez śmi gła drona Im lżejszy jest dron tym bardziej podatny jest na wspomniane wyżej zjawisko Jeśli dron niepożądanie obraca się w lewo użyj trymera kierunków w prawo aby skorygować lot Jeśli dron niepożądanie obraca si...

Page 14: ...ować lot Jeśli dron zbacza w prawo użyj trymera lotu w lewo aby skorygować lot Uchwyt na smartfon Zamocuj uchwyt na antenie pilota tak ja na poniższym zdjęciu Kamera Instrukcja obsługi dołączonej do zestawu kamery Activecam 4 1 znajduje się na stronie www overmax pl ...

Page 15: ... w uchwycie odblokuj zapięcie uchwytu Następnie wyciągnij element zamykający z zaczepu Rozłóż uchwyt i umieść w nim kamerę Po zainstalowaniu kamery uchwyt należy zablokować aby to zrobić wyko naj powyższe czynności w odwrotnej kolejności ...

Page 16: ...hwyt posiada znacznik informujący o kierunku montażu Dron wyposażony jest w prowadnice i zabezpieczenie do montażu uchwy tu kamery Umieść uchwyt w prowadnicach drona zgodnie z ze znacznikiem kierun kowym umieszczonym na uchwycie ...

Page 17: ...li dojdzie do uszkodzenia jakiegokolwiek elementu drona należy za przestać jego używania aż do momentu naprawy Obsługa niesprawnego drona może skutkować obrażeniami operatora oraz innych osób 4 Jeśli dron nie będzie używany przez dłuższy okres należy wyjąć baterie z pilota tak aby uniknąć wycieku elektrolitu 5 Należy dbać o to aby dron nie uderzył w żadną przeszkodę ani nie spadł na ziemię z dużej...

Page 18: ...www overmax pl ...

Page 19: ...s injuries After unpacking the product keep all the packing materials out of reach of children Check the charger wires plugs housings and other parts regularly In the event of any damage stop using the product immediately The product must not be used until it is repaired The chargers and batteries used with the device must be of power specification compatible with the instructions specified on the...

Page 20: ...e remote control to be dropped or exposed to shock Clean the product with a soft dry cloth It is users responsibility to ensure the product is safe both for them and for the environment The manufacturer importer and distributor shall assume no liability for the use of this product in any way or for any damage or injury caused by improper operation Both the packaging and the operation manual contai...

Page 21: ...n the correct position and side as shown in the picture above Improper assembly may cause malfunction or damage to the device Use the included key to unscrew the propellers Put the covers into the corresponding holes and tighten the screws Put the landing skids into the corresponding holes and tighten the screws ...

Page 22: ...lways be done under adult supervision In case of any disturbing symptoms the charging must be stopped so that the battery is not damaged or inflamed B Do not place the battery near open flame explosives flammables etc If the battery starts to overheat change color swell or other abnormal phenomena occurs at any time during charging or use stop using it im mediately C In case of leakage do not let ...

Page 23: ... G Kit components are made of plastic and electronic parts In addition they also contain batteries so do not dispose of them in an ordinary waste bin Dispose of the components in accordance with local regulations in the desi gnated areas Before use Battery installation Slide the battery into the compartment as shown in the picture Then plug the battery cable into the drone s port Controller batter...

Page 24: ... correctly aligned with the polarity marks on the bottom of the battery compartment Do NOT put the batteries in a reverse way b Do NOT mix different kinds of batteries or old ones with the new ones Remote control functions 1 left stick 2 direction trimmer 3 Power LED 4 Power button 5 Right stick 6 Flying left right trimmer 7 Flying forward backward trimmer remote control calibration button 8 Speed...

Page 25: ...een calibrated in the factory The process of calibration should only be performed when the drone does not respond to remote commands Remote control calibration Turn the remote control on Slide the calibration button down again and hold it for 3 seconds The remote control emits 3 beep sounds Move around the left and right stick minimum two full circles Move the remote control cali bration button do...

Page 26: ... The drone emits a beep sound and its LEDs start to glow steadily indicating correct synchronization UWAGA Do not move the drone during the synchronization process Calibration of the engines After correct synchronization of the transmitter and the receiver it is neces sary to calibrate the drone s engine NOTE this operation must be perfor med each time you turn on the drone Failure to comply with ...

Page 27: ...slow speed Move the throttle stick up to take off the drone 2 After landing move the left throt tle stick to the lowest position then press and hold the unlocking loc king button until the engines turn off Flying control Move the throttle stick up to take off the drone Move the throttle stick down so that the drone flies down ...

Page 28: ... drone forward Move the direction control stick down to fly the drone backward Move the direction control stick left to fly the drone in a given direction Move the direction control stick right to fly the drone in a given direction Press and hold the 360 flips button then move the direction control stick up down left or right to perform the stunt in a given direction ...

Page 29: ...come instable due to the turbulence caused by its own propellers This phenomenon is related to the gravitation and the force of the wind produced by the drone s propellers The lighter the drone is the more susceptible it is to the afore mentioned phenomenon When the drone rotates to the left use the directional trimmer right to correct the flight When the drone rotates to the right use the directi...

Page 30: ...right to correct the flight When the drone deviates right use the flying trimmer left to correct the flight FPV holder Attach the handle on the pilot s antenna as shown in the picture below Camera User manual for Activecam 4 1 can be found at www overmax pl ...

Page 31: ...er To place the camera in the grip unlock the grip buckle first Then pull out the closing element from the hitch Fold out the handle and place the camera in it Once the camera is installed the handle should be locked ...

Page 32: ...he camera grip The handle has a direction indicator Dron is equipped with guides and security for mounting the camera handle Place the handle in the guide rails in accordance with the directional mark on the handle ...

Page 33: ...s 3 If any part of the drone is damaged please stop using it immediately until the device is repaired Operating a faulty drone can result in injury to the operator and other people 4 If you plan not to use the drone for extended period of time remove the batteries from the controller to avoid their leakage 5 Ensure the drone does not hit any obstacle or fall to the ground from high altitude Otherw...

Page 34: ...RO www overmax pl ...

Page 35: ...re toate elementele ambalajului produsului trebuie să fie păstrate nu la îndemâna copiilor Verificați periodic încărcătorul cablurile prizele carcasa și alte părți ale dispozitivului Dacă detectați orice deteriorare întrerupeți imediat utilizarea acestuia până când este reparat Utilizarea încărcătorului dispozitivului și a bateriilor trebuie să aibă specificațiile de alimentare respectă orientăril...

Page 36: ...stuia Produsul trebuie curățat cu o cârpă moale uscată Responsabilitatea utilizatorului este de a se asigura că produsul a fost în condiții de siguranță atât pentru ei cât și pentru mediul încon jurător Atât producătorul importatorul și distribuitorul nu își asumă responsabilitatea pentru utilizarea acestui produs sau orice daune sau prejudicii cauzate de manipularea necorespunzătoare Atât instruc...

Page 37: ... partea corectă exact așa cum se arată mai sus Instalarea necorespunzatoare poate duce la deteriorarea dispozitivului sau defecțiunea acestuia Pentru a elimi na elicei utilizați cheia furnizată Se aplică carcasele în orificiile corespunzătoare și strângeți șuruburile Se aplică șasiu derapare în orificiile corespunzătoare și strângeți șuruburile ...

Page 38: ... oricăror simptome alarmante a opri încărcarea astfel încât să se prevină deteriorarea bateriei și a inflamației B Nu amplasați bateria în apropierea surselor de foc substanțe explo zive inflamabile etc Dacă în orice moment de încărcare sau utilizare a bateriei începe să se încălzească excesiv schimba culoarea sau apar alte anomalii întrerupeți imediat utilizarea acesteia C În caz de scurgeri nu a...

Page 39: ...e electroni ce În plus utilizarea bateriei astfel încât să nu le a pus în gunoiul menajer Fiecare dintre elementele trebuie să fie eliminate în conformitate cu regle mentările locale în desemnate în acest scop Pregătirea pentru utilizare drona Instalarea bateriei Glisați compartimentul pentru baterii așa cum se arată în figură Apoi conectați cablul bateriei la portul dronei Instalarea bateriilor î...

Page 40: ...or corectă în conformitate cu polaritățile de pe partea inferioară a camerei NU le amplasati invers b Nu amestecați diferite tipuri de baterii mărci sau baterii vechi uzate cu noi Schemat funkcji pilota 1 analog din stânga 2 cod de tuns 3 LED uri de putere 4 Comutator 5 analog dreapta 6 trimmer de zbor stânga dreapta 7 trimer de zbor direcție spate regulatorul de calibrare 8 schimbare de viteză 9 ...

Page 41: ...elecomanda au fost calibrate în timpul fabricației Calibrarea trebuie sa fie efectuată numai atunci când o drona nu răspunde la comenzile analogice Calibrarea telecomenzii Porniți telecomanda Mutați butonul de calibrare de la distanță în jos și mențineți apăsat l timp de 3 secunde telecomanda va emite trei semnale Din încercuire analogului stânga și la dreapta de minimum două cercuri pli ne Mutați...

Page 42: ...re Dron emite un semnal sonor iar LED urile vor lumina la o lumină constantă va însemna finalizarea procesului de sincronizare ATENȚIE În timpul procesului de sincronizare nu se schimba poziția sau po ziția dronă Calibrarea motoarelor dronei După sincronizarea corecta a emițătorului și receptorului trebuie să fie efec tuata calibrarea motoarelor dronei ATENȚIE această operație trebuie efec tuată d...

Page 43: ...torului la drona a zburat în aer 2 După aterizare setați analog stânga de rotație la poziția cea mai joasă apoi apăsați și mențineți apăsat blocul motor deblocare până când deco nectări motorului Control de zbor dronă Deplasați turația motorului până la butonul de navigare dronă a zburat în sus Deplasați turația motorului butonul de navigare în jos pentru a drona sa re duca inaltimea ...

Page 44: ...până la o dronă a zburat înainte Mutați direcțiile butonul de navigare în jos pentru un avion a zburat înapoi Mutațitijapedirecțiastângapentrucadronasazboareîntr odirecțieselectată Mutați butonul de navigare la direcțiile potrivite pentru ca drona sa zboare în direcția dorită Apăsați și mențineți apăsat acrobațiile apoi mutați butonul de navigare în direcția în sus în jos la stânga sau la dreapta ...

Page 45: ...lice Acest fenomen este legat de forța gravitațională care acționează asupra dispozitivului și forța generată de drona elice eoliene Drona este sensibila la fenomenul de mai sus menționat În cazul în care drona se rotește în sens antiorar indezirabil folosind direcțiile tunderea în dreapta pentru a ajusta zbor În cazul în care drona se rotește în sensul acelor de ceasornic folosind in dezirabil di...

Page 46: ...rona se abate de la dreapta utilizați zborul de tuns spre stânga pentru a corecta zborul Mâner pentru Smartphone Atașați mânerul pe antena telecomenzii a vedea imaginea de mai jos Cameră Manualul de utilizare livrat împreună cu camera Activecam 4 1 pot fi găsite la accesarea site ului www overmax pl ...

Page 47: ...în mâner trebuie sa deblocati clema mânerului Apoi trageți elementul de blocare cu autostopul Depliați mânerul și introduceți camera După ce instalați camera trebuie să blocați mânerul pentru a face acest lu cru urmați pașii în ordine inversă ...

Page 48: ...lui camerei Mânerul are un marcaj care indică direcția de montare Drona este echipata cu ghidaje și asigurarea camera suport de montare Amplasați ghidajele suport drona în conformitate cu codul etichetei plasat pe mâner ...

Page 49: ... componente ale dispozitivului se recomanda întrerupea utilizarii până la repararea dispozitivului Funcționare defectuoasă a dronei poate duce la rănirea utilizatorului și altor persoane 4 În cazul în care dispozitivul nu se va utiliza pentru o perioadă îndelun gată scoateți bateriile din telecomandă pentru a evita scurgerile 5 Trebuie sa fiti precauti ca in timpil utilizarii dispozitivului nu ar ...

Page 50: ...HU www overmax pl ...

Page 51: ...ó alkatrészeket melyek lenyelése esetén fulladást vagy más súlyos sérüléshez vezethet A termék kicsomagolása után a csomagolás összes elemét tartsa távol a gyermekektől Rendszeresen ellenőrizze a töltőt a vezetékeket a csatlakozókat valamint a berendezés más alkatrészeit Bármilyen meghibásodás feltárása esetén azonnal hagyja abba annak használatát egészen a hiba kijavításáig A berendezéssel haszná...

Page 52: ...ndezés mozgó alkatrészeit Ne tegye ki rázkódásnak sem leejtésnek a drónt valamint a távirá nyítót A terméket puha és száraz rongy segítségével tisztítsa A használók kötelessége gondoskodni arról hogy a termék legyen biztonságos számukra és a környezet számára is Mind a gyártó az importőr és a disztribútor nem vállal felelősséget az alábbi termék nem megfelelő használatából vagy kezeléséből fakadó ...

Page 53: ...a megfelelő oldalon pontosan úgy ahogy a fenti rajz mutatja A hely telen összeszerelés a készülék sérülését vagy nem megfelelő működését okozhatja A propellerek eltávolításához használja a készlethez mellékelt kulcsot Helyezze a burkolatokat a megfelelő nyílásokba és csavarozza fel Helyezze az alváz csúszótalpait a megfelelő nyílásokba és csavarozza fel ...

Page 54: ...solatos megjegyzések A A töltés mindig felnőtt személy felügyelete alatt történjen Bármily en nyugtalanító jelenség fellépése estén szüntesse meg a töltést hogy megakadályozza az elemek károsodását vagy annak kigyulladását B Ne tegye az elemet tűz forrása robbanóanyagok tűzveszélyes anyagok közelébe Ha bármikor az elem töltése vagy használata közben kezd az túlságosan felmelegedni színét változtat...

Page 55: ...yagokat G A készlet komponensei műanyagból valamint elektronikus alkatrészekből készülnek Ezen felül felhasználásra kerülnek elemek ezért ne dobja ki őket a háztartási hulladékok közé Az alkatrészek mindegyikét ártalmatlanítani kell a helyi előírásoknak megfelelően az erre kijelölt helyeken A drón előkészítése használathoz Az elemek installálása Tegye az elemet a kamrába úgy ahogy az ábra mu tatja...

Page 56: ...lhelyezésre a kamra alján jelölt polarizációnak megfelelően NE tegye be azokat fordítva b Ne keverje egymással a különböző típusú elemeket sem márkákat sem a régi használt elemeket A távirányító funkcióinak sémája 1 bal analóg 2 irány trymer 3 bekapcsolást jelző LED 4 kapcsoló 5 jobb analóg 6 repülési trymer bal jobb 7 repülési trymer előre hátra a távirányító kalibrálás nyomógombja 8 sebesség vál...

Page 57: ... távirányító kalibrálva lett a gyártás során A kalibrálást csak akkor kell végrehajtani ha a drón nem reagál az analógok parancsaira A távirányító kalibrálása Kapcsolja be a távirányítót Nyomja le a távirányító kalibrációjának gombját és tartsa 3 másodpercig a távirányító három hangjelzést ad ki Körözzön a bal valamint a jobb analóggal legalább két teljes kört Nyomja le a távirá nyító kalibrációjá...

Page 58: ...gjelzést ad ki és a LED ek folyamatos fénnyel kezdenek világítani ami jelzi a szinkro nizálás folyamatának befejezését FIGYELEM A szinkronizálás folyamata közben ne változtassa a drón po zícióját sem helyzetét A drón motorjainak kalibrációja Az adó a vevővel történt megfelelő szinkronizálása után be kell kalibrálni a drón motorjait FIGYELEM ezt a tevékenységet a drón minden bekapc solása után el k...

Page 59: ...át hogy a drón fele melkedjen a levegőbe 2 A leszállás után állítsa a bal fordu latszám analógot a legalacsonyabb pozícióba majd nyomja meg és tartsa nyomva motorok engedélyezése tiltása gombot a motorok kikapc solásának pillanatáig A drón repülésének irányítása Tolja a motor fordulatának rúdját fel hogy a drón a levegőbe emelkedjen Tolja a motor fordulatának rúdját le hogy a drón elkezdjen ereszk...

Page 60: ...a drón előre repüljön Tolja az irányok rúdját le hogy a drón hátrafelé repüljön Nyomja az irányok rúdját balra a drón a kiválasztott irányba repüljön Nyomja az irányok rúdját jobbra hogy a drón a kiválasztott irányba repüljön Nyomja meg és tartsa nyomva a mutatvány gombot majd tolja az irányok rúdját fel le balra vagy jobbra hogy a kiválasztott irányban mutatványt vé gezzen ...

Page 61: ...se után a drón beleeshet a saját propellerei okozta turbulenciába Ez a jelenség kapcsolatos a ráható gra vitációs erővel valamint a drón propellerei által létrehozott szél erejével Minél könnyebb a drón annál fogékonyabb a fenti jelenségre Ha a drón nem kívántan balra használja az irányok trymerét balra hogy korrigálja a repülést Ha a drón nem kívántan jobbra forog használja az irányok trymerét jo...

Page 62: ...ést Ha a drón eltér jobbra használja a repülés trymerét balra hogy korrigálja a repülést Okostelefon tartó Rögzítse a tartót az távirányító antennájára úgy ahogy lenti képen Kamera A készlethez csatolt Activecam4 1 kamera használati utasítása az alábbi ol dalon található www overmax pl ...

Page 63: ...ez oldja ki a tartó csattját Majd húzza ki a záróelemet az akasztóból Nyissa szét a tartót és helyezze el benne a kamerát A kamera beszerelése után a tartót biztosítani kell úgy hogy csinálja végig a fenti műveleteket fordított sorrendben ...

Page 64: ...se A tartón van egy tájékoztató jelzés a felszerelés irányáról A drón el van látva vezetősínekkel és biztosítással a kameratartó felsze reléséhez Helyezze a tartót a drón vezetősínjeibe egyezően a tartón található irányjelzéssel ...

Page 65: ...magasságokba való felszállást 3 Ha a drón bármelyik alkatrésze károsodást szenved abba kell hagyni annak használatát egészen a megjavításáig A meghibásodott drón kezelése az operátor vagy más személyek sérülését eredményezheti 4 Ha a drón hosszabb időn át nem lesz használva vegye ki az elemeket a távirányítóból hogy elkerülje az elektrolit kifolyását 5 Gondoskodjon arról hogy a drón ne ütközzön se...

Page 66: ... the following directives R TTE Directive 1999 5 EC EMC Directive 2004 108 EC Low Voltage Directive 2006 95 EC RoHS Directive 2011 65 EU The following harmonized standards have been applied Safety and Health EN 62479 2010 EN 60950 1 2006 A11 2009 A1 2010 A12 2011 A2 2013 EMC EN 301 489 1 V 1 9 2 2011 09 EN 301 489 17 V 2 2 1 2012 09 RF Spectrum Efficiency EN 300 328 V1 8 1 2012 06 Representative B...

Page 67: ......

Page 68: ...www overmax eu ...

Reviews: