background image

EN

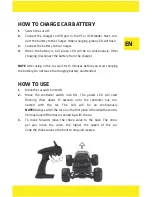
HOW TO CHARGE CAR BATTERY

1. 

Switch the car off.

2. 

Connect the charger to USB port in the PC or USB feeder. Next, con-
nect the battery to the charger. When charging, green LED will flash. 

3. 

Connect the battery to the charger.

4. 

When the battery is full, green LED will be on continuously. After 
charging, disconnect the battery from the charger.

NOTE

 After using in the car, wait 10-15 minutes before you start charging 

the battery. Do not leave the charging battery unattended.

HOW TO USE

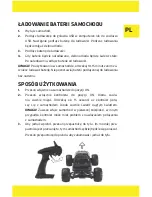
1. 

Move the car switch into ON.

2. 

Move the controller switch into ON. The power LED will start 
flashing. Wait about 15 seconds until the controller has con-
nected with the car. The LED will be on continuously. 

NOTE! 

Always switch the car on in the first place. Otherwise the contro-

ller may have difficulties in connecting with the car.

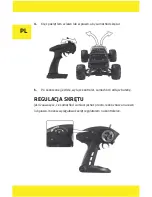
3. 

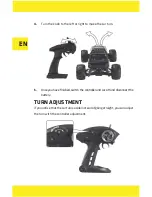
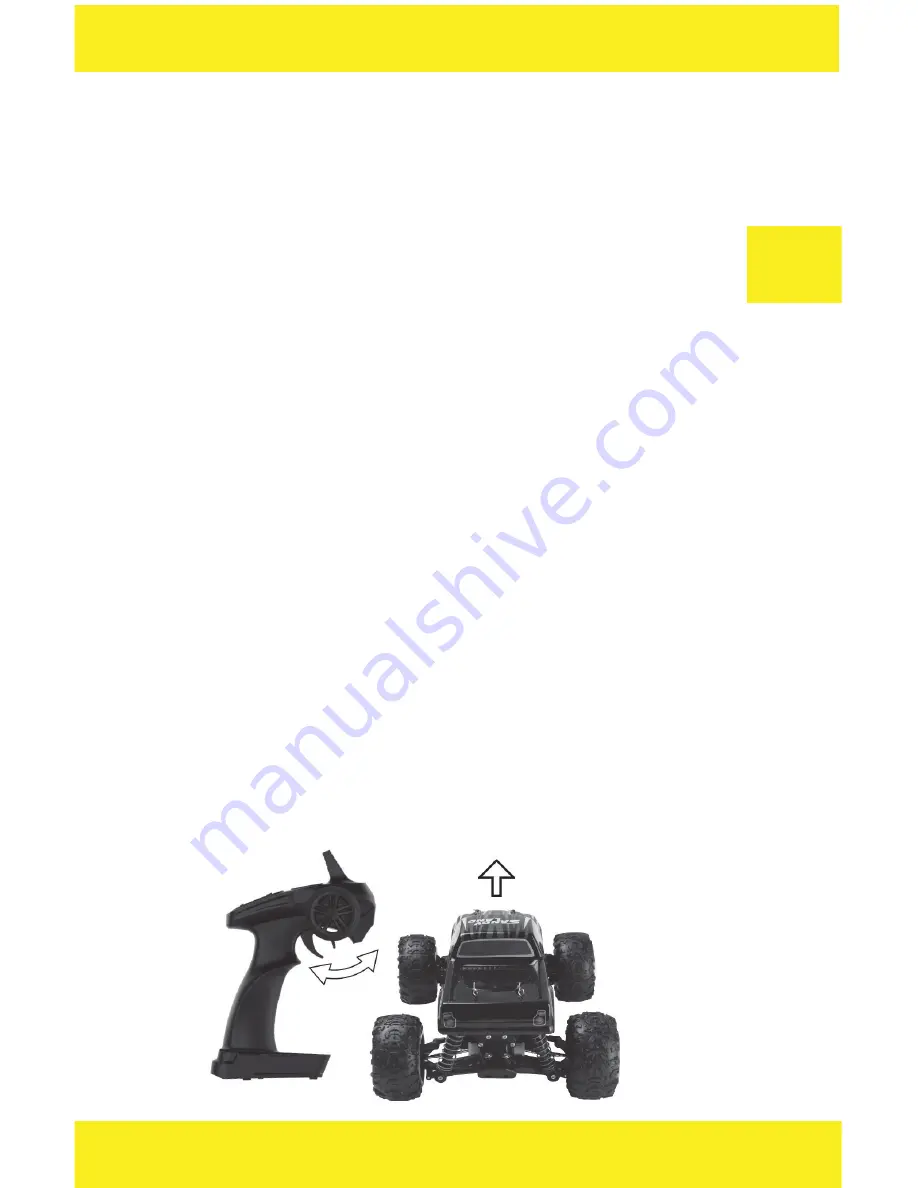
To move forward, move the choke valve to the back. The stron-
ger you move the valve, the higher the speed of the car. 
Slide the choke valve to the front to stop and reverse.

Summary of Contents for X-Monster 3.0

Page 1: ...User Manual Instrukcja obsługi RO PL EN HU DE X Monster 3 0 ...

Page 2: ...www overmax eu ...

Page 3: ...pomoctechniczna overmax pl Ważne informacje Prosimy o przeczytanie tej instrukcji przed przystąpieniem do obsługi produktu aby zapoznać się z jego funkcjami i wykorzystać je zgodnie z przeznaczeniem 1 Nie należy naprawiać oraz dokonywać modyfikacji urządzenia Czyn ności te może dokonać tylko autoryzowany serwis 2 Nie uruchamiaj urządzenia jeżeli zauważyłeś jakiekolwiek uszkodze nia 3 Nie używaj ur...

Page 4: ...b przenoszeniem urządzenia wyłącz je 12 Nie używaj urządzenia do innych celów niż do których zostało ono zaprojektowane 13 Trzymaj urządzenie z dala od ostrych przedmiotów 14 Nie kładź innych przedmiotów na urządzeniu kiedy z niego korzy stasz 15 Korzystaj z urządzenia tylko na płaskich i twardych powierzchniach Unikaj jazdy po piasku trawie lub innych powierzchniach które mogą spowodować uszkodze...

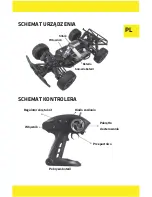
Page 5: ...PL Silnik Gniazdo baterii Bateria Włącznik SCHEMAT KONTROLERA Dioda zasilania Włącznik Przepustnica Pokrętło do sterowania SCHEMAT URZĄDZENIA Regulator skrętu kół Pokrywa baterii ...

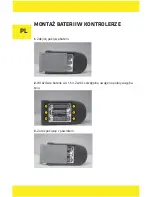
Page 6: ...PL MONTAŻ BATERII W KONTROLERZE 1 Zdejmij pokrywę baterii 2 Włóż dwie baterie AA 1 5 V Zwróć szczególną uwagę na polaryzację ba terii 3 Załóż pokrywę z powrotem ...

Page 7: ... Nie pozostawiaj baterii podłączonej do ładowania bez nadzoru SPOSÓB UŻYTKOWANIA 1 Przesuń włącznik na samochodzie do pozycji ON 2 Przesuń włącznik kontrolera do pozycji ON Dioda zasila nia zacznie migać Odczekaj ok 15 sekund aż kontroler połą czy się z samochodem Dioda zacznie świecić ciągłym światłem UWAGA Zawsze włącz samochód w pierwszej kolejności w innym przypadku kontroler może mieć problem...

Page 8: ...o aby samochód skręcał REGULACJA SKRĘTU Jeśli zauważysz że samochód zamiast jechać prosto lekko zbacza na lewo lub prawo możesz wyregulować skręt regulatorem na kontrolerze 5 Po skończonej jeździe wyłącz kontroler samochód i odłącz baterię ...

Page 9: ...z baterię 2 Czyść samochód i kontroler wilgotną szmatką 3 Nie używaj substancji chemicznych do czyszczenia urządzenia 4 Po każdym użyciu oczyść samochód z piasku i pyłu Zdjęcia mają charakter poglądowy rzeczywisty wygląd produktów może różnić się od prezentowanego na zdjęciach ...

Page 10: ...EN www overmax eu ...

Page 11: ...ortant Please read this manual before you start using the product to see all its functions and use them in accordance with intended use 1 Do not repair or modify the device Only an authorized service techni cian is allowed to perform these operations 2 Do not switch the device on if you have noticed any damage 3 Do not use the device when it acts up has been dropped or immer sed in water overheats...

Page 12: ...not use the device for other purposes than designed 13 Keep the device away from sharp items 14 Do not place other items on the device when you use it 15 Use the device on flat and hard surfaces only Avoid going on sand grass or other surfaces which may lead to damage 16 To charge a battery use a supplied charger only 17 After every charging disconnect the charger from USB port 18 Pay attention to...

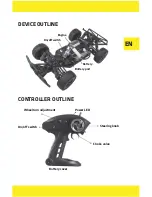
Page 13: ...EN Engine Battery port Battery On off switch CONTROLLER OUTLINE Power LED On off switch Choke valve Steering knob DEVICE OUTLINE Wheel turn adjustment Battery cover ...

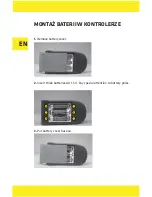
Page 14: ...EN MONTAŻ BATERII W KONTROLERZE 1 Remove battery cover 2 Insert three batteries AA 1 5 V Pay special attention to battery poles 3 Put battery cover back on ...

Page 15: ...ore you start charging the battery Do not leave the charging battery unattended HOW TO USE 1 Move the car switch into ON 2 Move the controller switch into ON The power LED will start flashing Wait about 15 seconds until the controller has con nected with the car The LED will be on continuously NOTE Always switch the car on in the first place Otherwise the contro ller may have difficulties in conne...

Page 16: ...to make the car turn TURN ADJUSTMENT If you notice that the car turns aside instead of going straight you can adjust the turn with the controller adjustment 5 Once you have finished switch the controller and car off and disconnect the battery ...

Page 17: ...fanddisconnectthebattery 2 Clean the car and controller with wet cloth 3 Do not use chemicals to clean the device 4 After every use remove sand and dust from the car The pictures are for reference only The real design of the products may differ from the pictures presented ...

Page 18: ...DE www overmax eu ...

Page 19: ...niczna overmax pl WICHTIGE INFORMATIONEN Bitte die vorliegende Bedienungsanleitung vor dem Gebrauch des Gerätes durchzulesen um seine Funktionen kennen zu lernen und es bestimmun gsgemäß zu verwenden 1 DasGerätdarfnichtrepariertodermodifiziertwerden DieseTätigkeiten dürfennurdurcheinautorisiertesServicedurchgeführtwerden 2 BetätigenSiedasGerätnicht wennSiedieBeschädigungenbemerkten 3 DasGerätsolln...

Page 20: ...eesaus 12 DasGerätdarfnichtfürdieanderenZweckealsdiebestimmungsgemäße Verwendungbenutztwerden 13 BewahrenSiedasGerätweitvondenscharfenGegenständenauf 14 BeiderVerwendungstellenSiekeineGegenständeaufdasGerät 15 BenutzenSiedasGerätnuraufebenenundhartenOberflächen Vermeiden SiedieSandflächen GrasoderandereFläche dieeineBeschädigungdes Gerätesverursachenkönnen 16 ZumLadenderBatterieverwendenSienureini...

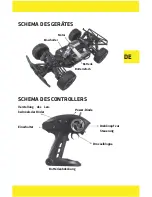
Page 21: ...E Motor Batteriefach Batterie Einschalter SCHEMA DES CONTROLLERS Power Diode Einschalter Drosselklappe Drehknopf zur Steuerung SCHEMA DES GERÄTES Verstellung des Len kwinkels der Räder Batterieabdeckung ...

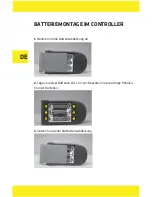
Page 22: ... BATTERIEMONTAGE IM CONTROLLER 1 Nehmen Sie die Batterieabdeckung ab 2 Legen Sie zwei Batterien AA 1 5 V ein Beachten Sie die richtige Polarisa tion der Batterien 3 Setzen Sie wieder die Batterieabdeckung ...

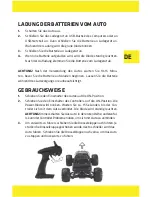
Page 23: ... Lassen Sie die Batterie während des Ladevorgangs nie unbeaufsichtigt GEBRAUCHSWEISE 1 Schieben Sie den Einschalter des Autos auf die ON Position 2 Schieben Sie den Einschalter des Controllers auf die ON Position Die Power Diode wird blinken Warten Sie ca 15 Sekunden bis der Con troller sich mit dem Auto verbindet Die Diode wird ständig leuchten ACHTUNG Immer schalten Sie das Auto in der ersten Re...

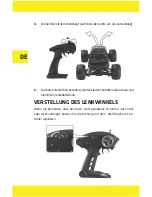
Page 24: ...STELLUNG DES LENKWINKELS Wenn Sie bemerken dass das Auto statt geradeaus zu fahren nach links oder rechts abbiegt können Sie die Drehung mit dem Drehknopf am Con troller regulieren 5 NachdemSiedieFahrtbeenden schaltenSiedenControllerundAutoausund klemmenSiedieBatterieab ...

Page 25: ...abweichen WARTUNG UND REINIGUNG 1 Vor der Reinigung schließen Sie das Gerät aus und klemmen Sie die Bat terie ab 2 Reinigen Sie das Auto und den Controller mit einem feuchten Tuch 3 Benutzen Sie keine chemische Mittel zur Reinigung des Autos 4 Nach jedem Gebrauch reinigen Sie das Auto von Sand und Staub ...

Page 26: ...RO www overmax eu ...

Page 27: ...cțiuni înainte de utilizarea produsului Impor tant este să vă familiarizați cu funcțiile sale și pentru a le utiliza conform destinației 1 Nu reparați sau modificați dispozitivul Toate lucrarile de reparație trebuie sa fie efectuate la un service autorizat 2 Nu porniți aparatul dacă observați deteriorarea unității 3 Nu utilizați dispozitivul atunci când acesta funcționează defectuos a căzut de la ...

Page 28: ...zați dispozitivul în alte scopuri decât cele pentru care a fost proiectat 13 Păstrați dispozitivul departe de obiectele ascuțite 14 Nu amplasați alte obiecte pe mașina atunci când îl utilizați 15 Folosiți numai pe suprafețe plane și dure Evitați deplasarea pe nisip iarbă sau alte suprafețe care ar putea deteriora dispozitivul 16 Pentru încărcarea bateriei vă rugăm să utilizați numai încărcătorul l...

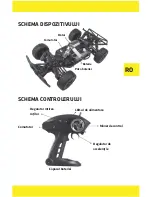
Page 29: ...RO Motor Priza bateriei Baterie Comutator SCHEMA CONTROLERULUI LED ul de alimentare Comutator Regulator de accelerație Mâner de control SCHEMA DISPOZITIVULUI Regulator rotirea roților Capacul bateriei ...

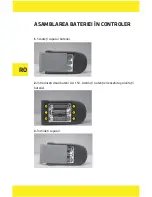
Page 30: ...RO ASAMBLAREA BATERIEI ÎN CONTROLER 1 Scoateți capacul bateriei 2 Introduceți două baterii AA 1 5V Acordați o atenție deosebită polarității bateriei 3 Închideți capacul ...

Page 31: ...u lăsați bateria conectată la încărcător nesupravegheată METODA DE UTILIZARE 1 MutațicomutatorulînpozițiaON 2 GlisațibutonuldecomandăînpozițiaON LED uldealimentarevaclipi va lumina Așteptațiaproximativ15secundepânăcândcontrolerulseconec tează Led ulvacontinuasăfuncționeze ATENȚIE Alwaysswitchthecaroninthefirstplace Otherwisethecontrol lermayhavedifficultiesinconnectingwiththecar 3 Vărugămsăactivaț...

Page 32: ...ina AJUSTAREA CONTROLULUI DE DIRECȚII Dacă observați că mașina în loc să meargă înainte merge ușor spre stânga sau spre dreapta puteți regla turnul de direcție de pe controler 5 Dupăfinalizareautilizăriidispozitivului vărecomandămsăoprițicontrolerulși sădeconectațibateria ...

Page 33: ...onectațibateria 2 Curățați mașina și controlerul cu o cârpă umedă 3 Nu utilizați substanțe chimice pentru curățarea dispozitivului 4 După fiecare utilizare curățați mașina de nisip și praf Fotografiile sunt doar ilustrative aspectul real al produsului poate diferi de cele prezentate ...

Page 34: ...HU www overmax eu ...

Page 35: ... termék használatbavétele előtt hogy megismerkedjen annak funkcióival és rendeltetésszerű használatával 1 Ne javítsa és ne hajtson végre módosításokat a készüléken Ezeket a tevékenységeket csak szakszerviz végezheti el 2 Ne üzemeltesse a készüléket ha észrevesz bármilyen rajta bármilyen sérülést 3 Ne használja a készüléket ha az elkezd hibásan működni vagy vízbe került túlzottan felmelegszik elszí...

Page 36: ...éket ne használja más célokra mint amire azt tervezték 13 Tartsa távol a készüléket éles tárgyaktól 14 Ne tegyen más tárgyat a készülékre amikor azt használja 15 A készüléket csak sík és kemény felületeken használja Kerülje a használatot homokban füvön vagy más olyan felületeken melyek a készülék károsodását okozhatják 16 Az akkumulátor töltéséhez csak a készlethez mellékelt töltőt használja 17 Mi...

Page 37: ...HU Motor Akkumulátor aljzat Akkumulátor Kapcsoló A TÁVVEZÉRLÓ SÉMÁJA Bekapcsolást jelző LED Kapcsoló Gázkar Vezérlőgomb A KÉSZÜLÉK SÉMÁJA A kerekek kormányzása Elemfedél ...

Page 38: ...HU A TÁVVEZÉRLÓ SÉMÁJA 1 Vegye le az akkumulátor fedelét 2 Tegyen be két AA 1 5V os elemet Fordítson különös figyelmet az elemek polarizációjára 3 Tegye vissza az elemfedelet ...

Page 39: ...n kezdje el tölteni az akkumulátort A töltésre kapcsolt akkumulátort ne ha gyja felügyelet nélkül A HASZNÁLAT MÓDJA 1 Az autón a kapcsolót tolja át ON pozícióba 2 A távvezérlőn a kapcsolót tolja át ON pozícióba A bekapcsolást jelző LED villogni kezd Várjon kb 15 másodpercet amíg a távvezérlő ös szekapcsolódik az autóval A LED folyamatos fénnyel kezd világítani FIGYELEM Mindig az autót kapcsolja be...

Page 40: ...KANYARODÁS SZABÁLYOZÁS Ha az tapasztalja hogy az autó az egyenesen haladás helyett enyhén kitér balra vagy jobbra be tudja állítani a kanyarodást a távvezérlőn levő szabály zóval 5 Ha befejezte kapcsolja ki a távvezérlőt és az autót majd csatlakoztassa le az akkumulátort ...

Page 41: ...ól TISZTÍTÁS ÉS KARBANTARTÁS 1 Tisztítás előtt kapcsolja ki a készüléket és csatlakoztassa le az akku mulátort 2 Tisztítsa meg az autót és a távvezérlőt nedves kendővel 3 Ne használjon vegyianyagokat a készülék tisztításához 4 Minden használat után tisztítsa meg az autót a homoktól és a portól ...

Page 42: ...e Group Sp z o o hereby declare under our sole responsibility that the of the above referenced product complies the following directives Representative BrandLine Group Sp z o o ul Dziadoszańska 10 61 248 Poznań EN 71 1 2014 2009 48 EC CE EN 71 2 2001 A1 2014 EN 60825 1 1994 A1 2002 A2 2001 EN 62115 2005 A2 2011 A11 2012 A12 2015 AfPS GS 2014 01 DIRECTIVE 2011 65 EU ...

Page 43: ......

Page 44: ...www overmax eu ...

Reviews: