OWC Mercury Elite-AL Pro, Assembly Instructions Manual
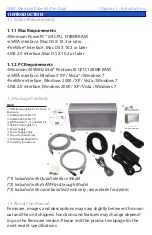
The OWC Mercury Elite-AL Pro is a high-quality external hard drive enclosure that provides reliable storage for all your files. Make sure to download the Assembly Instructions Manual for easy setup and maintenance. Get the manual for free at 88.208.23.73:8080 and enjoy seamless performance from your OWC Mercury Elite-AL Pro.
Share
Download


Reviews:
No comments
Related manuals for Mercury Elite-AL Pro

Marquis KD9
Brand: Electro-Voice Pages: 12

Z23U-624
Brand: Panduit Pages: 16

CB-MXP-43-F
Brand: AMX Pages: 2

AnkerMake M5
Brand: 3D Upfitters Pages: 17

SB-38W
Brand: Toa Pages: 4

HAMAR 2.0 R207 Square
Brand: RIHO Pages: 16

PROTECT Series
Brand: Viz-Art Automation Pages: 2

ENCLOSURE DTH 1
Brand: Peavey Pages: 4

DTH 5
Brand: Peavey Pages: 4

EuroSys 12PM
Brand: Peavey Pages: 7

ARAD3S
Brand: Pulsar Pages: 4

DE100 Ultra 160
Brand: CRU Pages: 2

ThunderForm Chevy Suburban
Brand: MTX Pages: 4

PDI JCOMM
Brand: Eaton Pages: 50

Sonata Designer 500
Brand: Antec Pages: 34

I2004AB-M1
Brand: Lcdmod Kit Pages: 18

CASE-3S3
Brand: Laser Pages: 2

Multi Hard Disk Box 3.5"
Brand: Sandberg Pages: 24


