background image

28

ware. Even after you have done these steps, your firewall/antivirus software may still block access. 

If using Wireless, make sure you are connected to the wireless router and that the signal 

is strong. Try to check for and install the latest firmware from your router’s manufacturer 

website and for the latest drivers for your wireless card. You can also try plugging in via 

Ethernet to see if it works that way. If using VPN software, try unchecking the box for 

Deterministic Network Enhancer or any other VPN protocol in your NIC Properties. 
If, after everything, it is still showing as a black dot, please try disabling all your Startup 

items and non-Microsoft services from your msconfig utility. Msconfig can be accessed 

by clicking on Start-> Run-> and typing in “msconfig” and clicking OK. 

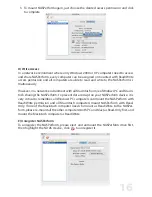
When trying to mount the NASPerform to my computer, I experience some problem. 

When first time registering the NDAS, you may not have entered all the NDAS device ID 

(alpha-numeric values) correctly. Please check NASPerform ID and write key from bot-

tom side of the enclosure again. There are no letter “O”s in ID; please verify that you have 

used the number “0” (zero) for anything resembling an “O.” Also please check your other 

letters as well; two V’s may look like a W. Please also make sure that there are 20 charac-

ters for the NASPerform ID, not including the Write Key. You can always unregister the 

problematic device, and start over to register the NASPerform again. 

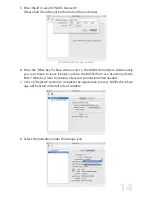
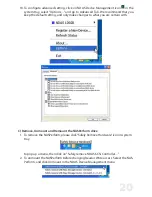
I have registered the NASPerform but cannot see NASPerform in “My Computer.” 

What should I do? 

Click  on  the  NDAS  device  Management  icon  in  your  System  tray  and  make  sure  the 

NASPerform is mounted. There should be a dot next to your NASPerform, colored either 

Blue (Read/Write) or Green (Read Only). If it is a black colored dot, then please go to 

the FAQ: “I’ve installed my NASPerform and it shows up as a Black Dot in NDAS Device 

Management.” 
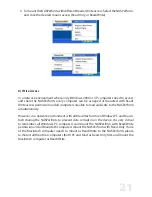
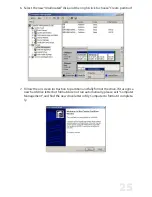
If the NASPerform is mounted, open “Computer Management” by right -clicking on “My 

Computer.” Go to “Manage,” then click on “Disk Management.” Check if your NASPerform 

is recognized. It should show up as Disk 1 or Disk 2 or a different number depending on 

the number of drives that you have in your computer. Make sure that the NASPerform 

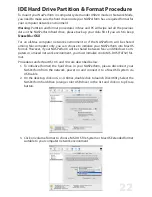
is partitioned and formatted. If you see something that says “Unallocated,” please refer 

to section “IDE Hard Drive Partition and Format” to format your NASPerform. Then, it 

should mount in “My Computer”. 

Why am I getting a “Data has been corrupted” message when I try to open or copy a file? 

Please  unmount  the  NASPerform  from  all  computers  except  one Windows  PC,  from 

which “chkdsk” command will be run. Open up Command Prompt Window and run “ch-

kdsk” to restore the NASPerform. Go to Start > Run > type in “cmd” without the quota-

tion marks. Then type in “chkdsk NASPerformDriveLetter: /F” For example, if your NAS-

Perform shows up as drive letter E: in My Computer, you would type in the following: 

chkdsk E: /F Note: “chkdsk” allows you to restore the NASPerform function, but it cannot 

repair corrupted data. Regular back up is always the safe way to keep your data. 

Why do I keep getting this error message: “The device (NASPerform) cannot be 

stopped right now. Try stopping the device again later.” ? 

Close any windows that are displaying your NASPerform and retry what you were do-

ing earlier. If you continue to get that error message, reboot your computer. However, if 

Summary of Contents for NASPerform

Page 1: ...User s Manual NASPerform USB2 0 Enclosure for 3 5 IDE Hard Drive...

Page 2: ...e date of purchase OtherWorld Computing warranty is not transferable and is limited to the original purchaser If the product is found to be defective then as your sole remedy and as the manufacturer s...

Page 3: ...ware Installation Software Installation for Mac USB2 0 Mode in Mac 13 Using Network Mode in Mac 13 Software Installation for PC USB2 0 Mode in Windows 2000 XP 17 Using Network Mode in Windows2000 XP 1...

Page 4: ...of ap plications Multimedia central storage device MP3s Digital Photos Digital Video Use as storage for Personal Computer and Home Networking storing and sharing files backup archiving etc Expanding s...

Page 5: ...p the power cord away from hot appliances Do not touch the power cord with wet hands Do not expose the unit to direct sunlight or hot air where the temperature could exceed 45 C or very cold locations...

Page 6: ...ts of your computer chassis Enclosure Sleeve Back Panel Base Plate USB Data cable connector Power Connector NDAS NetWork port Power ON OFF Switch LED Package Contents Enclosure Sleeve 1 USB Data Cable...

Page 7: ...lation Note The diagrams below are using a FireWire USB2 0 Enclosure as an example Step 2 Use your thumb to push the Base Plate out Step 1 Unscrew to loosen the Back Panel and remove the Back Panel fr...

Page 8: ...sides of the hard drive Do not tighten the screws yet Step 5 Set up the jumper ID as Master mode according to the HDD jumper setting spec or Single Master mode for Western Digital model hard drive Co...

Page 9: ...rd drive make sure all 4 Anti Shock Mounts sit inside the Support Slot Step 7 Press down on the hard drive and tighten all 4 screws to secure the hard drive to the Base Plate Step 8 Align the Base Pla...

Page 10: ...the Enclosure Step 10 Secure the Back Panel with the 5mm diameter screw Step 11 Plug the AC adapter into the Enclosure to power it on You may now connect the unit to your network by Ethernet Cable or...

Page 11: ...t the same time The OWC NASPerform works under either USB 2 0 mode as external drive for single computer or network NDAS mode as network shared storage Once your NASPerform is connected to your networ...

Page 12: ...FAT32 format To share the NASPerform each computer on the network must install the corre sponding NASPerform Driver On Windows XP 2000 install the same NASPerform driver v 3 x x On MacOSX install the...

Page 13: ...ntel based Mac at our website A Driver Installation Insert included CD Select to open the OS folder to match your operating system Run NDAS Install mpkg file Follow through the installer window to com...

Page 14: ...natively you can choose to leave it blank and use the NASPerform as a Read only device Enter Write Key later to obtain write access permission when needed Click on Register button to complete the regi...

Page 15: ...kes up to 2 minutes If you have multiple NASPerform connected repeat step 3 through step 10 9 10 11 C Eject Unmount and Remount the NASPerform Drive To disconnect the NASPerform from a Mac just simply...

Page 16: ...Widows PC and Macin tosh sharing the NASPerform to prevent data corrupt on your NASPerform device it is very critical to remember all Windows PC computers can mount the NASPerform with Read Write perm...

Page 17: ...rive Using NDAS Mode in Windows 2000 XP A Driver Installation Insert included CD Open the NDAS Driver folder and click to run Setup exe Follow through the installation Please note during installation...

Page 18: ...ions available to mount the NDAS device Note If Write Key was not provided when registering the device mount with Read Write mode option is gray out only mount with Read Only mode option is available...

Page 19: ...a local hard drive If you have multiple NASPerform connected please repeat step 2 through step 8 to register them all To view current list of computer hosts mounting the NASPerform click on Proper tie...

Page 20: ...make changes to what you are certain with 10 C Remove Unmount and Remount the NASPerform drive To remove the NASPerform please click Safely Remove Hardware icon in system tray to pop up a menu then cl...

Page 21: ...nd write to the NASPerform simultaneously However in a network environment with all Macintosh or mix of Widows PC and Macin tosh sharing the NASPerform to prevent data corrupt in on the device it is v...

Page 22: ...an choose to initialize your NASPerform into MacOS format However if your NASPerform will be shared between Mac and Windows Com puters in a mixed network environment you must initialize it into MS DOS...

Page 23: ...X and Windows computer you have to format it to FAT32 Standard Windows Disk Management described next will allow you to format hard drive up to 30GB into FAT32 and hard drive larger than 30GB into onl...

Page 24: ...24 Write Signature and Upgrade Disk Wizard windows will show up and click Next Write a signature to the new drive click Next Click Finish to close the wizard 3 4 5...

Page 25: ...ate partition Follow the on screen instruction to partition and fully format the drive If it assigns a new hard drive letter but format dose not run automatically please exit Computer Management and f...

Page 26: ...the same driver in Mac computer Vice versa What are the documented Router Wireless Access Point Card incompatible with the NASPerform The unsupported products are DLINK 713P 714P SMC 7004AWBR SMC7000...

Page 27: ...network it is no problem to connect computer to the network hub Also if you have any software firewalls installed on your computer i e Norton Inter net Security McAfee Personal Firewall etc make sure...

Page 28: ...nagement icon in your System tray and make sure the NASPerform is mounted There should be a dot next to your NASPerform colored either Blue Read Write or Green Read Only If it is a black colored dot t...

Page 29: ...the NASPerform is plugged into a 100mb full duplex capable switch and that you are using a 10 100mb Network Card The OWC NASPerform is not supported on hubs If you have your switch uplinked to another...

Page 30: ...rite protected Remove the write protection or use another disk You probably do not have Read Write access Please unmount write access from an other computer Mac most likely first Click on the NDAS Dev...

Page 31: ...to the NASPerform at a time and all the rest of computers need to be mounted as Read Only first It is designed to prevent data corruption we suggest you assign Read Write only to single Mac computer...

Reviews: