


OWC DRIVE DOCK
DEVICE SETUP
4
DEVICE SETUP
2.1 Quick Start
1. Plug the power cable into an outlet and the Drive Dock.
2. Plug in the data cable from the computer to the Drive Dock.
3. Seat a 2.5” or 3.5” SATA drive into one or both drive bays.
4. Switch the power on (back of the Drive Dock).
5. Press the power button(s) and wait a few seconds for the drive(s) to mount.
6. Begin using the Drive Dock.
2.2 Usage Notes
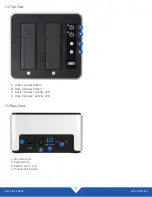
• If there is no active data connection, the LEDs will not function. When there is an active data connection
and the Drive Dock is powered on, the LEDs will show blue for power and pink for drive activity. A red
LED indicates the bay is powered on but no drive has been detected.
• To power on a drive, press and release the corresponding power button. To power off a drive, press
and hold the power button for three seconds.
• When you use the power switch on the back of the Drive Dock to shut off power, the next time you
switch the power on, neither drive bay will receive power. You will need to press the power button for
the drive(s) you want to use during that session.
• After unmounting the drive(s) and powering off the drive bay(s), the drives will still be visible to the
Thunderbolt bus for 7-8 seconds. If a drive is added and powered on during this time, the new drive
will not mount. This scenario does not apply when connecting via USB.
• When connected via Thunderbolt, you can power each drive bay on and off independently (and swap
out either of the drives) without affecting the other drive. When connected via USB, it is possible to
unmount either drive from the OS without impacting the other drive, but you cannot power a bay on or
off, or physically connect or disconnect one of the drives, without causing the other drive to temporarily
unmount. This is a limitation of the USB port multiplier technology. Depending on the hard drive, it may
take several seconds for it to remount.
• Hot-swapping is supported via Thunderbolt in all circumstances except when booting from a drive that
is physically mounted in the drive dock. Hot-swapping is not supported via the USB connection due to
port-multiplier limitations.
• In order for the computer to access volumes larger than 2TB, the OS must support large volumes (i.e.
Windows Vista and above).
• To safely remove your drive(s) and to ensure that no data is lost, always eject or unmount the drive(s) from
your operating system before powering off the drive(s). Please see
Section 3.2
for more information.