background image

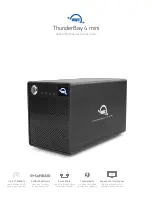
ThunderBay 4 mini – Thunderbolt 2

Support Resources

7

3.1 Formatting

For additional formatting information, including instructions on how to format the ThunderBay 4 mini for Mac or 
Windows, please go to: 

www.owcdigital.com/format

3.2 Troubleshooting

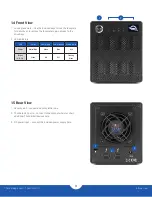
Begin your troubleshooting by verifying that the power cable is connected to the ThunderBay 4 mini and to a 
power source. If the power cable is connected to a power strip, make sure that the power switch on the strip is 
turned on. Then, verify that both ends of your cables are properly plugged into the computer and the enclosure. If 
the device is still not working properly, try connecting to another computer or using another Thunderbolt cable. 

If you are still experiencing problems, please see Section 3.4 to contact Technical Support.

3.3 About Data Backup

To ensure that your files are protected and to prevent data loss, we strongly suggest that you keep two copies 
of your data: one copy on your ThunderBay 4 mini and a second copy on either your internal drive or another 
storage medium, such as an optical backup, or on another external storage unit. Any data loss or corruption 
while using the ThunderBay 4 mini is the sole responsibility of the user, and under no circumstances may OWC, 
its parents, partners, affiliates, officers, employees, or agents be held liable for loss of the use of data including 
compensation of any kind or recovery of the data.

3.4 Contacting Technical Support

Email:

 Answered within 48 hours

www.owcdigital.com/support

Phone:

 M–F, 8am–5pm Central Time

(866) 692-7100 (N. America) | +1 (815) 338-4751 (Int’l)

Chat:

 M–F, 8am–8pm Central Time

www.owcdigital.com/support

SUPPORT RESOURCES

Summary of Contents for ThunderBay 4 mini

Page 1: ...tware Easy and complete drive management Daisy Chain Add up to five additional Thunderbolt devices Thunderbolt 2 Thunderbolt certified for Mac and Windows Expand Your Workspace Add 4K monitor via the...

Page 2: ...ntents 1 1 3 About This Manual 1 1 4 Front View 3 1 5 Rear View 3 1 6 Usage Notes 4 Installation 2 1 Drive Installation 5 2 2 Quick Start 5 2 3 Why Install SoftRAID 6 2 4 Replacing Drives 6 2 5 Drive...

Page 3: ...up to 15 mm supported 1 2 Package Contents 1 3 About This Manual The images and descriptions may vary slightly between this manual and the unit shipped Functions and features may change depending on...

Page 4: ...ve exposure to dust during use or storage Dust can build up inside the device increasing the risk of damage or malfunction Do not block any ventilation openings on the device These help to keep the de...

Page 5: ...to the drive bays 2 LED Indicators 1 5 Rear View 1 Security slot connect a security tether here 2 Thunderbolt 2 ports connect to the computer host or chain additional Thunderbolt devices here 3 DC pow...

Page 6: ...fore unplugging the ThunderBay 4 mini or removing the drives See the tips below for unmounting a drive from your specific OS macOS Drag the icon for the disk you wish to unmount to the trash can OR Ri...

Page 7: ...the tray and the corresponding track then try again 2 2 Quick Start 1 Install drives into the ThunderBay 4 mini according to the instructions in Section 2 1 2 Connect the power supply between the Thu...

Page 8: ...om email alerts for important events 2 4 Replacing Drives You can add or remove any drive without needing to turn off the ThunderBay 4 mini or unmount any of the other drives Each drive operates indep...

Page 9: ...problems please see Section 3 4 to contact Technical Support 3 3 About Data Backup To ensure that your files are protected and to prevent data loss we strongly suggest that you keep two copies of your...

Page 10: ...tion If this equipment does cause harmful interference with radio or television reception which can be determined by turning the equipment off and on the user is encouraged to try to correct the inter...

Reviews: