background image

4

OWC ThunderBay 4

Device Setup

If you purchased the ThunderBay 4 with drives, they have been installed prior to shipment — please 
skip to Section 2.2, Step 4. If you are installing your own drives, follow the steps in Section 2.1 to install 
3.5-inch hard drives into your ThunderBay 4 enclosure, or to replace existing 3.5-inch drives. Note: it is 
possible to install 2.5-inch SATA drives using the fine-threaded screws that are included (16 in total), 
and the four screw holes on the bottom of each drive tray (highlighted in step 5 below).

2.1 Hard Drive Installation

Follow these steps to install hard drives into your ThunderBay 4 enclosure, or to replace existing drives. 
Repeat steps 1 through 8 as necessary for each drive you are installing.

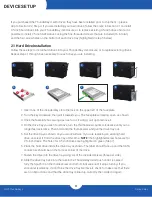
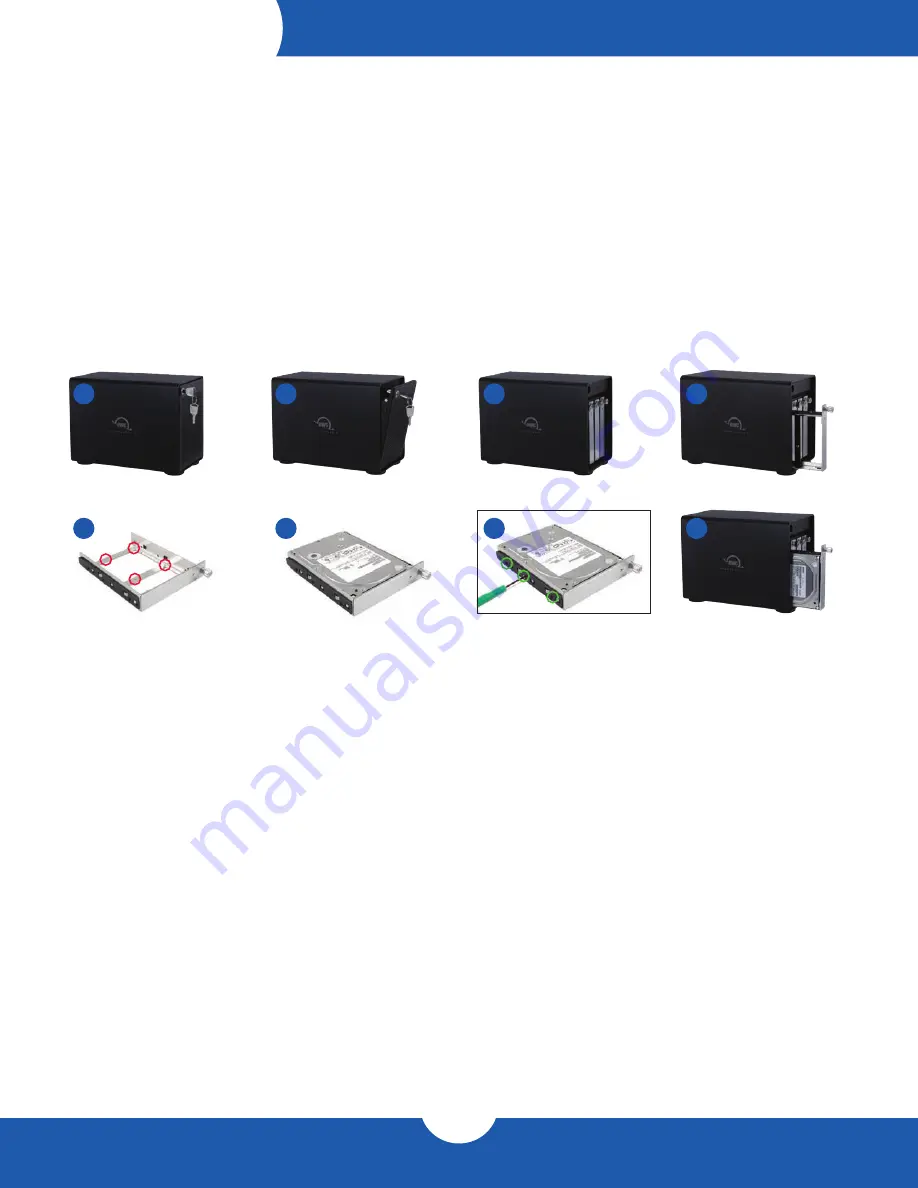
1. Insert one of the included keys into the lock on the upper left of the faceplate.
2. Turn the key clockwise, then pull it towards you. The faceplate will swing open, as shown.
3. Once the faceplate has swung open as far as it will go, pull up to remove it.
4. On the drive tray you wish to remove, turn the thumbscrew counter-clockwise until you no 

longer feel resistance. Then hold onto the thumbscrew and pull the drive tray out.

5. Set the drive tray as shown on your work surface. If you are replacing an existing hard 

drive, unscrew it from the drive tray at this time. 

NOTE:

 the highlighted screw holes are for 

2.5-inch drives. The holes for 3.5-inch drives are highlighted in green (Step 7).

6. Place the hard drive inside the drive tray as shown. The label should face up and the SATA 

connectors should be on the far rear corner of the drive.

7. Fasten the drive into the drive tray using six of the included screws (three per side).
8. Slide the drive tray back into the rails in the ThunderBay 4 and push until it is seated 

fully, then push in on the thumbscrew and turn it clockwise until it stops turning. If you 
encounter resistance, do not force the drive tray. Remove it, check to make sure that there 
are no obstructions and that the drive tray is lined up correctly, then slide it in again.

DEVICE SETUP

2

3

4

6

7

8

5

1

Summary of Contents for ThunderBay 4

Page 1: ...2 5 3 5 HDDs SSDs Mac Windows 4 Bay RAID Array Thunderbolt 2 Assembly Manual User Guide ThunderBay 4...

Page 2: ...Contents 1 1 3 About This Manual 1 1 4 Front View 2 1 5 Rear View 2 1 6 Usage Notes 3 Device Setup 2 1 Hard Drive Installation 4 2 2 Quick Start 4 2 3 About SoftRAID 5 2 4 Chaning Drives Drive Failur...

Page 3: ...erBay are trademarks of New Concepts Development Corporation registered in the U S and or other countries Mac and macOS are trademarks of Apple Inc registered in the United States and other countries...

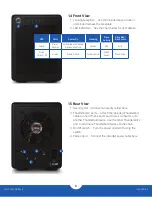
Page 4: ...to lock or unlock and remove the faceplate 2 LED indicators See the chart below for LED details 1 5 Rear View 1 Security slot Connect a security tether here 2 Thunderbolt 2 ports Attach the included...

Page 5: ...devices chained through the ThunderBay 4 the ON OFF switch of the ThunderBay 4 must be in the ON position For the safe removal of your drives and to ensure that no data is lost always eject or unmount...

Page 6: ...aceplate has swung open as far as it will go pull up to remove it 4 On the drive tray you wish to remove turn the thumbscrew counter clockwise until you no longer feel resistance Then hold onto the th...

Page 7: ...ThunderBay 4 manages and protects your data with our advanced SoftRAID engine SoftRAID offers multiple RAID options 0 1 4 5 1 0 giving you the ability to set up your storage for speed data security o...

Page 8: ...for OWC technical support contact information 3 2 About Data Backup To ensure that your files are protected and to prevent data loss we strongly suggest that you keep two copies of your data one copy...

Page 9: ...ere is no guarantee that interference will not occur in a particular installation If this equipment does cause harmful interference with radio or television reception which can be determined by turnin...

Page 10: ...keep the device cool during operation Blocking the ventilation openings may cause damage to the device and cause an increased risk of short circuiting or fire Warranty The OWC ThunderBay 4 has up to...

Reviews: