


5
OWC ThunderBay 4
Device Setup
2.2 Quick Start
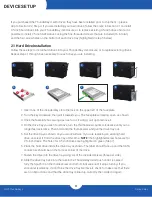
1. Install hard drives into the ThunderBay 4 according to the instructions in Section 2.1.
2. Connect the power cable to the enclosure and a power outlet, then make sure the ON/OFF
switch is set to the ‘ON’ position.
3. Connect a Thunderbolt cable between the ThunderBay 4 and a computer. When you do
this, the ThunderBay 4 will turn on and the drives will be available for use on the computer.
-
NOTE:
If you installed your own drives in the previous section, they need to be formatted
before you can use the ThunderBay 4. It shipped with a license for
, which
is recommended for setting up RAID volumes and working with ThunderBays. If you
purchased your solution with drives, they were already formatted as a RAID volume, but you
should still install SoftRAID to get the best performance and functionality.
If you do not wish to use SoftRAID you can visit
and use one
of the Mac or PC specific links for instructions on formatting your drives.
2.3 About Software RAID
OWC ThunderBay 4 manages and protects your data with our advanced SoftRAID engine. SoftRAID
offers multiple RAID options (0, 1, 4, 5, 1+0), giving you the ability to set up your storage for speed, data
security or the best of both worlds. Packed with features from active predictive disk failure monitoring,
to multiple array volume spanning, SoftRAID from OWC brings technology typically found only in data
centers to your workstation or editing bay.
To learn more about SoftRAID please visit:
2.4 Changing Drives & Drive Failure
You can add or remove any drive without needing to turn off the device or to unmount any of the other
drives. Each drive operates independently of the others and is not affected by the addition or removal
of another drive unless you set them up as members of a RAID array using software.
By itself, the ThunderBay 4 does not monitor drive health or alert you to a drive failure. You can monitor the
health of your drives via SoftRAID in order to determine when a drive has failed or is in a pre-failure state. To
replace a failed drive, simply remove the drive from its bay and replace it with another drive, following the
steps in Section 2.1. The ThunderBay 4 does not need to be turned off during this process.


