Full-height turnstile Oxgard Praktika Т-10 (T-10H)
28
PROTECTING THE FUTURE
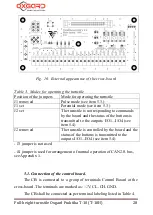
Fig. 16.
External appearance of the cross-board
Table 3.
Modes for operating the turnstile
Position of the jumpers
Mode for operating the turnstile
J1 removed
Pulse mode (see item 5.3.)
J1 set
Potential mode (see item 5.3.)
J2 set
The turnstile is not responding to commands
by the board and the status of the buttons is
transmitted to the outputs I/O1...I/O4 (see
item 5.4)
J2 removed
The turnstile is controlled by the board and the
status of the buttons is transmitted to the
outputs I/O1...I/O4 (see item 5.4)
- J3 jumper is not used
- J4 jumper is used for arrangement of normal operation of CAN2.0. bus,
see Appendix 1.
5.1. Connection of the control board.
The CB is connected to a group of terminals Control Board at the
cross-board. The terminals are marked as:
12
V, CL, CH, GND.
The CB shall be connected as per terminal labeling listed in Table 4.
Summary of Contents for Praktika T-10
Page 2: ...PROTECTING THE FUTURE...
Page 7: ...Installation instructions 7 PROTECTING THE FUTURE Fig 1 Initial position of the leaves...
Page 21: ...Installation instructions 21 PROTECTING THE FUTURE...
Page 26: ...Full height turnstile Oxgard Praktika 10 T 10H 26 PROTECTING THE FUTURE Fig 14 220 V 12 V...
Page 37: ...Installation instructions 37 PROTECTING THE FUTURE Fig 21 Sample for turnstile installation...
Page 39: ...Installation instructions 39 PROTECTING THE FUTURE...

