User Manual -
Solano Pro
V1.0 03/2017
9/14
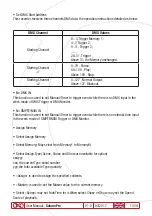
• Record a SCENE
To choose and access Record SCENE function, use function button to modify SCENENAME. Se-
lect Confirmation & Record, press OK to record the current inputed DMX data. The LED indicator
will flash 3 times. After finish, to select «Finish & Return» to return.
• Record a SHOW
To choose and access Record SHOW function, use function button to modify SHOWNAME.There
are 4 record methods for user choice: Manual, Auto,Semi Auto and Smart.
• Manual
Press Start button to start record, and then press Stop button to finish.
• Auto
Once the recorder received at least a frame which all DMX data are «zero», the recorder is
assumed to be in the state of ready to record, when received any «nonzero» DMX data, start to
record, when received all «zero» DMX data again, record completed.
• Semi Auto
The theory is the same as the Auto mode. The difference is that in Semi Auto mode, need to
press «Stop» to finish record. Or, when received all «zero» DMX data,record completed.
• Smart
This mode is applied to those DMX data which were played in a circle with changes, and the
DMX data frame must be the totally same in the circle playback.
• Select «Confirm & Record» to access Record control state. Select «Start Record» to record.
The recorder will handle the record in terms of the selected record method. If want to finish
record in advance, you can select» Stop & Return».
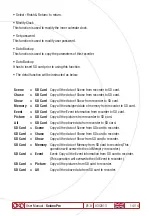
• Add a Chase(The user may use this recorder to edit Chase only if the Scene had been
recorded in it.)
• Slect Add Chase to edit Chase.
• Use function button to modify CHASENAME.
• In «STEP: xxx/yyy», the specified step may be modified.
xxx: the current step
yyy: the recorded total steps of this Chase, up to 200 steps can be recorded.
• Select the Scene of Step in «SceneName xxx/yyy».
xxx: the current Scene
yyy: the total Scenes available for option
Summary of Contents for Solano Pro
Page 2: ......


