background image

Page 6 


Manual Version: 

V1.0


Model Code: 

4714


Oypla.com LLP

 / www.oypla.com 


Contents


Front Cover 

Safety 
Instructions 

Operating 
Instructions 

Cleaning 
Instructions 

Trouble 
Shooting 

Back Cover 


-


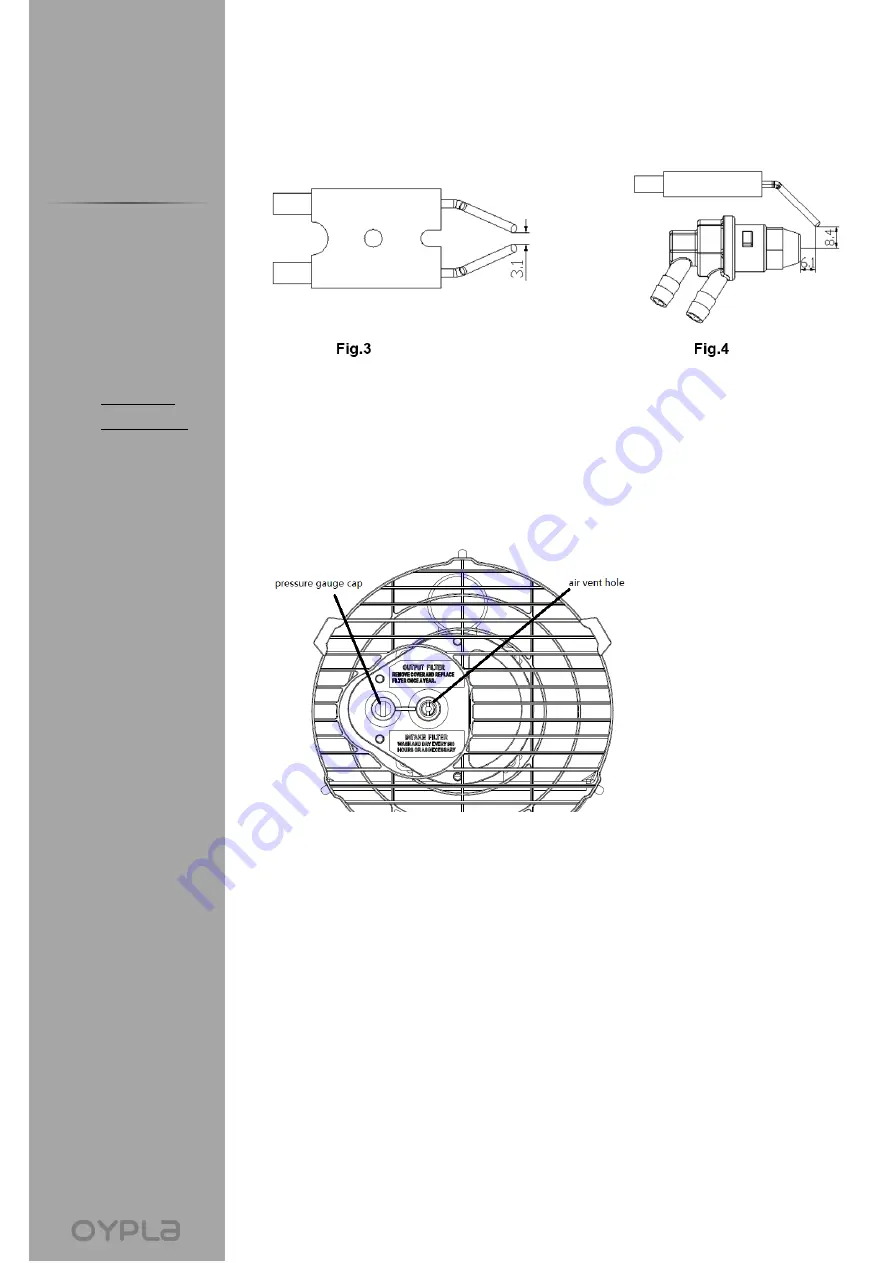
Ignition electrodes; Clean, adjust and if necessary, replace ignition electrode. For 
electrode gaps see Fig. 3-4 (dimensions in mm) 


-


Compressor pressure adjustment (see Fig. 5); Remove pressure gauge cap. Connect a 
pressure gauge on the pressure measuring port on the rear guard. Start heater and 
read air pressure value. If necessary, adjust pressure to the correct value turning the 
adjusting screw (the air vent hole in the adjusting screw middle) clockwise to increase, 
anti-clockwise to decrease the pressure. 

The compressor pressure is factory set and 

must be checked and adjusted ONLY by qualified technicians. Tampering with the 
unit may be dangerous.

 The target air pressure is 0.31bar. 


-


Electrical; Inspect cables, electrical parts and connections. 

Summary of Contents for 4714

Page 1: ...0 Model Code 4714 Oypla com LLP www oypla com User Manual Model Code 4714 20kW Industrial Heater Contents 1 Front Cover 2 Safety Instructions 4 Operating Instructions 5 Cleaning Instructions 7 Troubl...

Page 2: ...lways unplug the heater when it is not in use Even at the lowest setting the heater is still operating making it a potential fire hazard Clean only with a damp cloth Do not use strong industrial clean...

Page 3: ...et Never modify the plug in any way Do not use any adapter plugs with the appliance If operating a heater in a damp location is unavoidable use a residual current device RCD protected supply Avoid uni...

Page 4: ...switch to the on position If the thermostat control knob is set to higher than the ambient temperature the electrodes start sparking After 7 seconds the heater will start 4 If the thermostat knob is...

Page 5: ...th Do not use strong industrial cleaning substances or abrasive materials as these may damage the product Make sure the product is switched off unplugged from the socket and been left for an hour befo...

Page 6: ...emove pressure gauge cap Connect a pressure gauge on the pressure measuring port on the rear guard Start heater and read air pressure value If necessary adjust pressure to the correct value turning th...

Page 7: ...Version V1 0 Model Code 4714 Oypla com LLP www oypla com Contents 1 Front Cover 2 Safety Instructions 4 Operating Instructions 5 Cleaning Instructions 7 Trouble Shooting 8 Back Cover Wiring Diagram Tr...

Page 8: ...sposing of this product correctly will help save valuable resources and prevent any potential negative effects on human health and the environment which could otherwise arise from inappropriate waste...

Reviews: