set screw until you can tug on the cable without it slipping. It is highly recommended
that this step be completed by hand with a screwdriver and not with a power drill to pre-
vent the stripping of the set screw or possible damage to the amplifier. Once all of the
connections are complete we can continue to the next step.
Turning the Dials:
In this section we will cover the adjustments necessary to achieve great sound from
your new amplifier system.
�����
����
�����
����
����
��������
������
����������
���������
��������
���
���
���
���
����
����
����
��������
��������
���
����
�����
���
�������������
����
�����
���
����
�����
���
����
�����
����
�����
�����
�����
����
�������������
������������
����������
������
����
��
����
�������������
�����
�����
��
����
������
����������
������
��������
����
���
���
���
���
����
����
���������������
�����������
���������������
�����������
�������������������������
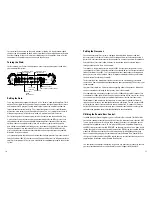
Setting the Gain:
It is a common misconception that the gain is the “volume” knob of the amplifier. This is
not true. The purpose of the gain adjustment is to match the signal output of the source
unit (aftermarket CD player or factory radio) to the input of the amplifier to allow the
largest amount distortion free play. This is important because the less total distortion
present the more volume you will be able to achieve. This is a simple process that will
allow you to get the gain very close to “dead on” without lots of trial and error.
First, with the gain at its lowest setting, turn on the vehicle, and the head unit. Using
a musical track that is dynamic and of good recording quality (no MP3’s please), turn
the volume of the source unit until audible distortion occurs (normally 3/4 of the way
up). Now reduce the volume roughly 1/8th of a turn. Next, slowly turn the amplifier
gain clockwise until audible distortion occurs, then reduce the gain by 1/8th turn. Now
the gain should be close to matched. Take a listen to several CD’s of different style
music and verify that the volume levels desired can be achieved without any audible
distortion. If so, you are done.
It is important to note that in head units with higher voltage preamps (we recommend >4
volts) full volume (100%) of the source unit will be possible as well as full potential of the
amplifier at verylow gain. The less gain utilized the less opportunity for noise to enter the
system.
Setting the Crossover:
Your new Vector amplifier system is equipped with adjustable high-pass and low-
pass crossovers. In order to set the crossover properly we must understand the job it
performs. A crossover determines which frequencies a chosen speaker will reproduce.
Subsonic filters (crossover) allow frequencies higherthan the one selected to pass
through to the speaker. Here is an example:
If a speaker is in a ported enclosure tuned to 35Hz, but the signal to speaker is carry-
ing frequencies of 10Hz – 200Hz the subsonic filter should be set to 35Hz to eliminate all
frequencies lower than 35Hz. This is recommended for all applications utilizing ported
boxes. Correct use of the subsonic filter will improve subwoofer efficiency and reduce
the possibility of overdriving the woofer.
In this situation many would adjust the bass at the source unit. However, this would
remove bass from the whole bandwidth producing poor sound quality. This action is not
recommended.
Low-pass filters work in a similar fashion except they allow all frequencies lowerthan
the one selected pass through to the speaker. Here is the example:
If a subwoofer has a frequency response of 28Hz – 150Hz and your other speakers are
crossedover at 100Hz you will find that this crossover setting will be very similar. Using
the same musical track as before at medium-high volume slide the crossover selec-
tor to low-pass, and slowly turn the frequency selector counter-clockwise (lower in
frequency) until all vocals and audible distortion are eliminated. Test the system at 90%
of full volume to check if sound continues to be distortion free. If it does the setting is
correct. With correct crossover settings your subwoofer should blend seamlessly into
your midrange providing you with full bandwidth with excellent fidelity.
Utilizing the Remote Bass Control:
Included with your Vector amplifier system is a Remote Bass Control. This RBC allows
you to have subwoofer control from the driver’s seat. An important note is that the RBC
is not a master gain you will still have to go through the process of setting the gain at
the amplifier for optimum results. To use, plug the RBC cable (supplied with the amp
and RBC) into the terminal marked “REMOTE” on the amplifier. Once this is done, begin
routing the cable to the location you wish to mount the RBC. Using the supplied bracket
mount the RBC. Continue routing the cable (away from all moving linkage and sharp
edges.) and finish by plugging the remaining end into the Remote Bass Control. When
the system is active the blue led on RBC should light up, test the function and you have
completed the installation of your Remote Bass Control.
This completes the amplifier installation. If you have any questions or concerns contact
your local authorized dealer or call Oz Audio Technical Support at 561-998-0211.
11
10


