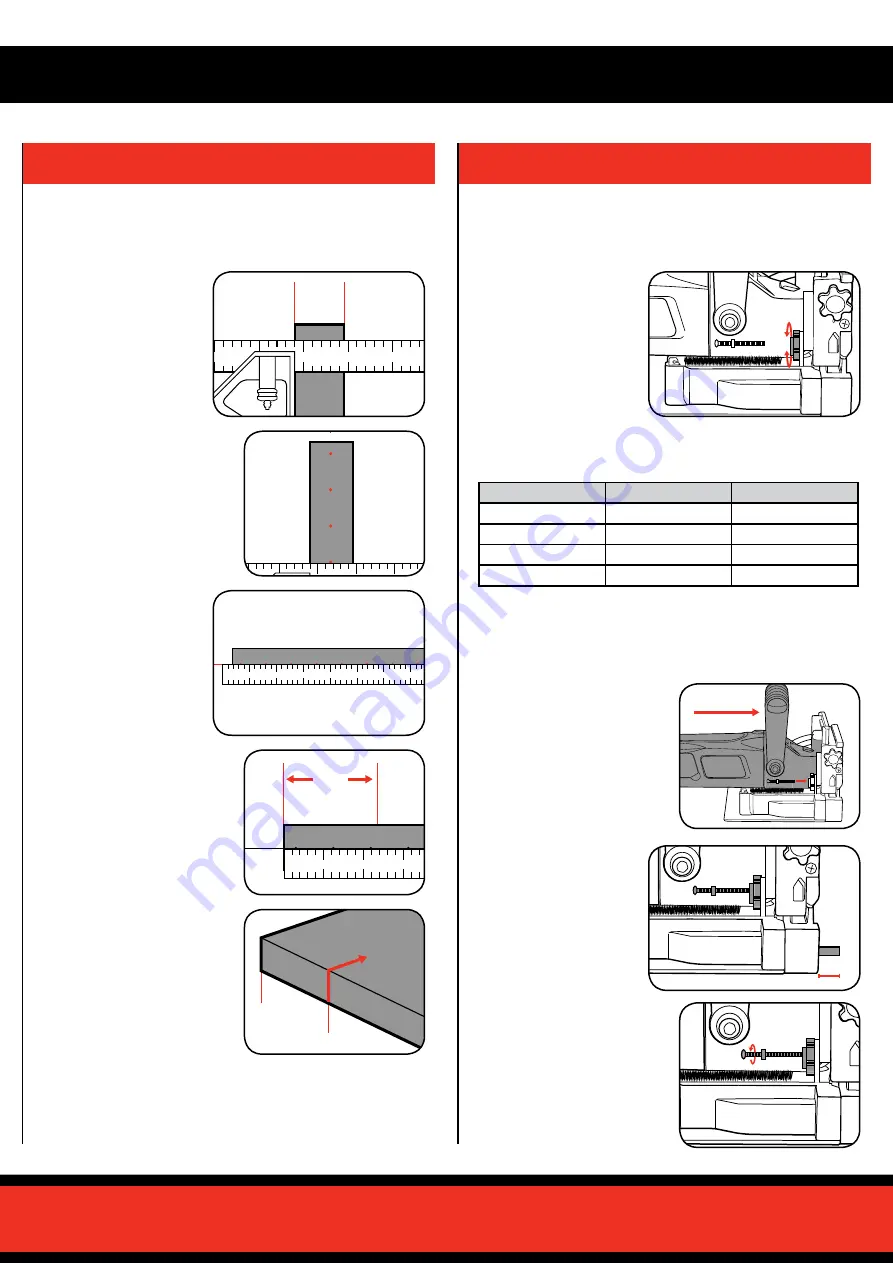
2. MARKING THE WORKPIECE
3. ADJUSTING THE CUTTING DEPTH
Centrelines
1 Measure the width of
your workpiece with a
square.
The centreline of the workpiece and the centreline of the biscuit must
be lined up accurately to ensure a successful joint. The centreline
marking procedure is outlined below.
2 Divide the measurement by 2
to get the midpoint. Mark this
point several times along the
workpiece with a pencil.
3 Using a ruler, mark
the centreline across
the entire face of the
workpiece.
4 Using a square measure, mark
a line 65mm from the edge of
the workpiece.
Note:
65mm is the recommended
distance from the edge
of the workpiece to the
centreline of the biscuit.
5 Using a square, draw a
continuation of the centreline
on the top of the workpiece
for use when aligning the
centreline indicator of your
biscuit joiner.
1 Set the depth adjustment dial
using the procedure above,
then extend the blade until the
depth stop contacts the depth
adjustment dial.
3 To adjust the scale, rotate
the depth stop screw until the
depth of the blade matches the
scale as outlined in the above
table. Repeat this process for
each depth setting.
measure
65mm
65mm
Adjusting the Cutting depth
Checking the Accuracy of the depth Stop
1 Rotate the depth
adjustment dial so that
it clicks into the desired
setting.
2 Measure the distance
between the blade and
the face of the fence.
The depth adjustment dial controls the depth of the cut made in the
workpiece as required for your biscuit.
Your choice of biscuit is dictated by the size of the workpiece. The
following table shows the relationship of the markings on the depth
adjustment dial to cutting depth and the biscuit used.
Note:
It is recommended to check the accuracy of the depth adjustment
dial as part of your setup procedure.
Marking
Biscuit
Cutting depth
0
#0
8mm
10
#10
10mm
20
#20
12.5mm
M
N/A
14mm (maximum)


