background image

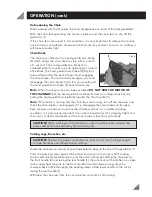
Re-tensioning the Chain

When working with the chainsaw, the chain (6) expands as a result of the heat generated.

With the chain (6) expanding, the tension slackens and the chain (6) can slip off the
guide bar (7).

If the chain (6) is tensioned in this condition, it is very important to release the tension
once cutting is completed, otherwise the chain (6) may contract so much on cooling, it
will be excessively tight.
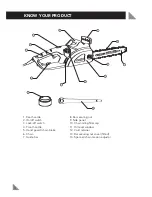
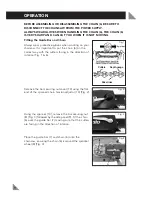
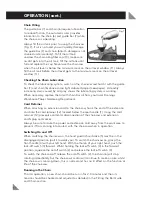
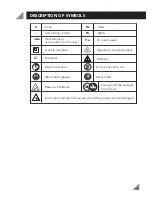
Chain Brake

The chainsaw is fitted with a hand guard/chain brake
(5) which brings the chain (6) to a stop within a tenth 
of a second. The hand guard/chain brake (5) is
actuated either manually or while operating as a result
of kickback, the hand guard/chain brake (5)(Fig. 8) is
pushed forward by the back of your hand engaging
the chain brake. To use the chainsaw again, you must
disengage the chain brake, to do this you should pull
the hand guard/chain brake (5) back towards you.

Note: 

When the chain brake has been actuated 

DO NOT RUN THE MOTOR OF

THE CHAINSAW. 

Set the hand guard/chain brake (5) back to its original position, by

pulling the hand guard/chain brake (5) towards the front handle (4).

Note: 

If the motor is running and the chain (6) is not turning, turn off the chainsaw and

check the chain brake is not engaged, if it is, disengage the chain brake and try again.

Each time you are about to use the the chainsaw, check it is in perfect working
condition. It is particularly important to ensure the guide bar (7) is properly fitted, the
chain (6) is correctly tensioned and the chain brake is functioning correctly.

CAUTION! 

When working with the chainsaw, care should be taken to keep the

power and extension cord away from the chain (6).

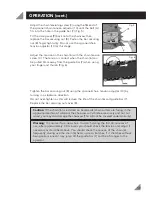
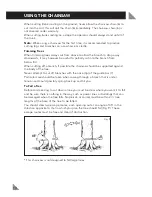
Cutting Logs, Branches, etc.

CAUTION! 

Position the power and extension cord so that it will not get caught

on tree branches and foliage during cutting.

Guide the chainsaw so no part of your body extends beyond the line of the guide bar (7).

Press the bucking spikes against the timber ensuring the chain (6) is NOT making
contact with the material being cut, only then start cutting by holding the chainsaw by
the front handle (4) and raising the rear handle (1). If you cannot cut the timber in a single
stroke, apply light pressure to the front handle (4) and continue sawing, draw the
chainsaw back a little then apply the bucking spikes a little lower and finish the cut by
raising the rear handle (1).

Withdraw the chainsaw from the cut while the chain (6) is still running.

12

OPERATION (cont.)

Fig. 8

Summary of Contents for CSE-355

Page 1: ...Electric Chainsaw 1800W Instruction Manual 2 Year Replacement Warranty CSE 355 CAUTION Read this instruction manual before using this tool To view the full range visit www ozito com au 1010...

Page 2: ...ION ELECTRICAL SAFETY GENERAL SAFETY INSTRUCTIONS ADDITIONAL SAFETY INSTRUCTIONS FOR CHAINSAWS OPERATION USING THE CHAINSAW MAINTENANCE SPARE PARTS DESCRIPTION OF SYMBOLS WARRANTY Page 2 Page 2 Page 3...

Page 3: ...tch 9 5mm 3 8 Sharpening File 5 32 Chain Oiling Automatic Oil Tank Capacity 140ml Tool Weight 4 55kg 2 SPECIFICATIONS MODEL NO CSE 355 1 x Chainsaw CSE 355 1 x Chain 1 x Chain Bar and Cover 1 x Bottle...

Page 4: ...witch 4 Front handle 5 Hand guard chain brake 6 Chain 7 Guide bar 8 Bar securing nut 9 Side panel 10 Chain oiling filler cap 11 Oil level window 12 Cord retainer 13 Bar securing nut cover fitted 14 Sp...

Page 5: ...30V and 240V only Always check that the power supply corresponds to the voltage on the rating plate Note The supply of 230V and 240V on Ozito tools are interchangeable for Australia and New Zealand Th...

Page 6: ...ols to rain or wet conditions Water entering a power tool will increase the risk of electric shock d Do not abuse the cord Never use the cord for carrying pulling or unplugging the power tool Keep cor...

Page 7: ...unplugged out of the reach of children and do not allow persons unfamiliar with the power tool or these instructions to operate the power tool Power tools are dangerous in the hands of untrained users...

Page 8: ...fixed secure and level surface Slippery or unstable surfaces such as ladders may cause a loss of balance or control of the chain saw When cutting a limb that is under tension be alert for spring back...

Page 9: ...oper precautions are taken Do not let go of the chain saw Do not overreach and do not cut above shoulder height This helps prevent unintended tip contact and enables better control of the chain saw in...

Page 10: ...ain 6 on the correct way with the cutters facing in the direction of rotation Fig 1 6 Remove the bar securing nut cover 13 using the flat end of the spanner chain tension adjustor 14 Fig 2 Using the s...

Page 11: ...djustor 14 by turning in a clockwise direction Do not over tighten as this will reduce the life of the chain 6 and guide bar 7 Replace the bar securing nut cover 8 Caution If the chain 6 is installed...

Page 12: ...Cord Retainer When attaching an extension cord to the chainsaw hook the end of the extension cord into the cord retainer 12 located below the rear handle 1 Using the cord retainer 12 prevents acciden...

Page 13: ...is running and the chain 6 is not turning turn off the chainsaw and check the chain brake is not engaged if it is disengage the chain brake and try again Each time you are about to use the the chains...

Page 14: ...w should be supported against the body of the tree Never attempt to cut off branches with the nose tip of the guide bar 7 Particular care should be taken when sawing through a branch that is under ten...

Page 15: ...d tear and can be removed with a flat file If the top rail of the guide bar 7 is uneven use a flat file to restore them to the same height Fig 10 The bottom edge of the guide bar 7 is exposed to heavy...

Page 16: ...spark and or stop The brushes are a wearing component of the chainsaw and should be replaced prior to the carbon wearing out fully Brushes will wear out after many uses but before they do contact Ozi...

Page 17: ...eware of kickback Beware of debris being Regulator compliance mark V Volts Hz Hertz Alternating current W Watts min Revolutions or reciprocation per minute Double insulated no No load speed Warning Di...

Page 18: ...es the need for landfill and raw materials Reuse of recycled material decreases pollution in the environment Please recycle packaging where facilities exist Check with your local council authority for...

Page 19: ...wing actions will result in the warranty being void If the tool shows signs of damage or defects caused by or resulting from abuse accidents or alterations If the tool has been disassembled or tampere...

Reviews: