background image

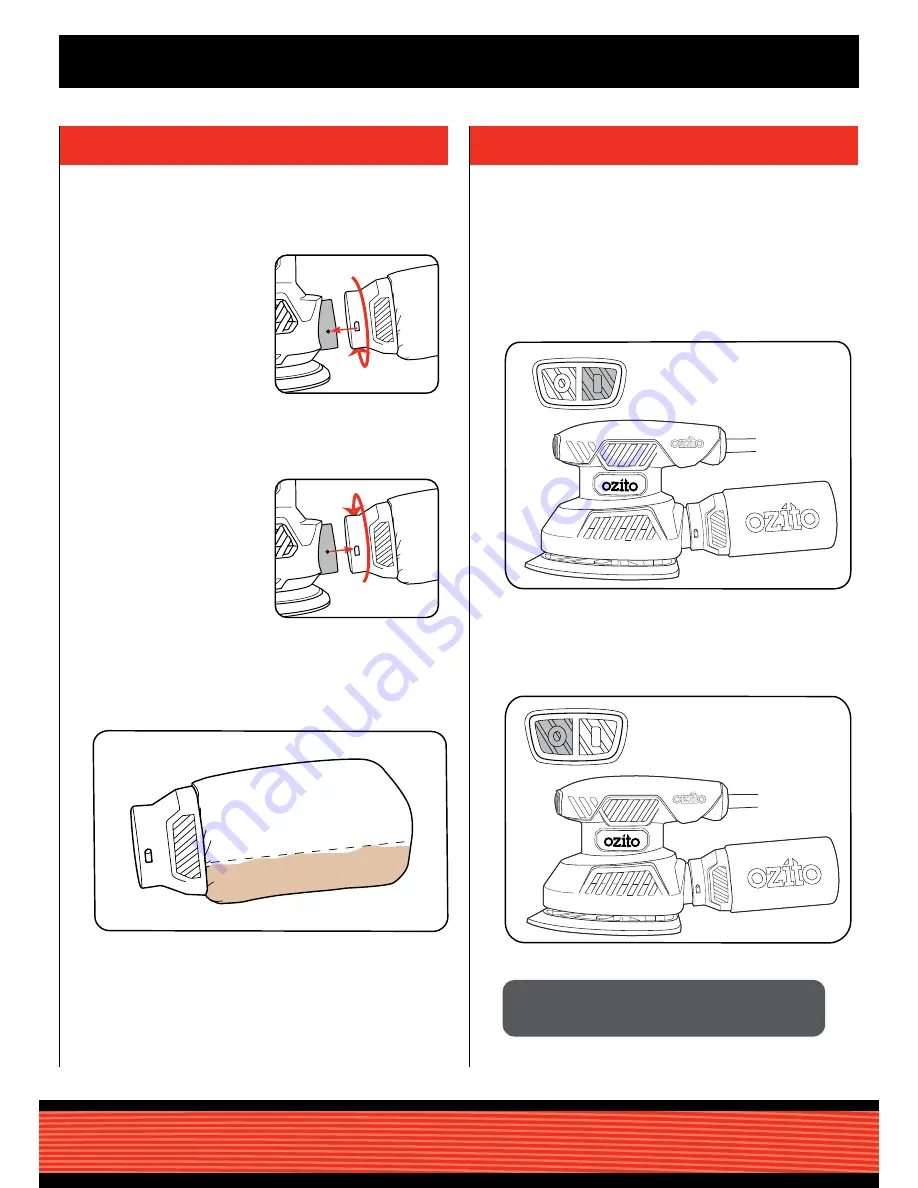
2.  DUST BAG

3.  ON/OFF SWITCH

2.   To turn on, press the on/off switch to the “I” position.

3.   To turn off, depress the on/off switch to the “0” position.

2.   To remove, pull 

the dust bag away 

from the extraction 

port.

1.   Push the dust 

bag onto the dust 

extraction port.

CAUTION:

 GUIDE THE CORD DURING SANDING TO 

PREVENT IT BEING CAUGHT ON THE  WORKPIECE, 

OR OTHER OBJECTS.

OPERATION

1/3

The tool is recommended for use with a residual current 

device with a rated residual current of 30mA or less.

1.   Connect the tool to the mains power supply.

2.   Empty dust bag when it becomes 

1

/

3

 full for optimum dust extraction.

Install

Remove

Empty

Summary of Contents for DETAIL SANDER

Page 1: ... 125W INSTRUCTION MANUAL SPECIFICATIONS Motor 125W No Load Spead 14 000 opm Paper Fitment Hook and Loop Power Cord 2m SAA Weight 1 02kg DSR 2100 WHAT S IN THE BOX Detail Sander Sandpaper Sheet Dust Bag ozito com au ...

Page 2: ... with the holes on the sanding pad 5 Dust Bag 6 Hook Loop Sanding Sheet ACCESSORIES 1 On Off Switch 2 Hook Loop Backing Pad 3 Soft Grip 4 Dust Bag Adaptor DETAIL SANDER SETUP PREPARATION 2 Replace the sanding sheet when it is worn 3 Replace hook loop backing pad when worn see maintenance section Ensure the tool is disconnected from the power supply before performing any of the following operations...

Page 3: ...ush the dust bag onto the dust extraction port CAUTION GUIDE THE CORD DURING SANDING TO PREVENT IT BEING CAUGHT ON THE WORKPIECE OR OTHER OBJECTS OPERATION 1 3 The tool is recommended for use with a residual current device with a rated residual current of 30mA or less 1 Connect the tool to the mains power supply 2 Empty dust bag when it becomes 1 3 full for optimum dust extraction Install Remove E...

Page 4: ...e 3 Let the motor build up to maximum speed Gradually lower it onto the workpiece with a slight forward movement 4 For optimum results use either of these strokes 5 Upon completion of the sanding operation remove the sander from the workpiece Turn off the sander 1 Secure the material to be sanded ...

Page 5: ...es should only be replaced by a qualified electrician or power tool repairer Sandpaper Selection Selecting the correct grit of sandpaper is an important step in achieving optimum results Coarse grit will remove the most material Finer grit will produce a smoother finish The condition of the workpiece will determine the grit of the sandpaper to be used The higher the grit number the finer the grade...

Page 6: ...s can be ordered through the Special Orders Desk at any Bunnings Warehouse If you have any further questions please contact Ozito Customer Service on Australia 1800 069 486 New Zealand 0508 069 486 enquiries ozito com au The following is a list of spare parts carried by Ozito Please contact Customer Service for any parts not listed 1 2 3 4 5 6 7 8 9 10 11 12 13 14 15 16 17 18 19 20 21 22 23 24 25 ...

Page 7: ...ses or dust Power tools create sparks which may ignite the dust or fumes c Keep children and bystanders away while operating a power tool Distractions can cause you to lose control 2 Electrical safety a Power tool plugs must match the outlet Never modify the plug in any way Do not use any adapter plugs with earthed grounded power tools Unmodified plugs and matching outlets will reduce risk of elec...

Page 8: ...he tool is disassembled or tampered with in any way WARRANTY TO ENSURE A SPEEDY RESPONSE PLEASE HAVE THE MODEL NUMBER AND DATE OF PURCHASE AVAILABLE A CUSTOMER SERVICE REPRESENTATIVE WILL TAKE YOUR CALL AND ANSWER ANY QUESTIONS YOU MAY HAVE RELATING TO THE WARRANTY POLICY OR PROCEDURE OZITO Australia New Zealand Head Office 1 23 Letcon Drive Bangholme Victoria Australia 3175 The benefits provided ...

Reviews: