OZTIL750WA
3. STARTING & STOPPING
4. OPERATING THE TILLER
OPERATION
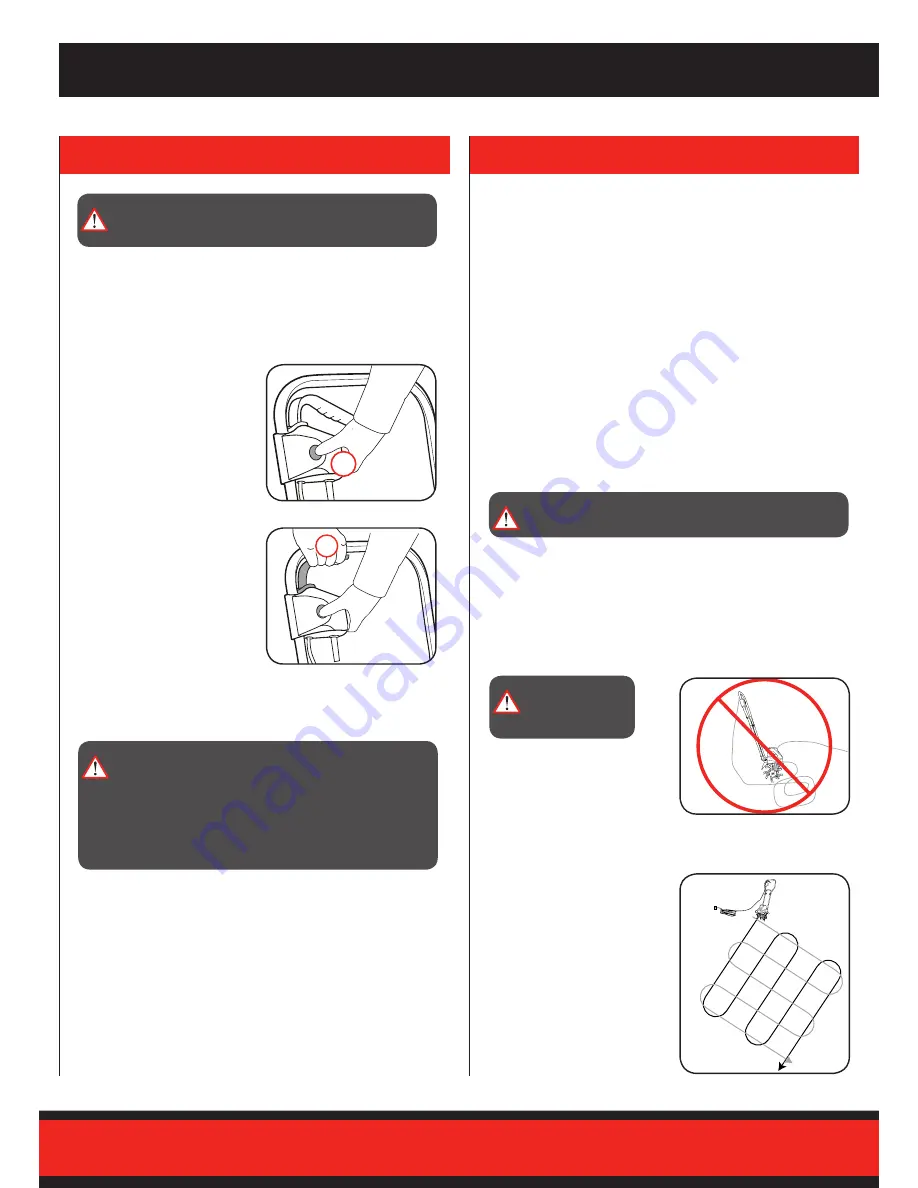
1. To start the tiller, press and
hold the Lock-off Button.
¥
Water the work area prior to commencing tilling operation.
¥
Move the tiller to the work area prior to starting the motor.
¥
Hold the tiller firmly while switching it on. The tines will pull
the tiller forward during operation.
¥
Hold the upper handle securely, walk backwards slowly and
allow the tines to dig into the work area.
¥
For breaking sod or deep tilling, allow the tines to pull the
tiller forward to the end of your arm’s reach, then firmly pull
the tiller back towards you. By repeatedly allowing the tiller to
move forward and then pulling back to you, the tiller will be
most effective.
¥
For better results, move the machine forward as well as
backwards.
¥
If the tiller digs deep enough to stay in one spot, gently rock
the tiller side to side to start the tiller moving forward again.
¥
Lay the power cable on the ground in front of the outlet in
a figure 8. Work away from the outlet or cable and ensure
that the power cable always trails in the hoed soil which will
prevent the hoe blades from travelling over the cable.
1
2
1
2
WARNING!:
THE POWER SUPPLY FOR THIS PRODUCT
SHOULD BE PROTECTED BY A RESIDUAL CURRENT
DEVICE RATED AT 30mA OR LESS.
Starting the Tiller
For your safety the Tiller is designed with a safety switch. If the
Start/Stop Lever is squeezed, the tiller will not operate. This
prevents accidental start up of the tiller.
2. Pull the Start/Stop Lever
towards the handle, the
motor will start and the Tines
will begin to rotate, then
release the Lock-off Button.
1. Release the Start/Stop Lever to stop the Tiller.
Stopping the Tiller
Tips
For preparing seed bed, we recommend using one of the tilling
patterns.
Tilling Pattern A - Make two
passes over area to be tilled,
the second at a right angle to
the first.
WARNING!:
KEEP
POWER CORD
AWAY FROM TINES.
WARNING!:
THE TILLER BLADES WILL CONTINUE TO
ROTATE FOR A FEW SECONDS AFTER THE MOTOR
IS SWITCHED OFF . NEVER ATTEMPT TO MANUALLY
STOP THEM. IN THE EVENT THAT THE ROTATING TILLER
BLADE STRIKES AN OBJECT, IMMEDIATELY SWITCH OFF THE
MACHINE AND WAIT FOR THE TILLER BLADES TO COME TO
A COMPLETE STOP. THEN INSPECT THE CONDITION OF THE
BLADES.
Overload Protection
The tiller has an internal cut off switch which will stop the
operation of the motor temporarily if too high in temperature.
This cut off switch will suddenly stop the motor from operating
should the motor become too hot during the operation of the
tiller.
First disconnect the tiller from the power supply and inspect
blade for any obstructions.
A wait of 10 minutes in cooling time, or longer depending on
ambient temperature and the operation being performed,
before switching On the tiller and resuming normal operation.
CAUTION!:
BE PARTICULARLY CAREFUL WHEN YOU PULL
THE MACHINE TOWARD YOURSELF.


