ONLINE MANUAL
Scan this QR Code with
your mobile device to take
you to the online manual.
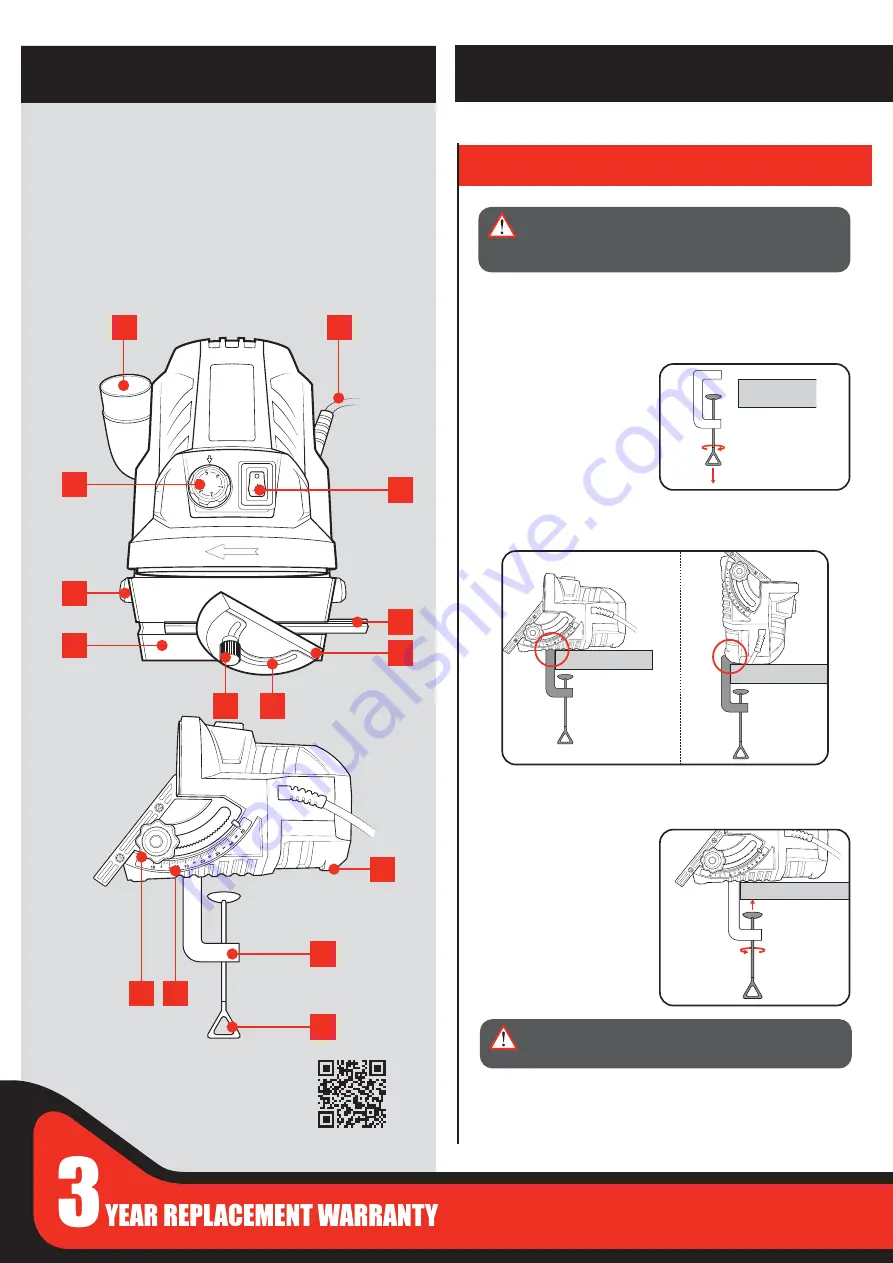
Securing The Disc Sander
This mini disc sander can be mounted vertically or horizontally onto
your bench to suit the workpiece being sanded.
1. Unwind the screw on the
C-clamp bracket so that it fits
over your workbench.
2. Position the sander vertically or horizontally on the workbench
and slide the free end of the C-clamp bracket into the appropriate
mounting slot on the tool.
Note:
Ensure the free end of the C-clamp is fully inserted into the
slot.
3. Wind up the screw on the
C-clamp to lock the sander
against your workbench.
Note:
Ensure the entire surface
of the C-clamp screw is pushed
fully against the workbench.
WARNING!
DO NOT TURN ON THE TOOL UNTIL THE
SCREW IS TIGHTENED SUFFICIENTLY SO THAT THE
SANDER IS UNABLE TO MOVE AROUND.
1. Dust Extraction Port
2. Power Cord
3.
On/Off Switch
4. Fence Rail
5. Mitre Fence
6. Mitre Angle Guide
7. Fence Adjustor Screw
8. Tilt Table
9. Table Adjustor Screw
10. Speed Control Dial
11. Vertical Mounting Slot
12. C-Clamp Bracket
13. Clamp Screw
14. Tilt Angle Guide
15. Angle Increment Dial
MINI BENCH DISC SANDER
KNOW YOUR PRODUCT
1. ASSEMBLY
SETUP & PREPARATION
1
2
10
8
14
15
3
5
11
4
12
13
9
7
6
WARNING!
ENSURE THE TOOL IS TURNED OFF
AND DISCONNECTED FROM THE POWER SUPPLY
BEFORE PERFORMING ANY OF THE FOLLOWING
OPERATIONS.


