OPERATION (cont.)
11
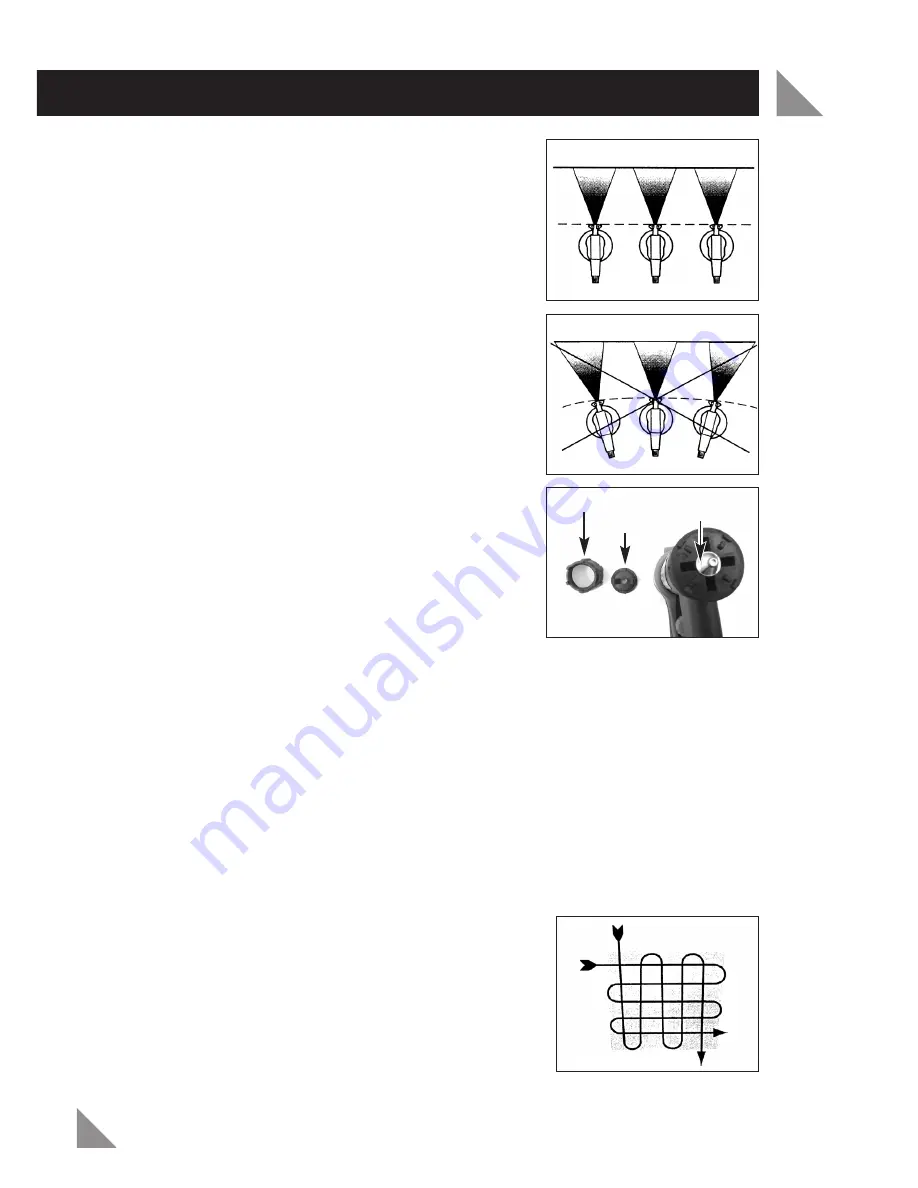
Always hold the spray gun at an even distance from
the object to be sprayed. The distance will very with
the type of paint being sprayed, 20cm is suggested
to start with and adjust if necessary. Move the spray
gun evenly across or up and down, depending on
the adjusted spraying effect (Fig. 9).
The movement of the spray gun should be by the
arm rather than the wrist to ensure that the space
between the spray gun and surface remains the
same throughout the operation.
Uneven movement of the spray gun will give a
uneven surface quality (Fig.10). A even movement of
the spray gun will give a uniform surface quality.
If coating material builds up on the nozzle (2) and
air cap (1) (Fig.11). Remove the air cap nut and air
cap (1). Clean both parts and around nozzle (2) with
solvent or water using a stiff brush.
If the nozzle (2) becomes blocked it can be removed
by using a 9mm open ended spanner, carefully
unscrew from the paint head. Clean the nozzle (2)
and remove any paint build up. Be careful not to
damage the nozzle (2) as this will affect the spray gun performance.
Helpful Hints
1. Do not spray outdoors on a windy day as the results may be unsatisfactory.
2. Evenly control the speed of movement of the spray gun. A fast speed will give
a thin coat and a slow speed will give a heavy coat.
3. Only apply one coat at a time. If a further coat is required follow the paint
manufacturers instructions for re-coating and drying times.
4. If spraying small areas or objects keep the output setting low as this will avoid
excessive use of paint and will minimise overspray.
5. When spraying large areas or objects, it is best to
use a crisscross pattern, either from left to right
then up or down or vice-versa. This will ensure
maximum coverage (Fig. 12).
6. Avoid stopping and starting when spraying as this
can lead to too much or not enough paint on a
surface.
7. To ensure edges are covered, commence spraying just to the side of an area
being sprayed, continue and do not stop until the spray has gone past the
opposite edge.
Fig. 9
Fig. 10
Fig. 11
Fig. 12
1
2
Air cap nut
Summary of Contents for MPS-700
Page 1: ......


