background image

3.  ASSEMBLY

4.  CONTROLS

OPERATION

Switching On and Off

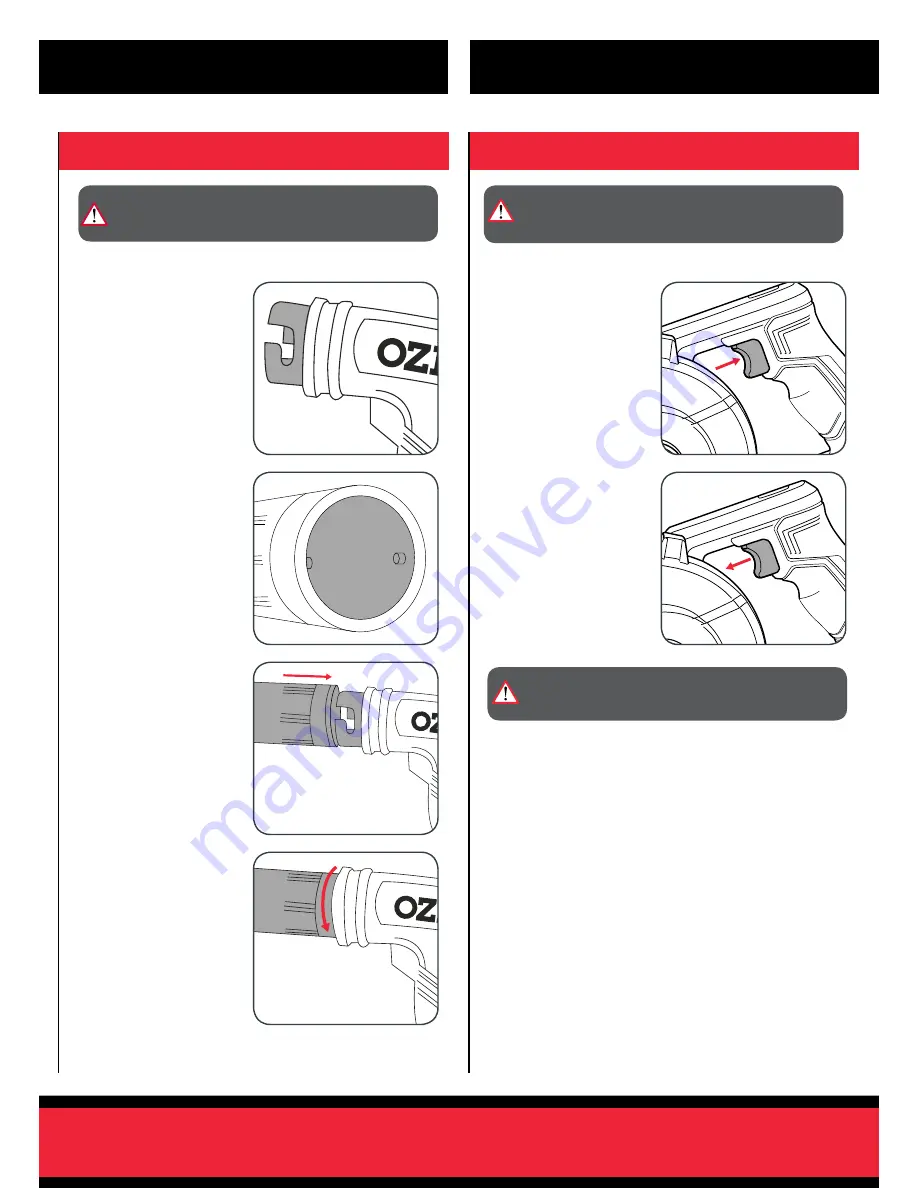
Connecting the blower nozzle

WARNING!


DO NOT USE THE BLOWER WITH ANY 

ACCESSORIES OR ATTACHMENTS OTHER THAN THOSE 

SUPPLIED. SUCH USAGE MIGHT BE HAZARDOUS.

WARNING!


DO NOT PUT PART OF YOUR BODY SUCH 

AS HANDS AND FINGERS NEAR THE INLET OR OUTLET 

OPENING.

2   To stop the blower 

release the on/off switch.

2   Both the blower nozzle 

and central inflation 

adaptor are fitted with 

internal nodes that line 

up and slot into the 

blower housing.

4   To lock into place, rotate 

nozzle in clockwise 

direction until nozzle 

clicks into place.

5   To remove blower 

nozzle, rotate in anti-

clockwise direction.

3   Line up the internal 

nozzle nodes with 

workshop blower housing 

and slide into place.

1   To start the blower 

squeeze the on/off 

switch.

1   The workshop blower 

end is equipped with 

slots to ensure nozzles 

and adaptors lock into 

place and remain fitted 

during use.

WARNING!


ENSURE THE TOOL IS SWITCHED OFF AND 

DISCONNECTED FROM THE POWER SUPPLY BEFORE 

PERFORMING ANY OF THE FOLLOWING TASKS.

Summary of Contents for PXWBS-200

Page 1: ...ium Ion INSTRUCTION MANUAL SPECIFICATIONS Voltage 18V No Load Speed 15 500 min Max Air Speed 78km hr Weight 1 0kg PXWBS 200 WHAT S IN THE BOX Cordless Workshop Blower Inflation Adaptors x 3 ozito com au Battery Charger sold separately ...

Page 2: ...harger LED Indicator LED Indicator Situation GREEN Flashing Stand By no battery pack is inserted RED Flashing Battery is charging low charge RED Illuminated Battery is charging mid charge GREEN Illuminated Battery is fully charged BOTH Illuminated Battery pack is too hot or too cold charging will begin automatically when battery reaches correct charging temperature BOTH Flashing Defective battery ...

Page 3: ...nated Battery is charging low charge GREEN Illuminated Battery is fully charged RED Flashing Battery or Charger fault RED GREEN Flashing Battery pack is too hot or too cold remove battery from charger and store at room temperature 20ºC Insert battery again when at correct charging temperature If this happens again the battery is defective and needs to be replaced Inserting Removing the Battery not...

Page 4: ... fitted with internal nodes that line up and slot into the blower housing 4 To lock into place rotate nozzle in clockwise direction until nozzle clicks into place 5 To remove blower nozzle rotate in anti clockwise direction 3 Line up the internal nozzle nodes with workshop blower housing and slide into place 1 To start the blower squeeze the on off switch 1 The workshop blower end is equipped with...

Page 5: ...housing and rotate adaptor clockwise until it clicks into locked position 4 To fit inflation adaptor to a small inlet use either of the other 2 adaptor ends Fit larger end of smaller adaptor piece to central adaptor 5 Fit small end of adaptor to the inlet on the device to be inflated Once fitted use On Off switch to inflate device 6 To Remove adaptor turn in anti clockwise direction Note Be aware ...

Page 6: ...all instructions and cautionary markings on the charger battery pack and the product using the battery pack 2 This charger is not intended for any uses other than charging rechargeable batteries Any other use may result in risk of fire electric shock or electrocution 3 Do not place any object on top of the charger or place the charger on a soft surface that may result in excessive internal heat Pl...

Page 7: ...es ensure these are connected and properly used Use of dust collection can reduce dust related hazards 4 Power tool use and care a Do not force the power tool Use the correct power tool for your application The correct power tool will do the job better and safer at the rate for which it was designed b Do not use the power tool if the switch does not turn it on and off Any power tool that cannot be...

Page 8: ...repaired or replaced if the goods fail to be of acceptable quality and the failure does not amount to a major failure Generally you will be responsible for all costs associated with a claim under this warranty however where you have suffered any additional direct loss as a result of a defective product you may be able to claim such expenses by contacting our customer service helpline above 0715 WA...

Reviews: