background image

ONLINE MANUAL

Scan this QR Code with your 

mobile device to take you to 

the online manual.

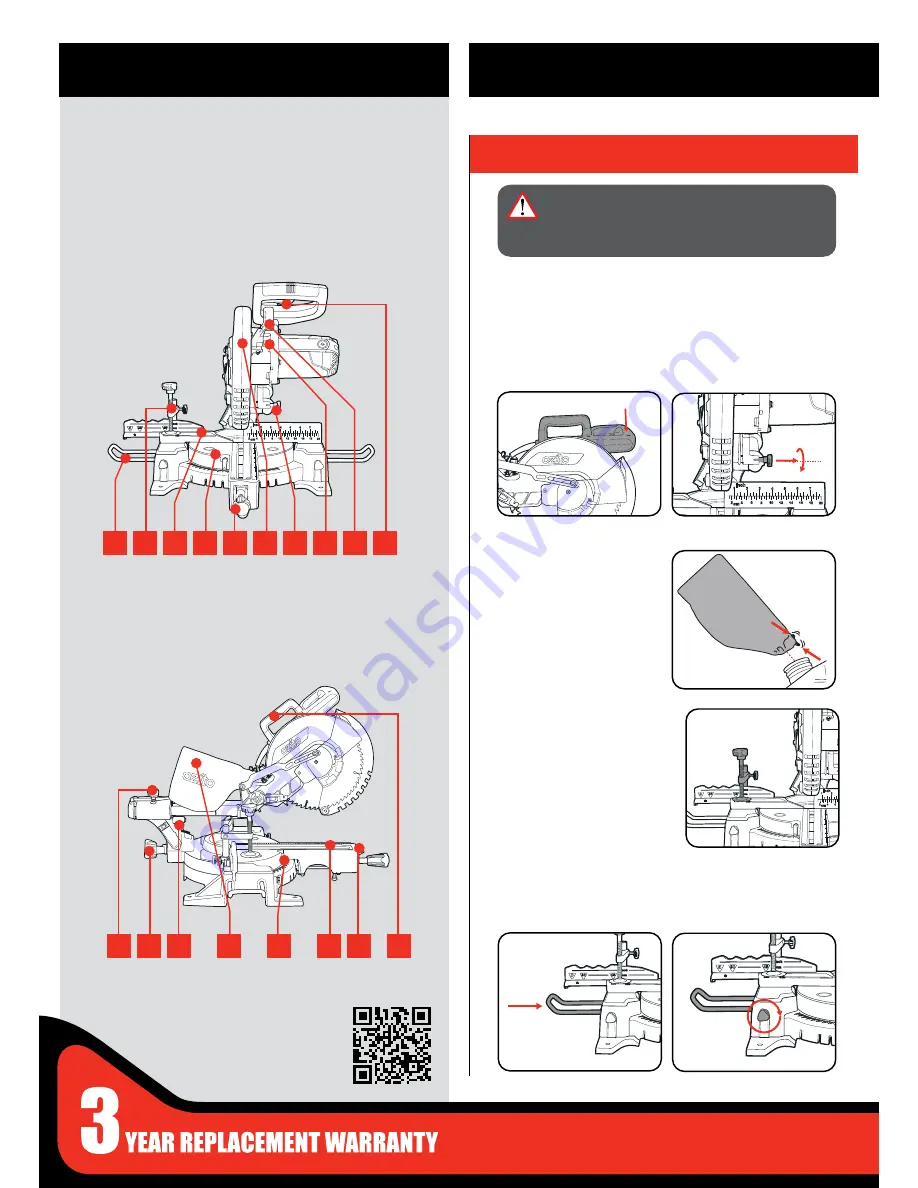
1  Material Support Bar  
2  Material Clamp
3 Fence
4  Mitre Table 
5  Mitre Table Lock 

6  Retractable Safety Guard 
7  Lock Down Pin
8  Spindle Lock Button 
9  Release Lever
10 Trigger

MITRE SAW 

KNOW YOUR PRODUCT

1.  ASSEMBLY

1.   Remove foam packaging materials and using the carry handle, 

carefully lift the mitre saw from its box and place it on a level 

work surface.

1.   Squeeze the clamp at the 

end of the dust bag, place 

over the dust extraction 

port.

1.   Insert each bar into the 

two holes located on 

both sides of the base.

2.   Release cutting head from its transport position. While holding 

the head of the saw down release the lock down pin by rotating 

it 90 degrees.

11 Slide Lock
12 Bevel Lock
14 Dust Bag
13 Laser Guide

15 Mitre Angle Pointer
16 Table Insert
17 Mitre Release
18 Carry Handle

SETUP & PREPARATION

Unpacking

Material Support Bars

Dust Bag

WARNING!

 ENSURE THE TOOL IS SWITCHED 

OFF AND DISCONNECTED FROM THE POWER 

SUPPLY BEFORE PERFORMING ANY OF THE 

FOLLOWING PROCEDURES.

2.   Tighten screw when in 

place. 

Material clamp will assist 

securing timber when making 

cuts.

Note:

 The clamp can be 

mounted on either the left or 

right side of the blade.

Material Clamp

1

11 12 13

14

15

16 17 18

2 3 4 5 6 7 8 9 10

Summary of Contents for SCMS-10STAND

Page 1: ...ltage other than that specified on the tool If the tool shows signs of damage or defects caused by or resulting from abuse accidents or alterations Failure to perform maintenance as set out within the...

Page 2: ...ar into the two holes located on both sides of the base 2 Release cutting head from its transport position While holding the head of the saw down release the lock down pin by rotating it 90 degrees 11...

Page 3: ...itre saw stand This provides the flexibility to transport the Mitre Saw to other work areas WARNING ENSURE THE MITRE TABLE LOCK IS TIGHT BEFORE MAKING A CUT FAILURE TO DO SO MAY RESULT IN THE MITRE TA...

Page 4: ...cutting the grain of the workpiece A 90 straight cut is made with the mitre scale set in the 0 00 450 450 Mitre Mitre cuts are made with the mitre scale set at an angle other than 0 450 Left 450 450...

Page 5: ...rear fence Place the workpiece flat on the mitre table with one edge securely against the rear fence Note If the workpiece is warped ensure the concave curves inward side is against the rear fence Wor...

Page 6: ...ITH THE BLADE TEETH POINTING DOWNWARDS ENSURE THE ARROW DIRECTION ON THE BLADE CORRESPONDS WITH THE ARROW ON THE UPPER BLADE GUARD MAINTENANCE Blade Bolt Inner Flange Outer Flange Blade Spindle Fence...

Page 7: ...lities exist Check with your local council authority for recycling advice V Volts Hz Hertz Alternating current W Watts min Revolutions or reciprocation per minute Double insulated no No load speed War...

Page 8: ...replaced by a specially prepared cord available through the service organization Note Double insulation does not take the place of normal safety precautions when operating this tool The insulation sys...

Page 9: ...mponents from the box and group matching pieces together Check that you have all the contents listed in this manual 2 Lay two legs on the ground and one long lower support in between the legs aligning...

Page 10: ...hers washers and nuts should be used to secure the saw to the top of the stand 6 Align one short lower support inside the legs at the same height as the long lower support Ensure that the lip of the s...

Reviews: