background image

1

ONLINE MANUAL

Scan this QR Code with your 

mobile device to take you to 

the online manual.

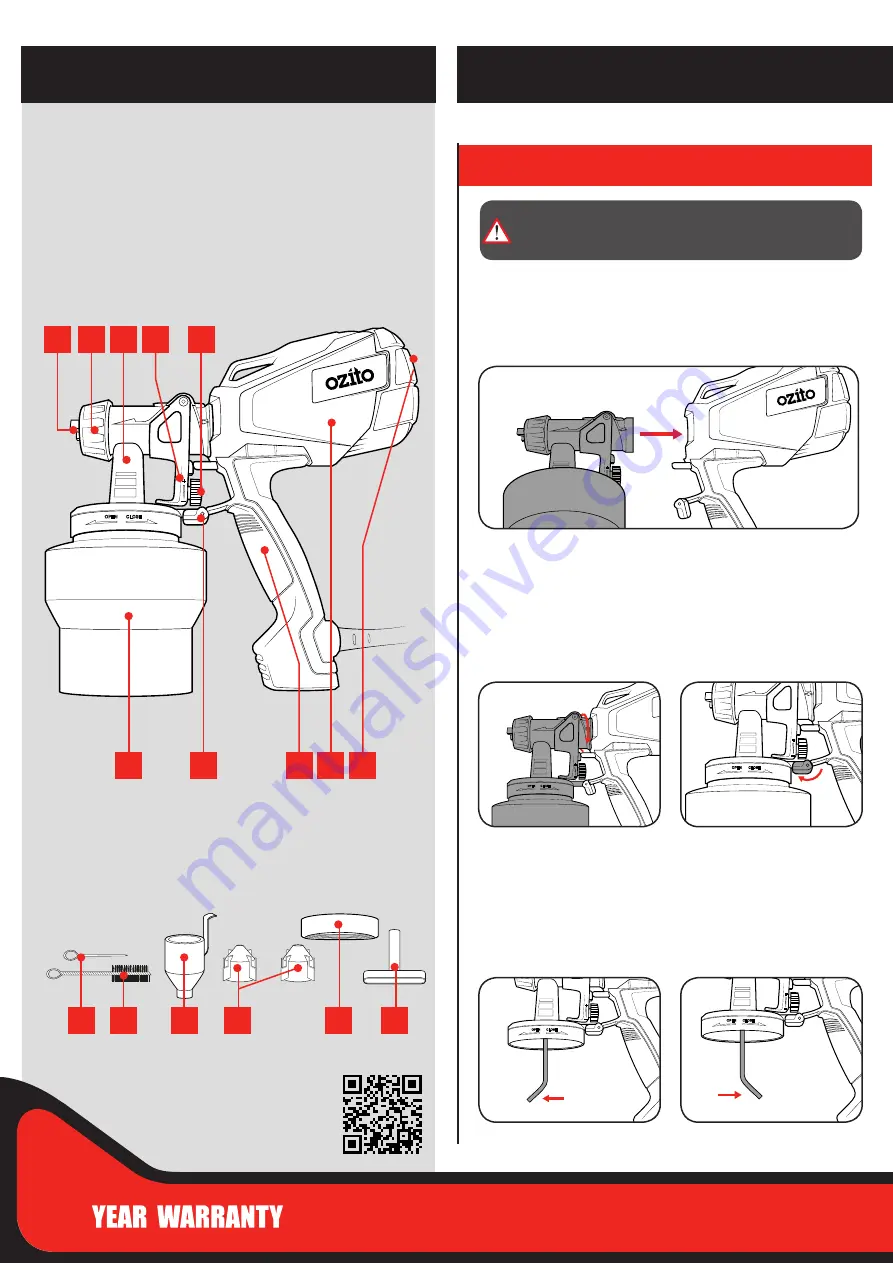
1 Nozzle 
2  Air Cap
3  Paint Head
4  On/Off Trigger
5  Spray Regulator Dial

6  Paint Pot
7  Locking Lever
8  Soft Grip Handle
9  Spray Gun Body
10 Air filter

SPRAY GUN

KNOW YOUR PRODUCT

1 2 3 4

5

6

7

11 12

13

14

15

16

8 9 10

1.  ASSEMBLY

11 Cleaning Needle
12 Cleaning Brush
13 Viscosity Cup

14 Nozzles x 2
15 Paint Pot Lid
16 Fluid Needle Removal Tool

ACCESSORIES

SETUP & PREPARATION

1   Insert the paint head into the gun body by aligning the 

arrows on the neck of the paint head and body.

Note: 


Ensure the locking lever is rotated out of the way to 

avoid damaging the locking lever.

1   When spraying horizontal 

or low objects turn the 

suction tube to the front.

3   Rotate the locking lever 

forward to secure the paint 

head.

2   Rotate the paint head 

clockwise into the correct 

orientation.

2   When spraying overhead 

objects turn the suction 

tube to the back.

Inserting the Paint Head

Aligning the Suction Tube

WARNING!


ENSURE THE TOOL IS DISCONNECTED FROM 

THE POWER SUPPLY BEFORE PERFORMING ANY OF THE 

FOLLOWING OPERATIONS.

Summary of Contents for SGP-5000

Page 1: ...a major failure and for compensation for any other reasonably foreseeable loss or damage You are also entitled to have the goods repaired or replaced if the goods fail to be of acceptable quality and the failure does not amount to a major failure Generally you will be responsible for all costs associated with a claim under this warranty however where you have suffered any additional direct loss as...

Page 2: ...S SETUP PREPARATION 1 Insert the paint head into the gun body by aligning the arrows on the neck of the paint head and body Note Ensure the locking lever is rotated out of the way to avoid damaging the locking lever 1 When spraying horizontal or low objects turn the suction tube to the front 3 Rotate the locking lever forward to secure the paint head 2 Rotate the paint head clockwise into the corr...

Page 3: ...URFACE PREPARATION AND PAINT THINNING ARE THE TWO MOST IMPORTANT AREAS ENSURE ALL SURFACES ARE FREE OF DUST DIRT AND GREASE IMPORTANT THE SPRAY GUN CANNOT BE USED WITH MATERIALS CONTAINING ABRASIVE SUBSTANCES GLAZES DISPERSION PAINTS CAUSTIC AND ALKALINE SUBSTANCES TEXTURED COATINGS OR TOXIC SPRAYS 1 Squeeze the on off trigger to start spraying 1 Squeeze the trigger while aiming at a piece of card...

Page 4: ... fan This is done by rotating the air cap into the position shown to the right To change spray patterns simply loosen the air cap and rotate to the desired position Ensure that the air cap is tightened again to secure in place Changing Nozzles Choosing Spray Patterns CAUTION PROTECTIVE CLOTHING SHOULD BE WORN DURING OPERATION TO AVOID INJURY WARNING NEVER UNDER ANY CIRCUMSTANCES AIM THE NOZZLE AT ...

Page 5: ...ghten paint pot Spray jet pulsates Material in paint pot running out Air filter clogged Refill Clean or replace Pattern runs or sags Applying to much material Decrease spray regulator dial or increase movement speed Too much overspray Gun too far from spray object Too much material applied Reduce distance Decrease spray regulator dial Pattern is very light and splotchy Moving the spray gun to fast...

Page 6: ...esult in personal injury e Do not overreach Keep proper footing and balance at all times This enables better control of the power tool in unexpected situations f Dress properly Do not wear loose clothing or jewellery Keep your hair clothing and gloves away from moving parts Loose clothes jewellery or long hair can be caught in moving parts g If devices are provided for the connection of dust extra...

Reviews: