• Keep the vents of the spray gun clean at all times. If possible, prevent foreign
matter from entering the vents.
• If the body of the spray gun requires cleaning, do not use solvents but a moist
soft cloth only. Never let any liquid get inside the gun body; never immerse any
part of the spray gun into a liquid.
Note: Ozito Industries will not be responsible for any damage or injuries
caused by the repair of the sander by an unauthorised person or by mishandling
of the spray gun.
MAINTENANCE
DESCRIPTION OF SYMBOLS
CARING FOR THE ENVIRONMENT
TROUBLE SHOOTING
Power tools that are no longer usable should not be disposed of
with household waste but in an environmentally friendly way. Please
recycle where facilities exist. Check with your local council authority
for recycling advice.
Recycling packaging reduces the need for landfill and raw materials.
Reuse of recycled material decreases pollution in the environment.
Please recycle packaging where facilities exist. Check with your
local council authority for recycling advice.
Spare parts can be ordered from the Special Orders Desk
at your local Bunnings Warehouse.
For further information, or any parts not listed here, visit
www.ozito.com.au or contact Ozito Customer Service:
Australia 1800 069 486
New Zealand 0508 069 486
E-mail: enquires@ozito.com.au
SPARE PARTS
Problem
Cause
Remedy
Little or no material
flow
Nozzle / Suction tube clogged
Spray regulator dial to low
Suction tube loose
No pressure build up in paint pot
Air filter clogged
Clean
Increase regulator dial
Insert
Tighten paint pot
Clean or replace
Material leaking
Nozzle loose
Nozzle worn
Material build up on air cap and nozzle
Tighten
Replace
Clean
Atomization is too
coarse
Viscosity of material too high
Material volume too large
Nozzle clogged
Air filter clogged
Too little pressure build up in container
Thin material
Decrease spray regulator dial
Clean
Clean or replace
Tighten paint pot
Spray jet pulsates
Material in paint pot running out
Air filter clogged
Refill
Clean or replace
Pattern runs or sags
Applying to much material
Decrease spray regulator dial
or increase movement speed
Too much overspray
Gun too far from spray object
Too much material applied
Reduce distance
Decrease spray regulator dial
Pattern is very light
and splotchy
Moving the spray gun to fast
Decrease spray regulator dial
or decrease movement speed
V
Volts
Hz
Hertz
~
Alternating current
W
Watts
BAR
Pressure rating
Read Instruction manual
Warning
Double insulated
Wear eye, breathing,
ear protection
Do not use in raining
/min
Revolutions or r
Regulatory Compliance
Mark (RCM)
eciprocation per minute
ºC
Degrees Celsius
WARNING!
ENSURE THE TOOL IS DISCONNECTED FROM THE
POWER SUPPLY BEFORE PERFORMING ANY OF THE FOLLOWING
OPERATIONS.
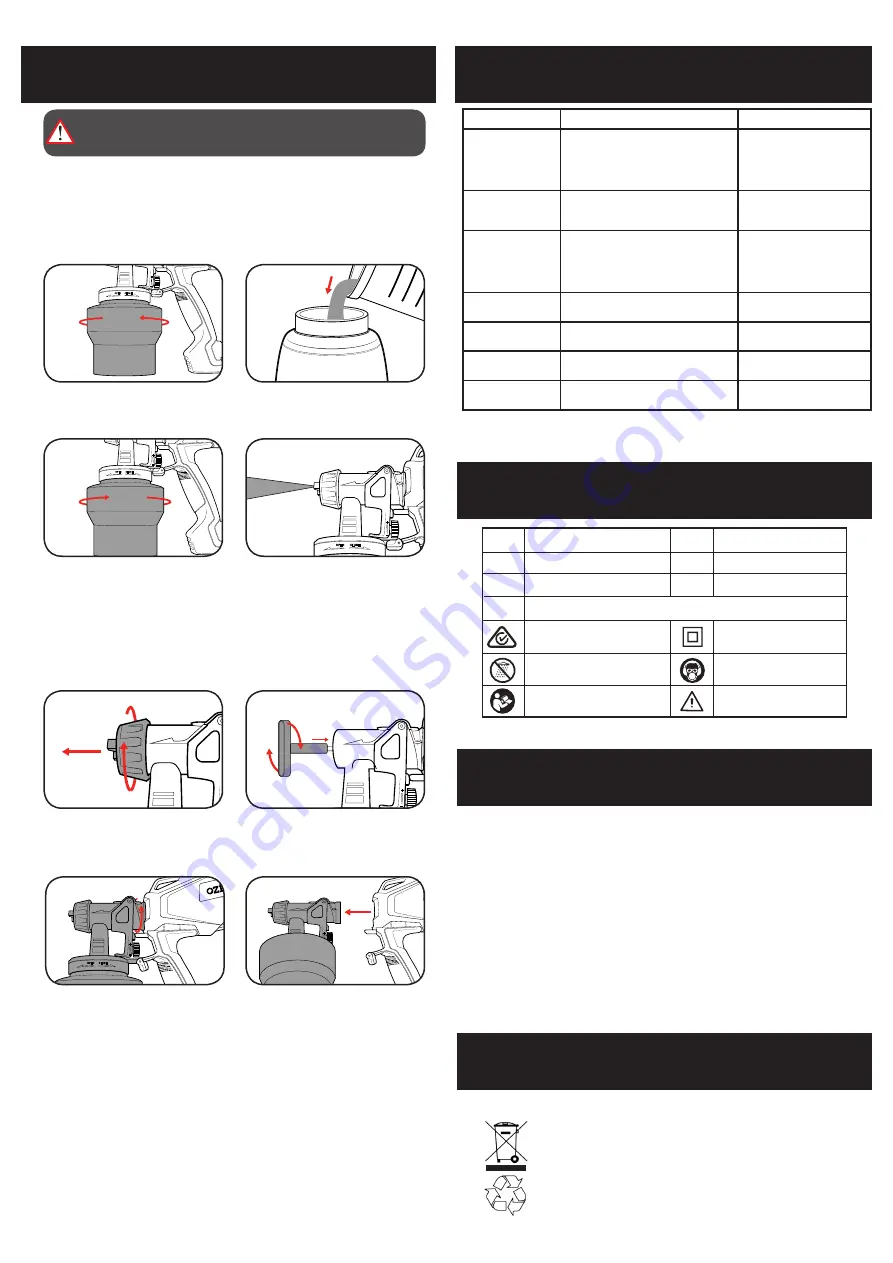
1 Unscrew the paint pot and return
remaining material into a container.
1 Unscrew the air cap nut to remove
the air cap and nozzle.
4 Remove the paint head from the
body and dismantle the paint pot
and suction tube.
3 Unlock the locking lever and rotate
the paint head anti-clockwise until
the arrows on the neck of the paint
head and body align.
6 Take note of the holes on the air cap and nozzle, if blocked clean using the
provided cleaning needle.
3 Clean the paint pot and suction
tube with a brush and then screw
the pot back into the gun.
5 Remove the paint pot and empty
any remaining solvent.
After each use it is essential that the spray gun is cleaned thoroughly. This will
prevent any blockages occurring and provide reliable performance when you next
come to use it.
2 Fill the paint pot with solvent or
water.
Note: Use only non-
flammable liquids
2 Insert the fluid needle removal tool
over the needle. Rotate 90 degrees
and then pull firmly to remove the
needle.
5 Dip a cloth in solvent or water and clean the air cap, nozzle, rear of the paint
head and suction tube.
7 Prior to storing the spray gun, ensure it is completely dry.
4 Plug the gun back in and spray the
solvent into a container. Repeat
until clear solvent comes out.
Cleaning
Cleaning Parts
a
b


