background image

Page 6 of 9

SV-5 Max Owner’s Manual

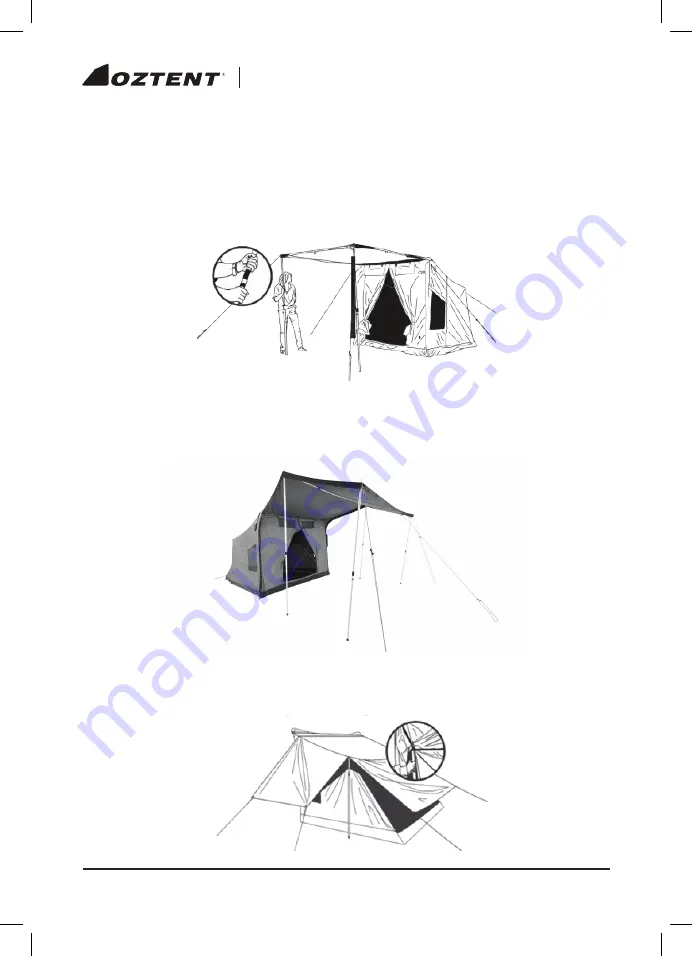
Step 4: Setting Up Your Awning

4.1  Once the tent has been pegged to the ground, unroll the front awning.
4.2  Twist to unlock the two 1.9m upright awning poles and twist again to lock at desired height. 

Attach a 3.5m spreader pole to the spigot of each upright, then, using the front eyelets, attach the 
poles to the awning as illustrated. Secure with guy ropes as shown.

Step 5: Peaking the Awning

5.1  Using the 2.3m upright awing poles and a 3.5m spreader, connect to the eyelets located midway 

along the awning and raise to full height. You may need to adjust the front guy ropes when 
raising the poles.

Step 6: Securing the Fly

6.1  Connect the fly poles through the eyelet on each side of the fly and secure the fly with guy ropes 

as shown.

Summary of Contents for SV-5 MAX

Page 1: ...rnments provided fair compensation is paid For more information see www copyright com au and www copyright org au The owners of copyright in the content on this document may receive compensation for t...

Page 2: ......

Page 3: ...ent 4 Campsite Choice 4 Lay Out Your Oztent SV 5 Max 4 Setting Up Your Oztent SV 5 Max 5 Setting Up Your Awning 6 Peaking the Awning 6 Securing the Fly 6 Setting Up the Zip In Tarp Extension 7 Safety...

Page 4: ...wning 2 3 2 3m 90 5 Telescopic Poles for Tent Awning 2 4 3 5m 137 7 Telescopic Spreader Poles for Tent Awning 2 5 2 3m 90 5 Telescopic Poles for Zip In Tarp Extension 3 6 SV 5 Max Fly with 2 x 1 7m 66...

Page 5: ...erproofing Keep all flame and heat sources away from this tent This tent is made with flame resistant fabric but it is not fireproof The tent fabric will burn if left in continuous contact with an ope...

Page 6: ...e avoid setting the tent on ground that is already wet If you can t minimize the resulting humidity and potential of condensation by keeping your tent well ventilated We also recommend that you consid...

Page 7: ...Using the strap attached to the middle of the frame lift the frame up and over your head 3 3 While supporting the tent gently slide the bracing arm on either side of the tent into its lock position 3...

Page 8: ...h upright then using the front eyelets attach the poles to the awning as illustrated Secure with guy ropes as shown Step 5 Peaking the Awning 5 1 Using the 2 3m upright awing poles and a 3 5m spreader...

Page 9: ...ight poles to support the Tarp Extension using the three eyelets located at the end of the Tarp Extension adjust the poles to the desired height and secure with guy ropes and tent pegs Note that you s...

Page 10: ...move use of another peg as a hook is recommended Zippers Be careful with your zippers Go slow when zipping Make sure to align the tracks before sliding the zipper and don t exert excessive force If fa...

Page 11: ...ident ii misuse or abuse including failure to properly maintain or service iii normal wear and tear iv storm damage or improper storage v incomplete or improper installation vi incorrect improper or i...

Page 12: ...www oztent com AUSTRALIA www oztent com au Ph 02 8706 5100 Toll Free 1800 OZTENT or 1800 698 368 USA www oztent com us Ph 8555 OZTENT or 855 569 8368 INTERNATIONAL www oztent com Ph 61 2 8706 5100...

Reviews: