ASSEMBLY INSTRUCTIONS:
IMPORTANT: This tent is to be pitched once before going camping to ensure
that all parts are present and to become familiar with the assembly of the tent.
STEP 1 - LAY OUT THE TENT
Select a sheltered camp site protected from the wind that will not allow water to pond under the tent
floor.
Clear a level area of all stones, twigs, etc.
Lay out tent with doors facing the desired direction.
Open doors to allow air inside when standing tent up.
Peg down loosely the corners of the tent.
Join fibreglass poles together ensuring each section is firmly secured into the next.
STEP 2 - INSTALL THE POLES
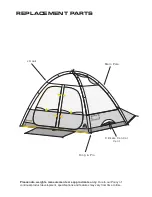
Place ends of the two main poles onto the pins (see figure 1), on opposite corners across the tent
(see figure 2).
STEP 3 - STANDING THE TENT UP
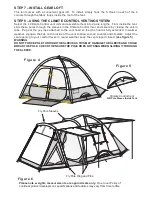
Begin attaching the J Hooks
(see figure 3)
to the poles from the bottom to the top, the inner tent will
stand up during this action
(see figure 4, page 8).
Fasten the toggle and loop over the poles at the
top of tent.
STEP 4 - PEG DOWN THE TENT
Peg the four corners of the tent to the ground by driving pegs through the metal rings at the base
corners of the tent. Firm but not tight. Peg down all remaining peg loops, ensure all peg down points
are utilised.
STEP 5 - INSTALL THE RAIN FLY
Slip the remaining pre-bent ferrule poles through the sleeves at the front of the fly, the first pole sleeve
is located at the front edge of the roof on the fly and the second is located 1 metre further along the roof
from the first pole. Once the poles have been threaded through the sleeves place the front pole ends onto
the pins at the front of the fly and the second pole ends into the pins at the front corner of the tent.
(see figure 6, page 8)
WARNING
DO NOT FORCE POLE THROUGH THE SLEEVE AS THIS MAY DAMAGE THE SLEEVE AND
COULD BREAK THE POLE. CHECK TO ENSURE THE POLE DOES NOT SNAG WHEN SLIDING IT
THROUGH THE SLEEVE.
Place the fly over the tent. Secure fly by attaching velcro inside the fly to poles. Peg out fly vestibule room
in front of the tent
(see figure 6, page 8)
. Attach hooks along the fly base to the rings on the inner tent.
Peg down remaining pegs loops on the fly sheet. Open rear, side and front entrances of the fly as
required. Position the PE ground sheet between the vestibule bedroom and front door. To erect awnings
join steel poles together and position top of pole through the eyelet in awning. Attach guy rope to top
of pole and peg down. If present, on the under side of awning connect flow away buckles and adjust
webbing to maximise head height and minimise water ponding on awning.
STEP 6 – INSTALL THE GUY ROPES
Peg out guy ropes attached to the fly, make a loop (about 30 to 50 cm long) with the slider on the end
of the rope and peg out as far as possible from tent. Ensure all peg down points are utilised and all guy
ropes are attached firmly and remain firm.
PLEASE NOTE:
IT IS RECOMMENDED AWNINGS ARE LOWERED DURING RAIN. IN SEVERE CONDITIONS THE TENT SHOULD
BE DISMANTLED.


