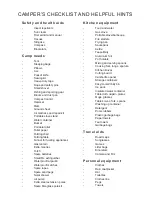
background image

MODEL 

#

 MP-BDSPU

PARTS LIST 

4 x Pegs
2 x Guy Ropes
1 x Tent Bag

NB:  Always mention the Model Number in  

        all correspondence regarding your tent.
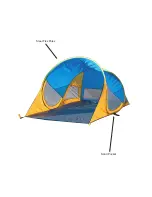
PopUp Beach 

Dome

IMPORTANT:  This  beach  dome  is  to  be  pitched  once  before  use  to  ensure  that  all 

parts are present and to become familiar with the assembly and pack up of the beach 

dome.

Step 1 – Choosing the beach dome site

Select a sheltered site protected from the wind.

Clear a level area of all sharp objects, twigs etc.

Step 2 – Standing the beach dome up

Remove the beach dome from the carry bag and release elastic strap, gently allow the beach 

dome to unfold and open fully.

Step 3 – Peg down the beach dome

Position the beach dome facing the desired direction.  Peg the four corners of the beach 

dome to the ground by driving pegs through the webbing loops at the base corners of the 

beach dome.  Firm but not tight.  Fill the sand bags provided and sand pockets under the front 

and rear floor of the beach dome for added stability.

Step 4 – Install guy ropes

Attach the guy ropes to the beach dome.  Make a loop (about 30 cm to 50 cm long) with the 

slider on the end of the rope and peg out as far as possible from the beach dome.  Ensure all 
peg down points are utilised and all guy ropes are attached firmly and remain firm. 

PLEASE  NOTE:  IN  SEVERE  CONDITIONS  THE  BEACH  DOME  SHOULD  BE 

DISMANTLED.

Please  note,  weights  measurements  are  approximate  only.    Due  to  our  Policy  of  continual  product 

development, specifications and features may vary time to time.

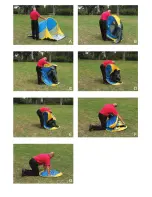
ASSEMBLY INSTRUCTIONS

Summary of Contents for MP-BDSPU

Page 1: ...M O D E L MP BDSPU O W N E R S M A N U A L w w w o z t r a i l c o m a u PopUp Beach Dome...

Page 2: ...NG WATERPROOFNESS WHAT IS NOT COVERED BY WARRANTY OZtrail tents use waterproof and water repellent fabrics However with the addition of seams zips and other desirable features a recreational tent will...

Page 3: ...bour This warranty is subject to the original proof of purchase and the products being used in accordance with the instruction manual Important This tent is to be assembled once before going camping t...

Page 4: ...osition the beach dome facing the desired direction Peg the four corners of the beach dome to the ground by driving pegs through the webbing loops at the base corners of the beach dome Firm but not ti...

Page 5: ...Steel Flex Poles Sand Pocket...

Page 6: ...zontal to vertical as you do this step see photo B 6 Place your right hand on top of the pole loop at chest level bring your right hand down towards your ankles see gure C and D 7 As you nalise step 6...

Page 7: ...A B C D E F G...

Page 8: ...seams Repairing a tear for small tears use a self adhesive patch kit We recommend a canvas or awning repairer for larger tears Faulty zipper all our tents are manufactured with zippers which if the z...

Page 9: ...roof tarpaulin Waterproof matches Spare ropes Spare sand pegs Solar shower Air pump Extra steel extension poles Spare breglass pole kit Kitchen equipment Food and water Gas stove Portable stove barbeq...

Page 10: ...NOTES DESIGNED AND IMPORTED BY OZTRAIL LEISURE PRODUCTS ABN 77 010 916 006 P O Box 1 SUMNER PARK QLD 4074 AUSTRALIA info oztrail com au...

Reviews: