background image

12

Tent Poles and Shock Cord are similar to 

the Tyres on your Car, they require both 

maintenance and replacement from time 

to time after unexpected damage.  Over 
stretching, dropping and age are the most 
common causes of shock cord failure. Excessive 
curvature during tent assembly or during 
periods of high winds is the most common 

causes of pole failure. By maintaining both the 

Poles and Shock Cord you will be ensuring that 

you get the best performance and life out of 
your OZtrail Tent.

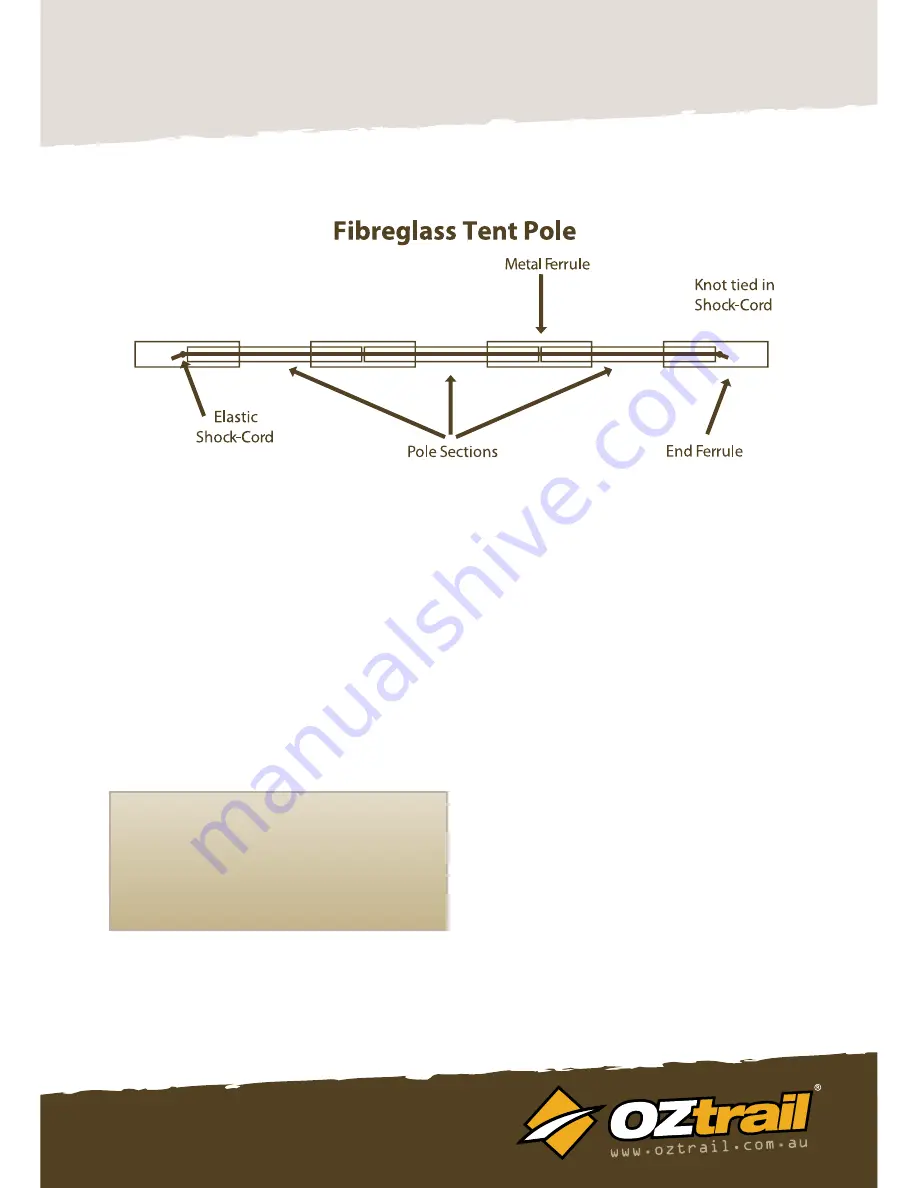
Replacing Shock-Cord

See Figure 15

Step One:  Measure and Cut

Measure the length of the Tent Pole.  You should 

use a length of Shock Cord roughly two-thirds 
the length of the Tent Pole.  This will ensure that 

the Shock Cord has the appropriate amount of 
elasticity.

Step Two: Threading the Pole Sections

Tie a large knot in the end of the Shock Cord 
length.  This knot needs to be large enough 
to stop it passing through the tubular hole in 

the pole sections whilst you are threading it.  

Thread the Shock Cord through the tubular hole 
in each pole section.

Tent Pole and Shock Cord  

Replacement

HELPFUL HINT
To maximise the life of your shock cord never 
drop the tents poles during transporting. 
When packing poles into their carry bag be 
careful not to settle them by tapping them 
vertically on a hard surface.

Figure 15

Summary of Contents for Villa Dome

Page 1: ...Owners Manual Villa Dome DTE VI9 D www oztrail com au...

Page 2: ...aturing Tensile Tab J Hooks attachments for easy assembly and rigidity Seam inserted reinforced guy rope tabs with shock loops on fly to add strength and stability Handy storage pockets with reflectiv...

Page 3: ...reglass roof side poles blue sticker 8 x Silver steel side wall poles 1 x Grey fibreglass pre bent halo pole with spigot end tips 2 x Silver steel awning poles 1 x Pole bag 12 x Guy ropes 46 x Pegs 1...

Page 4: ...tc Step 2 Lay out the tent Unpack the contents of your tent Lay out the inner tent facing the desired direction Ensure that you have the doors in the correct position Step 3 Peg down the tent Peg out...

Page 5: ...hat run across the tent above the side door on the opposite side of the tent Assembly Instructions cont HELPFUL HINT Before attempting this step it helps to open the doors of the tent This allows for...

Page 6: ...is securely in place select the grey fibreglass pre bent halo pole with spigot end tips and locate the eyelets on the rear wall of the inner tent see Figure 10 Place the end tips of the pole spigot i...

Page 7: ...r quarters The width of the folded tent should be the length of the pole bag see Figure 14 PLEASENOTE Insevereconditionsthetentshouldbedismantled Disassembly Instructions HELPFUL HINT Never store your...

Page 8: ...may vary from what is stated Helpful Hint Avoiding Mould and Mildew You should always pack your products both clean and completely dry In many climates there is a risk of Mould or Mildew damage to ma...

Page 9: ...ometimes the zipper coil bursts open or does not close This could be due to wear or metal fatigue The problem can be easily fixed see the instructions on page 15 Always carry a roll of heavy duty tape...

Page 10: ...r is well ventilated Even on the coldest night do not close every vent window and door A well ventilated tent not only maintains healthy Oxygen levels but also reduces condensation build up inside the...

Page 11: ...our tent shelter near cliffs in case of collapse or rock fall Do not leave your tent shelter erected in strong winds collapse the tent onto the ground and seek refuge in your vehicle Do not pitch your...

Page 12: ...Measure and Cut Measure the length of the Tent Pole You should use a length of Shock Cord roughly two thirds the length of the Tent Pole This will ensure that the Shock Cord has the appropriate amount...

Page 13: ...you have these measurements you will be able to organise a Pole Replacement kit from your local Camping Goods retailer You may have to cut the replacement pole to length This can be done with a Hack S...

Page 14: ...ter is well ventilated ZIPS All care is taken in the design to cover zips At times wind driven rain could force water under the flaps and through the zips To minimise this make sure all doors and wind...

Page 15: ...th use the jaws of the zip slider can open ever so slightly When this occurs the slider does not compress the zip teeth or coil together tightly enough and the zip bursts open or does not close Undo t...

Page 16: ...Check out www oztrail com au for other great products from OZtrail Leisure Products Imported by OZtrail Leisure Products PO Box 1 Sumner Park QLD AUSTRALIA 4074 Made in China...

Reviews: