


4
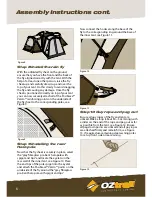
Step 5 Install the main poles
and standing the tent up
Select the two “grey fibreglass main poles with
yellow stickers” and place them diagonally
across the central apex of the tent from corner
to corner sliding them through the pole sleeves
with yellow trim, see Figure 4. Tie off where poles
cross.
Now select the two “grey fibreglass middle poles
with a pole cap on one end and red sticker”.
Starting from the rear of the tent, see figure 5.
Place them from front to back across the sides
of the central area of the tent, slide the poles
capped end first through the pole sleeves with
red trim above the room dividers, ensuring the
pole slides through the opening into the mesh
sunroom area.
With the help of another person, connect the
pole ends onto the corresponding pin and ring
assemblies at the base of the tent, see Figure
2. Place the cap pole ends into the webbing
pockets inside the mesh sunroom area, see
Step 1 Choose the site
Select a sheltered camp site protected from the
wind that will not allow water to pond under
the tent Floor. Clear a level area of all stones,
twigs, etc.
Step 2 Lay out the tent
Unpack the contents of your tent. Lay out the
inner tent facing the desired direction. Ensure
that you have the doors in the correct position.
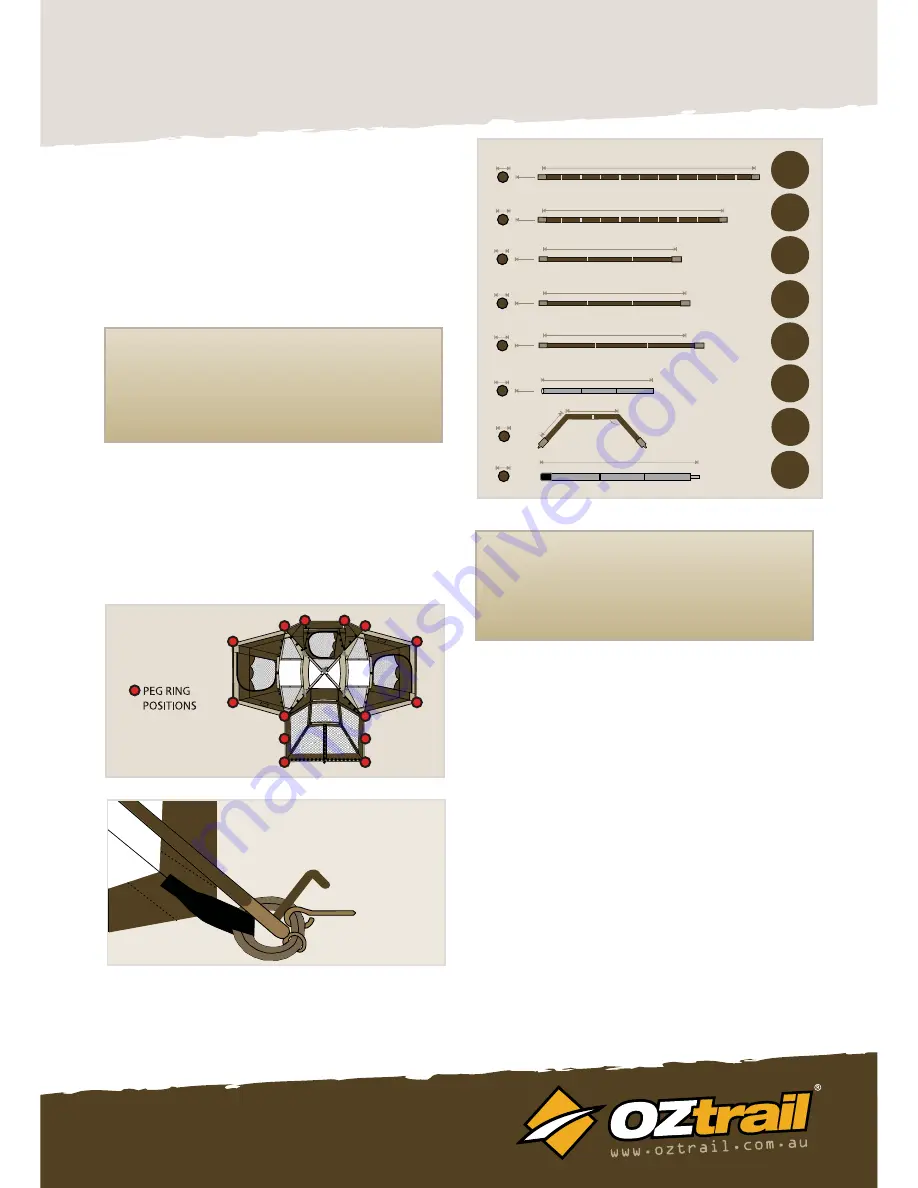
Step 3 Peg down the tent
Peg out the corners of the inner tent. The peg
point locations are indicated in Figure 1. Anchor
the tent to the ground by inserting the pegs
through the loops around the base of the tent
at an angle of 45 degrees as indicated in Figure
2. Firm but not tight. As you work from one peg
point to the other around the tent base pull the
floor firmly, but not tight.
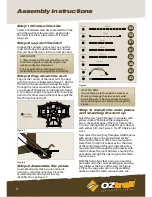
Step 4 Assemble the poles
Assemble all poles making sure each pole
junction is securely connected. Place the
assembled poles side by side for easy
identification, see Figure 3.
Assembly Instructions
Figure 1
Figure 2
HELPFUL HINT
1. After unpacking the tent or shelter, use the
check list on page 3 to identify all parts and
make sure all parts are present.
2. It is important to condition your tent or
shelter before use. See page 9 for instructions
HELPFUL HINT
Do not force pole through the sleeves as
this may damage the sleeve and could
break the pole. Check to ensure the pole
does not snag when sliding it through the
sleeve.
Figure 3
117cm
135degree
62
cm
7.9mm
x1
16mm
648cm
11mm
11mm
159cm
185cm
x2
553cm
11mm
x2
x1
11mm
169cm
188cm
19mm
x1
11mm
178cm
x2
x2
x8


