background image

5

Select the “grey fibreglass roof front pole with 

the green sticker” and slide through the pole 

sleeves that run across the top of the front entry 

of the mesh sunroom. Insert the ends of the 

“grey fibreglass roof front pole with the green 

sticker” into the narrow opening of the 2-way 

hubs that are pre-attached to the tent.

Select the “grey fibreglass roof centre pole with 

the grey sticker” and slide through the sleeve 

with grey trim that runs across the top of the 

rear of the mesh sunroom closest the centre of 

the tent. Insert the ends of the “grey fibreglass 

roof centre pole with the grey sticker” into the 

narrow opening of the 2-way hubs that are pre-

attached to the tent.

Now select one of the “grey fibreglass roof side 

poles with blue sticker” and slide through the 

sleeve with blue trim that run across the tent 

above the side doors of the tent. Insert the ends 

of the “grey fibreglass roof side poles with blue 

sticker” into the narrow opening of the 2-way 

hubs that are pre-attached to the tent.

Repeat this process for the remaining “grey 

fibreglass roof side poles with blue sticker” and 

slide through the sleeve with blue trim that 

run across the tent above the side door on the 

opposite side of the tent.

Assembly Instructions cont.

HELPFUL HINT
Before attempting this step it helps to 

open the doors of the tent. This allows for 

the air to enter into the tent as you raise it.
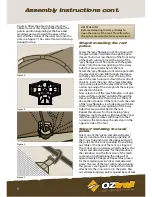
Figure 4

Figure 5

Figure 6

Figure 7

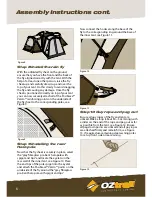
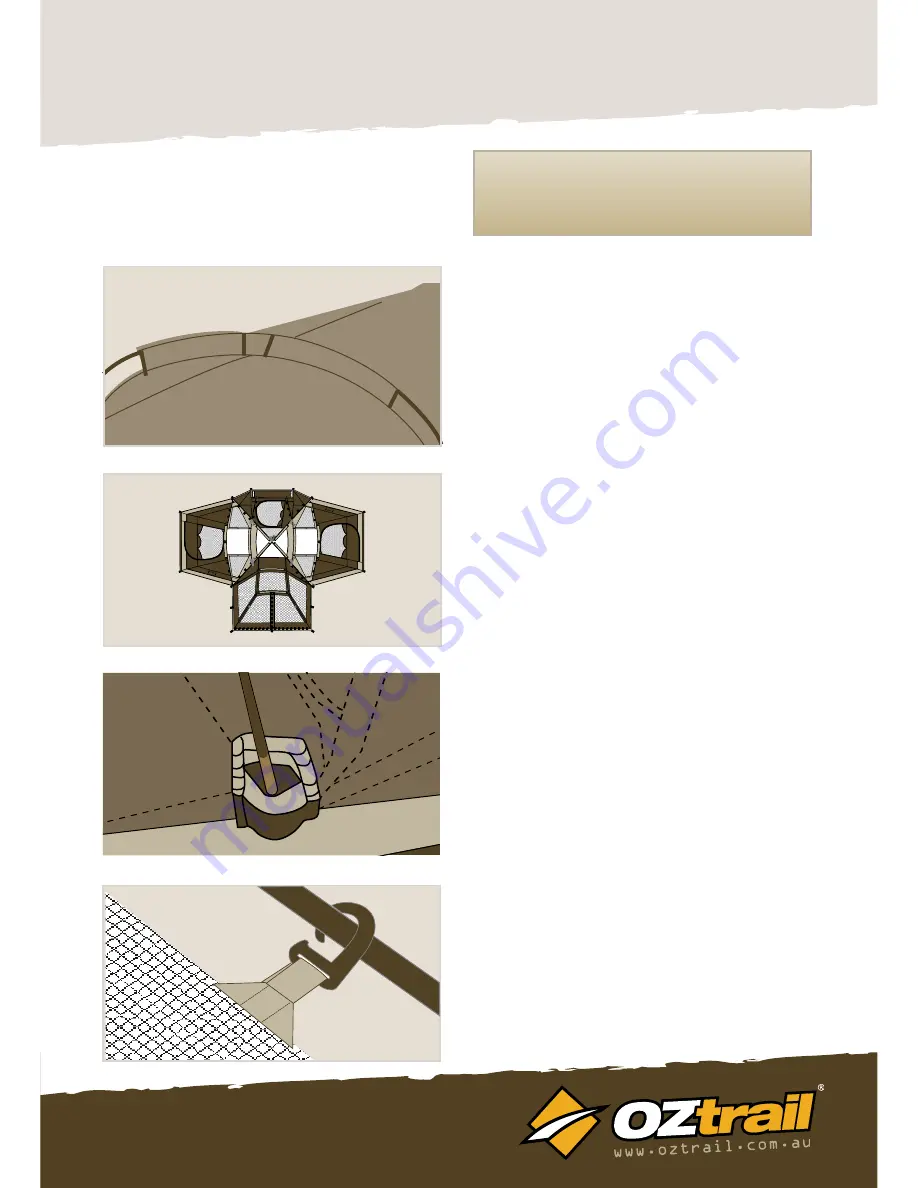
Figure 6. Allow the poles to bow into their 

natural curve at this stage. While holding the 

pole in position, beginning at the base and 

working your way towards the apex of the 

tent, clip the J Hooks of the inner tent onto the 

pole, see Figure 7. The central tent will stand up 

during this step. 

Step 6 Installing the roof 

poles

Step 7 Installing the wall 

poles

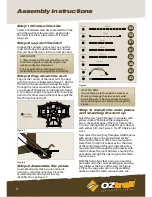
Select one of the “silver steel side wall poles”, 

insert an end into the remaining opening of 

the 2-way hub and insert the opposite end of 

the pole onto the corresponding Pin and Ring 

assembly at the base of the tent, see Figure 2. 

The correct pin is not always directly below, the 

“silver steel side wall poles” for the pole above 

the side doors and the front door of the mesh 

sunroom sit inclined along the side wall at 

approximately 60 degrees. Repeat this process 

for the remaining seven “silver steel side wall 

poles”. The rest of the tent will stand up during 

this process, see Figure 8. Connect the J-Hooks 

attached to the inner tent onto the poles. Peg 

out all remaining peg points around base of tent.

Summary of Contents for Villa Dome

Page 1: ...Owners Manual Villa Dome DTE VI9 D www oztrail com au...

Page 2: ...aturing Tensile Tab J Hooks attachments for easy assembly and rigidity Seam inserted reinforced guy rope tabs with shock loops on fly to add strength and stability Handy storage pockets with reflectiv...

Page 3: ...reglass roof side poles blue sticker 8 x Silver steel side wall poles 1 x Grey fibreglass pre bent halo pole with spigot end tips 2 x Silver steel awning poles 1 x Pole bag 12 x Guy ropes 46 x Pegs 1...

Page 4: ...tc Step 2 Lay out the tent Unpack the contents of your tent Lay out the inner tent facing the desired direction Ensure that you have the doors in the correct position Step 3 Peg down the tent Peg out...

Page 5: ...hat run across the tent above the side door on the opposite side of the tent Assembly Instructions cont HELPFUL HINT Before attempting this step it helps to open the doors of the tent This allows for...

Page 6: ...is securely in place select the grey fibreglass pre bent halo pole with spigot end tips and locate the eyelets on the rear wall of the inner tent see Figure 10 Place the end tips of the pole spigot i...

Page 7: ...r quarters The width of the folded tent should be the length of the pole bag see Figure 14 PLEASENOTE Insevereconditionsthetentshouldbedismantled Disassembly Instructions HELPFUL HINT Never store your...

Page 8: ...may vary from what is stated Helpful Hint Avoiding Mould and Mildew You should always pack your products both clean and completely dry In many climates there is a risk of Mould or Mildew damage to ma...

Page 9: ...ometimes the zipper coil bursts open or does not close This could be due to wear or metal fatigue The problem can be easily fixed see the instructions on page 15 Always carry a roll of heavy duty tape...

Page 10: ...r is well ventilated Even on the coldest night do not close every vent window and door A well ventilated tent not only maintains healthy Oxygen levels but also reduces condensation build up inside the...

Page 11: ...our tent shelter near cliffs in case of collapse or rock fall Do not leave your tent shelter erected in strong winds collapse the tent onto the ground and seek refuge in your vehicle Do not pitch your...

Page 12: ...Measure and Cut Measure the length of the Tent Pole You should use a length of Shock Cord roughly two thirds the length of the Tent Pole This will ensure that the Shock Cord has the appropriate amount...

Page 13: ...you have these measurements you will be able to organise a Pole Replacement kit from your local Camping Goods retailer You may have to cut the replacement pole to length This can be done with a Hack S...

Page 14: ...ter is well ventilated ZIPS All care is taken in the design to cover zips At times wind driven rain could force water under the flaps and through the zips To minimise this make sure all doors and wind...

Page 15: ...th use the jaws of the zip slider can open ever so slightly When this occurs the slider does not compress the zip teeth or coil together tightly enough and the zip bursts open or does not close Undo t...

Page 16: ...Check out www oztrail com au for other great products from OZtrail Leisure Products Imported by OZtrail Leisure Products PO Box 1 Sumner Park QLD AUSTRALIA 4074 Made in China...

Reviews: