.
. . .
.
S P E C I F I C A T I O N S
General Specifications
Hardware Installation Guide
A-5
D I P S W I T C H E S
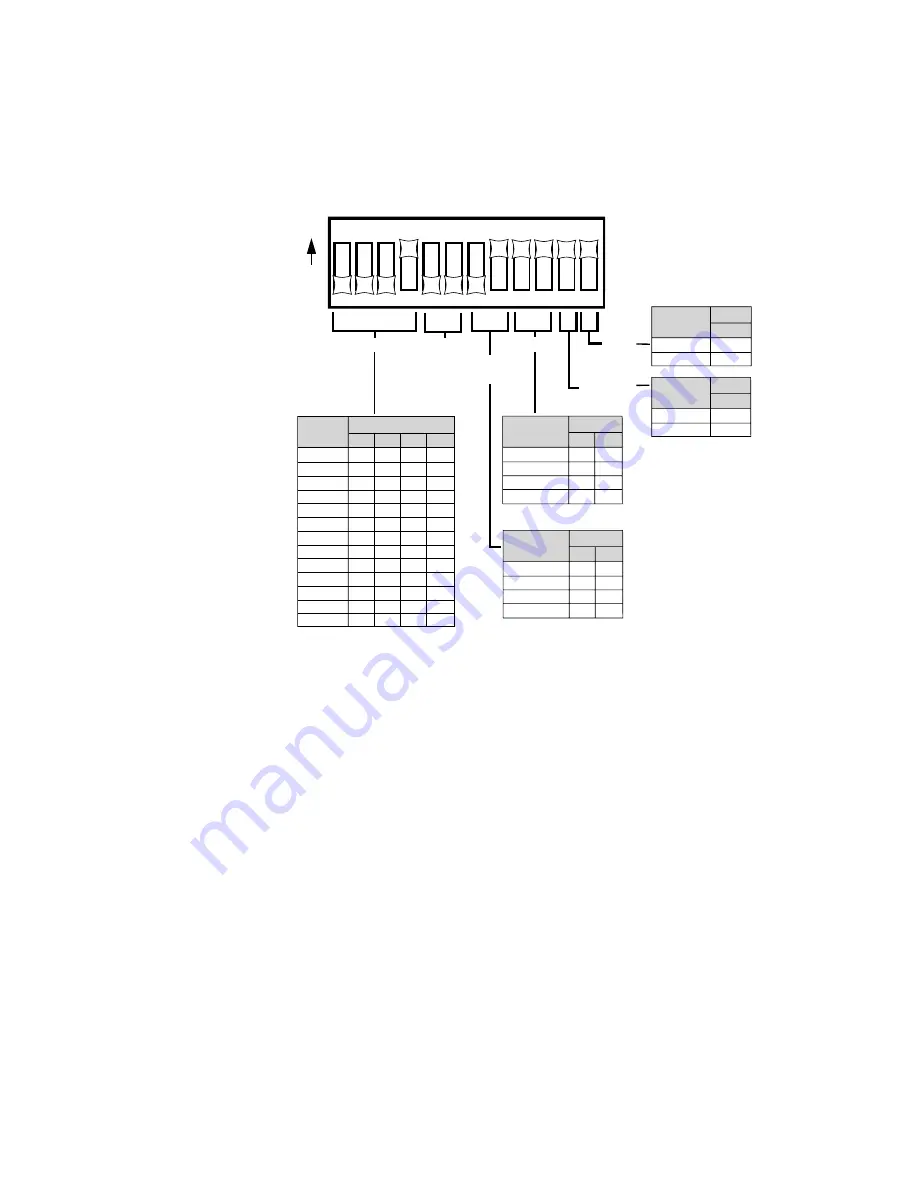
Figure A-3 DIP Switch Positions
All DIP switches must be in the OFF position when using the Command Line
Interface or Site Manager application to configure a radio.
The DIP switches become active only after system reboot, which can be done
by turning the main power switch off then on.
1
2
3
4
5
6
7
8
9
10
11
12
O
N
RF CHANNEL
Switch
1
OFF
OFF
OFF
OFF
OFF
OFF
OFF
ON
ON
ON
ON
ON
ON
OFF
OFF
OFF
ON
ON
ON
ON
OFF
OFF
OFF
OFF
ON
ON
OFF
ON
ON
OFF
OFF
ON
ON
OFF
OFF
ON
ON
OFF
OFF
ON
OFF
ON
OFF
ON
OFF
ON
OFF
ON
OFF
ON
OFF
ON
2
3
4
Channel
TOPOLOGY
RESET
ANTENNA
ALIGNMENT
APG2_020
1
2
3
4
5
6
7
8
9
10
11
12
13
Star Remote
Star Base
Peer-to-Peer
Point-to-Point
Switch
9
OFF
OFF
ON
ON
OFF
ON
OFF
ON
10
Topology
Yes
No
Switch
12
ON
OFF
Reset
Alignment
Normal
Switch
11
ON
OFF
Antenna
Alignment
BPSK Mb/s
QPSK Mb/s
CCK 5.5 Mb/s
CCK 11Mb/s
Switch
7
ON
ON
OFF
OFF
ON
OFF
ON
OFF
8
Modulation
Mode
MODULATION
MODE
RESERVED
NOTE
✐
Summary of Contents for AirPro Gold
Page 1: ...P Com AirPro Gold Wireless Router Hardware Installation Guide...
Page 2: ...P Com AirPro Gold Wireless Router H a r d w a r e I n s t a l l a t i o n G u i d e...
Page 11: ...C O N T E N T S xi P Com AirPro Gold...
Page 13: ...L I ST O F FI G U RE S xiii P Com AirPro Gold...
Page 15: ...L I ST O F TA B L E S xv P Com AirPro Gold...
Page 39: ...HAR DW ARE I NSTA LL AT ION Basic Configuration Setup 3 10 P Com AirPro Gold 3...
Page 43: ...RA CK MOUN TI NG 23 inch Rack Mount 4 4 P Com AirPro Gold 4...
Page 44: ...Hardware Installation Guide A 1 A SPECIFICATIONS...


