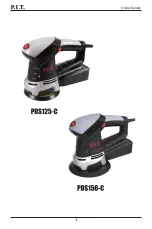
Orbital Sander
6
tice.
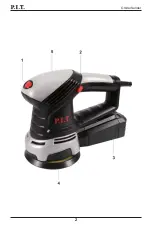
Product Features
The numbering of the components shown re-
fers to the representation of the power tool on
the graphic pages.
1
Orbital stroke rate preselection thumbwheel
2
On/off switch
3
Complete dust box (Microfi lter system)
4
Sanding pad
5
Handle (insulated gripping surface)
6
Sanding sheet
7
Screw for sanding pad
8
Extraction outlet
9
Locking lever for dust box
10
Dust extraction hose
Not all of the accessories illustrated or de-
scribed are included as standard delivery.
Assembly
►
Pull the plug out of the socket before
carrying out any work on the power
tool.
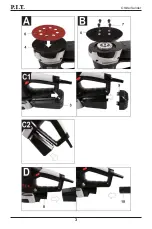
Changing the sanding sheet (see fi gure A)
Remove dirt and dust from the sanding pad,
e.g. with a paintbrush, before attaching a new
sanding sheet.
The surface of the sanding pad is fi tted with
a hook-andloop fastening, allowing sanding
sheets with a similar backing to be secured
quickly and easily.
Press the sanding sheet firmly onto the un-
derside of the sanding pad.
To ensure optimum dust extraction, make
sure that the punched holes in the sanding
sheet are aligned with the drilled holes in the
sanding pad.
Selection of the Sanding Plate
The power tool can be fitted with sanding
pads of various hardnesses, depending on
the application:
– Extra soft sanding pad: Suitable for polish-
ing and sensitive sanding even on curved
surfaces.
– Soft sanding pad: Suitable for all sanding
work, universal application.
– Hard sanding pad: Suitable for heavy
sanding on fl at surfaces.
Changing the sanding pad (see fi gure B)
Note:
Replace damaged sanding pads imme-
diately.
Remove the sanding sheet or polishing tool.
Unscrew the screw completely and remove
the sanding pad. Attach the new sanding
pad and retighten the screw so that it is fin-
ger-tight.
Note:
Pads with diameters of 150 mm and
125 mm have diff erent carriers. The pads can
only be fi tted to the right power tool.
Note:
When attaching the sanding pad, make
sure that the teeth of the catch mate with the
recesses in the sanding pad.
Note:
Damaged sanding pads must only be
replaced by an after-sales service centre au-
thorised to work with P.I.T. power tools.
Dust/chip extraction
The dust from materials such as lead paint,
some types of wood, minerals and metal can
be harmful to human health.
Touching or breathing in this dust can trigger
allergic reactions and/or cause respiratory
illnesses in the user or in people in the near
vicinity.
Certain dusts, such as oak or beech dust,
are classified as carcinogenic, especially in
conjunction with wood treatment additives
(chromate, wood preservative). Materials con-
taining asbestos may only be machined by
specialists.
– Use a dust extraction system that is suit-
able for the material wherever possible.
– Provide good ventilation at the workplace.
– It is advisable to wear a P2 filter class
breathing mask.
The regulations on the material being ma-
chined that apply in the country of use must
be observed.
►
Avoid dust accumulation at the work-
place.
Dust can easily ignite.
Self-generated dust extraction with dust
box (see fi gures C1–C2)
Fit the dust box onto the extraction outlet so
that it clicks into place.
To empty the dust box, press the locking lever
on the side of the dust box. Remove the dust
box by pulling it downwards.
External dust extraction (see fi gure D)
Attach the dust extraction adapter to the
extraction outlet. Make sure that the locking
levers of the dust extraction adapter lock into
place.
The dust extractor must be suitable for the
material being worked.
When extracting dry dust that is especially
detrimental to health or carcinogenic, use a
special dust extractor.
When working on vertical surfaces, hold the
power tool with the dust extraction hose fac-
ing downwards.
Summary of Contents for PDS150-C
Page 2: ...Orbital Sander 1...
Page 3: ...Orbital Sander 2...
Page 4: ...Orbital Sander 3...
Page 11: ...10...
Page 12: ...11 18...
Page 13: ...12 PDS150 C 220 50 500 6000 12000...
Page 14: ...13 PDS150 C 150 mm 6 1 9 1 1 1 1 P I T 1 2 3 4 5 6 7 8 9 10 A B 150 125 P I T 2...
Page 15: ...14 C1 C2 D 230 220 3 P I T P I T...
Page 16: ...15 2 2 2 1 2 OnePower 12 I 3 P I T P I T 10 50 80...
Page 17: ...16 4 3 2 2 5...
Page 18: ...17...


