

Cordless Impact Drill
5
tion.
►
Clean the battery ventilation slots from
time to time with a soft, dry and clean
brush.
►
Charge the battery pack without complete-
ly discharging it. Be sure to stop using the
tool and charge the unit if you notice a de-
crease in tool power.
►
Never recharge a fully charged battery
pack. Overcharging shortens battery life.
►
Charge the battery pack at room tempera-
ture. Allow a hot battery pack to cool be-
fore charging.
►
Charge the lithium-ion battery pack if you
will not use the tool for a long time (more
than six months).
►
Do not open the battery, otherwise there is
a danger of a short circuit.
►
Protect the battery from high temperatures,
such as prolonged exposure to the sun,
fire, water and moisture. There is a risk of
explosion.
►
Store the battery between 0 and 45°C. Do
not leave the battery in the car in summer.
►
The supplied lithium-ion batteries must be
used in accordance with the requirements
of the dangerous goods legislation. For
commercial shipments, such as by a third
party or freight forwarder, special warnings
and labels must be applied to the packag-
ing. Be sure to consult with a Hazardous
Materials Specialist when preparing your
device for shipping. Also observe local re-
quirements and regulations. They may be
stricter.
►
Cover or secure open contacts and pack
the battery so that it does not move around
in the package.
►
Follow local regulations regarding the dis-
posal of the battery pack.
Safety Warnings for Drills
and Screwdrivers
►
Wear ear protectors when impact drill-
ing
. Exposure to noise can cause hearing
loss.
►
Hold power tool by insulated gripping
surfaces when performing an operation
where the cutting accessory or fastener
may contact
hidden wiring.
Cutting ac-
cessory and fasteners contacting a “live”
wire may make ex- posed metal parts of
the power tool “live” and could give the op-
erator an electric shock.
►
Use auxiliary handle(s), if supplied with
the tool.
Loss of control can cause per-
sonal injury.
►
Use appropriate detectors to determine
if utility lines are hidden in the work
area or call the local utility company for
assistance.
Contact with electric lines can
lead to fire and electric shock. Damaging a
gas line can lead to explosion. Penetrating
a water line causes property dam- age.
►
Switch off the power tool immedi-
ately when the tool is jams. Be prepared
for high reaction torque that can cause
kickback.
Protect the battery against heat, e. g.,
against continuous intense sunlight, fire,
water, and moisture.
Danger of explosion.
►
In case of damage and improper use
of the battery, vapours may be emitted.
Ventilate the area and seek medical
help in case of complaints.
The vapours
can irritate the respiratory system.
►
Use the battery only in conjunction with
your Bosch power tool.
This measure
alone protects the battery against danger-
ous overload.
►
Read the operating instructions of the
battery charger.
►
Adjust the gear switch only when the
machine is at a complete stop.
►
Always push the gear selector and
turn the operating mode selector switch
through to the stop.
Otherwise, the ma-
chine can become damaged.
Product Description and
Specifications
Read all safety warnings and all in-
structions.
Failure to follow the warn-
ings and instructions may result in
electric shock, fire and/or serious injury.
Intended Use
The machine is intended for driving in and
loosening screws as well as for drilling in
wood, metal, ceramics and plastic. Impact
drills are additionally intended for impact drill-
ing in bricks, brickwork and masonry.
The light of this power tool is intended to illu-
minate the power tool’s direct area of working
operation and is not suitable for household
room illumination.
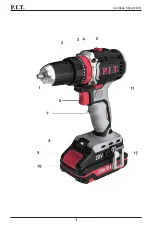
Product Features
The numbering of the product features refers
to the illustration of the machine on the graph-
ics page.
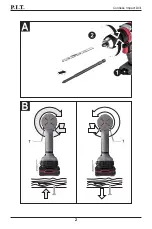
(1) Chuck jaws
(2) Keyless drill chuck
Summary of Contents for PROFESSIONAL PSB20H-10C
Page 1: ......
Page 2: ...Cordless Impact Drill 1...
Page 3: ...Cordless Impact Drill 2...
Page 11: ...10...
Page 12: ...11...
Page 13: ...12 P I T 2...
Page 15: ...14 1 2 3 4 A 1 2 2...
Page 16: ...15 1 2 P I T https pittools ru servises B...
Page 17: ...16 10 50 80 2 2 1 2 I 3 4 0 4...
Page 18: ...17 3 2 2 5...
Page 23: ......