11
STEP 2: COMPLETE ELECTRICAL CONNECTION
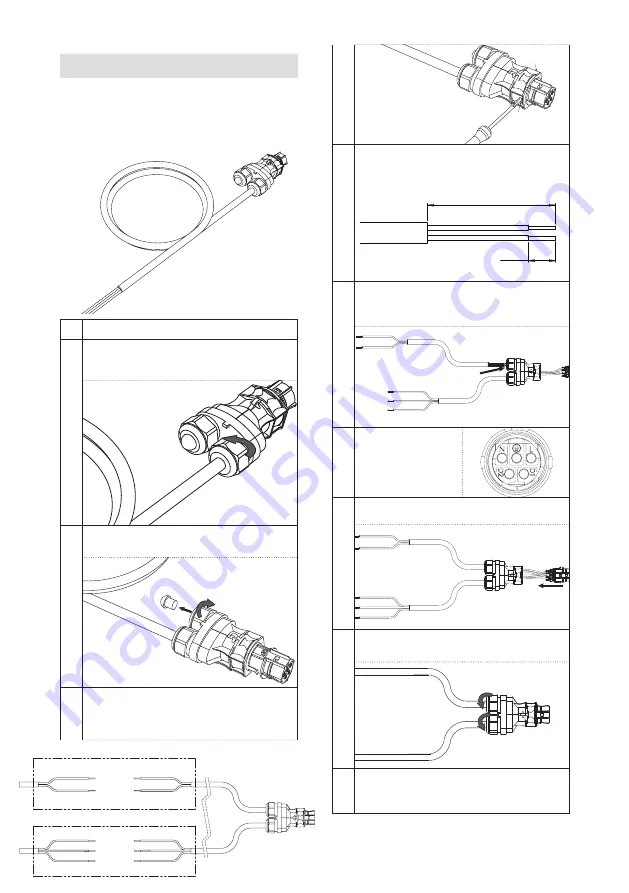
Dimming Applications — Standalone Units
The dimming cord will come with a power cord
already terminated to the line connections on the 5-pin
female Y-connector. The connector will need to be
disassembled in order to add the dimming connection.
dimming
connection
power cord
(factory installed)
1
Turn off and lock out the branch circuit.
2
Loosen power cord strain relief so power cord
can move freely
strain relief
power cord
(factory installed)
3
Loosen capped strain relief to remove factory-
installed cap.
strain relief
cap
4
Press the tabs on both sides of the Y-connector to
remove the 5-pin connector from the back shell.
tab
tab
5
Strip the wires in the dimming cable, per the
stripping requirements below.
37mm
8mm
6
Feed dimming cable through open strain relief on
the 5-pin Y-connector back shell (cable diameter
6-10mm)
7
Terminate the wires
to D1 (+) and D2 (-)
connections of your
sinking controller.
(-)
Negative
(+)
Positive
8
Push connector back into back shell.
9
Tighten strain relief for both the control and the
power cables.
dimming cord
power cord
Connect the whip end of the power cord to
branch circuit and the dimming cord to the pre-
installed dimming circuit. Refer to
figure 10.
continues on next page...
Neutral/Line 208-400V
Bond (GND)
Junction Box
Junction Box
Positive (+) 0-10V
Negative (-) 0-10V
Line (Hot) 208-400V
dimming cord
power cord
figure 10
power supply cord
(dimming)
Summary of Contents for HORTILED Top 2.0
Page 1: ...HORTILED Top 2 0 EN User and installation manual...
Page 2: ......


