background image

Complete Radio Replacement Kit with

Integrated Climate Control Retention for Select 

2014–2020 Dodge Durango

RPK4-CH4102

 © 2020 AAMP Global. All rights reserved. PAC is a Power Brand of AAMP Global.

PAC-audio.com

Pacific Accessory Corporation

Page 6

Rev: v.1

Date: 011021

®

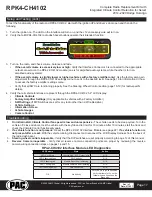
If you have Automatic Climate 

Controls, install the insert that says 

“AUTO”. Be sure to line up the light 

pipe with the hole in the kit. Please 

note that if the vehicle does not have 

automatic climate controls with the 

factory panel, inserting this button will 

not add that functionality.

Depending on how the vehicle 

is equipped, there may be up to 

7 functioning buttons below the 

climate controls. Only the options 

available on the factory dash panel 

will operate with the RPK4-CH4102. 

Inserting buttons with icons that do 

not match the factory buttons will not 

add features to the vehicle. 

Sort through the included 

RPK4-CH4102 loose buttons and 

set aside the ones that match the 

buttons on the factory dash panel 

and any blank buttons (when 

necessary) for a total of 7 buttons 

that will be installed into the new 

dash panel. The leftover buttons will 

not be used.

The buttons will be programmed later 

(see page 16), so their arrangement 

in the new dash panel is a matter of 

customer preference. Loosely slide 

the buttons into the desired opening, 

but make sure you are satisfied with 

the positions prior to seating them 

fully into the kit. The buttons are 

difficult to remove once they are fully 

seated. The top of the blank is easily 

noted by the line on the side.

Step 4

Step 3

Part Four: Preparing the New Dash Panel 

Blank Insert

Top

Bottom Wider

Than Top

Front

Back

Blank

Blank

Blank

Step 5

1   2   3   4   5   6   7

Referencing the factory panel, 

install the appropriate insert 

(AUTO or Blank) in the middle 

of the fan speed knob on the 

new dash panel. Be sure to 

choose the proper insert as 

changing them out after one 

has been inserted can be 

challenging.

Step 1

Step 2

Summary of Contents for RPK4-CH4102

Page 1: ...res Uconnect Access Remote Start Lock Unlock SOS Assist Vehicle Location Service WiFi Hotspot SiriusXM Guardian Services Rear Seat Entertainment RSE 2 In vehicles equipped with parking sensors you mus...

Page 2: ...Interface Harness RPK4 CH41XX HAR 6 LCD Display Harness 10P 2 10P 18 HAR 7 Vehicle Accessory Button Inserts Instructions Components Starting at the bottom pull outward on the center dash panel and wo...

Page 3: ...ing the AC Heater Control Module in place AC Heater Control Module Step 1 Keyless Entry Antenna Located Below Relocating the AC Heater Control Module Steps 1 5 The AC Heater Module mounted at the rear...

Page 4: ...Control Module wire harness to allow the module to be relocated to the right side of the dash opening Return the Keyless Entry Antenna into place and secure it with the two 7mm screws that were remov...

Page 5: ...cables through the sub dash up to the area behind the radio opening Remove the silicon dust caps from the ports on the new USB hub that will be used by the aftermarket radio If the aftermarket radio d...

Page 6: ...hrough the included RPK4 CH4102 loose buttons and set aside the ones that match the buttons on the factory dash panel and any blank buttons when necessary for a total of 7 buttons that will be install...

Page 7: ...the RadioPRO Interface Double DIN Single DIN Remove shaded tabs on left and right sides of the brackets Right side not shown Interface Connector 2 Interface Connector 1 LED 2 LED 1 Rotary Dial Not Us...

Page 8: ...input Gray Front R input Gray Black Front R input Green Rear L input Green Black Rear L input Purple Rear R input Purple Black Rear R input Reverse Camera Video from factory Reverse Camera Cargo Camer...

Page 9: ...oute the MQS4PT 36 harness and to plug it into the star connectors Route the MQS4PT 36 harness to the star connectors on the left most side of the dash Make sure to route the cable to where it does no...

Page 10: ...Fig 1 To aftermarket radio s camera input RPA 16P1V V1 V Out V 5 Video Output Video Input1 Red Camera 12v Out 800mA Black Camera Ground Out From Reverse Camera To aftermarket reverse camera s power wi...

Page 11: ...d ground connections are active when the vehicle is on Use these leads to power your aftermarket camera s up to 800mA total If the cameras require more than 800mA please use an external relay See page...

Page 12: ...Camera Nanny Camera Verify that the buttons are correct on the display and match the buttons and button positions on the new dash panel If the layout matches press Looks good to complete the vehicle...

Page 13: ...mera Step 2 Select the camera trigger Step 3 Verify the camera input s have been setup properly Exit the settings by pressing the back button until you are on the options screen Step 4 From the set of...

Page 14: ...the selected speed threshold Steering Wheel Controls IMPORTANT The interface comes pre programmed with all factory SWC functions and does not require programming unless you wish to re assign the SWC...

Page 15: ...t the factory amplifier s audio settings Amplifier Audio Settings Open Factory Amplifier Settings Step 1 Make Adjustments Step 2 Real Time Fade On Fading from aftermarket radio Real Time Fade Off Fadi...

Page 16: ...unction that button performs will be presented when the proximity sensor is alerted to your finger touching the button this function can be toggled on off Setup and Testing cont Assigning functions to...

Page 17: ...Key is in ignition position Verify that there is 12v on the Yellow wire and Ground on the Black wire To test the functionality of the radio and RPK4 CH4102 start with the ignition off and driver s doo...

Page 18: ...of the module until the status LED starts blinking red Once the LED starts blinking red release the button You must release the button while the LED is blinking red in order to perform the reset This...

Reviews: