Page
18 of 39
Number
SM001-300
HVAC: Idle Management System
Appendix
A. Battery Condition and Performance
Battery Voltage is critical for system operation. Special
attention should be given to both sets of batteries.
NOTE
Poor quality batteries or a weak alternator will have a
negative impact on unit run time. Always maintain the
best possible batteries and charging system.
Load test and maintain batteries as required by the man-
ufacturer.
Battery symbol in diagnostics screen indicates battery
health. This is created after many cycles. If batteries
have been disconnected recently this symbol will reset.
Several cycles will be needed to get accurate battery
health.
B. Fan and Temperature Control Display
With the control off: check for 12 VOLT at and from F1 10
amp fuse to the connector on rear of control, terminal 1.
Terminal 7 is negative. Check for 12 volts at control termi-
nal 6 (wake up) coming from the main/ compressor con-
troller terminal D6. Pushing the control (on) will switch
this input from the main controller to ground at the control
panel. This signals the main control to start the system.
When control is on the wake up signal should be less
than 1 volt.
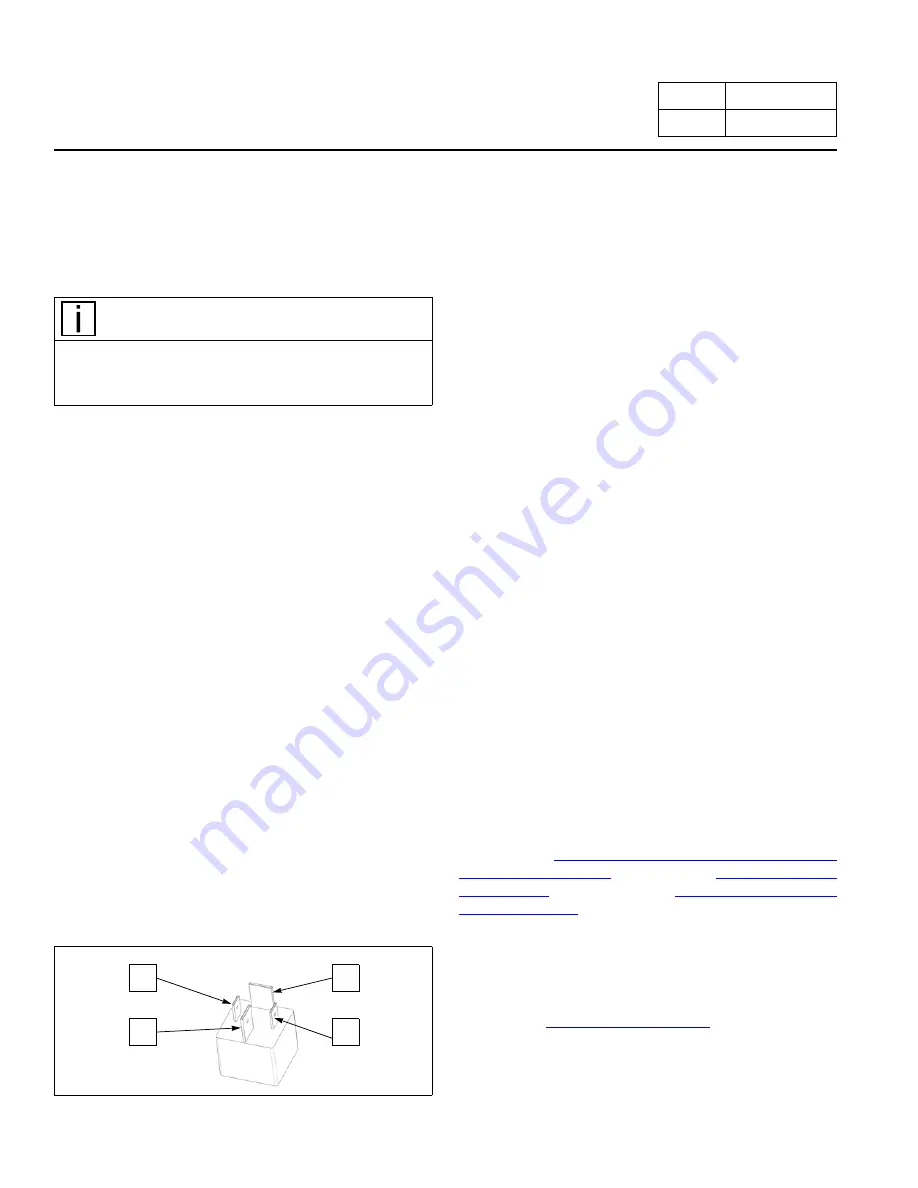
C. Relay Testing
With relay unplugged, confirm there is 12 VOLT on the
sockets where 85 and 30 relay terminals are connected.
If you do not have 12 VOLT here check fuses, wiring and
battery connections.
Figure 15.
Relay Testing
87
86
85
30
Now, with relay unplugged, check across terminals 85
and 86 of the relay, using an OHM meter. You should
have approximately 90 ohms + or - 10% at 68°F (20°C).
This is measuring the resistance through the relay coil. If
you do not, replace relay.
Overview
When you turn the EHVAC unit on, if all safety switches
are okay, such as the high pressure switch, temperature
sensor / freeze switch and the compressor thermal limit
switch, the Main / Compressor controller will connect the
compressor relay, condenser fan relay and the evapora-
tor blower relay terminals 86 to ground at their respective
terminals D10, D11 and D12 at the controller. This will
close the contacts 30 and 87 of all 3 relays and allow
power to each component.
You should now have 12 VOLT passing through the
relays on spade terminals 87. This provides power to
fuses F2, F3 and F4, continuing to the Linear Power
Module, evaporator blower, condenser fan and the com-
pressor controlling section of the Compressor Controller
Assembly.
With relay plugged in: turn the unit on. If you do not have
12 VOLT on terminal 87, check across terminals 85 (+)
an 86 (-). You should have 12 VOLT. If you do not, you
may have a defective harness or system controller. If you
have 12 VOLT here and do not have 12 VOLT on termi-
nal 87 your relay is defective. The internal coil of the relay
is energized but the contacts are not closing. Replace the
relay.
If you have 12 VOLT on terminal 87 and the compressor,
condenser fan or evaporator blower does not run you
could have a defective component such as evaporator
blower, condenser fan or compressor controller.
See testing “
J. Evaporator Blower Motor and Linear
D. Pressure Switch Testing
You must remove top covers to access the switch.
The brazed “
” on page 12 is not
removable. This switch is normally closed. When the unit
is off for a few minutes, unplug the System Controller and
check between pins D2 and D5, you should always have
continuity. If you do not, you may have a broken wire, bad


