background image


7  

Another  way  to  ensure  proper  fit  is  to  check  the  side  to  side  play  of  the  handle  assembly  at  the  canister  and  at  the 
tailgate end of the rails. There should be, at the minimum, enough play to allow the cover to move freely with no drag 
and at a maximum 1/8 inch per side. More than 1/8 inch per side may result in the cover opening unintentionally and in 
severe cases  it may fall between the rail tracks and damage the cover. 

There  are  “Stick  on  Shims”  on  the  shim 

brackets  that  can  be  removed  if  the  unit  is  too  tight  and  “Stick  on  Shims”  in  the  hardware  pack  that  can  be 
added if too loose. Refer to Figure 6C for “Stick on Shims” if adjustment is needed. 

Firmly shut the tailgate with the cover in the closed position and check to make sure the “Tailgate Ajar” warning is not 
active. If the warning is active and more than reasonable force is necessary to  fully shut the tailgate, more clearance 
may be necessary at the Rail End Caps.  

FIG. 7C 

Part  number  is  on 
the  serial  number 
label  in  the  upper 
left  corner  of  the 
canister 

(looking 

from tailgate). 

Rail 
Metal 

Handle 
Stop 

FIG. 7E 

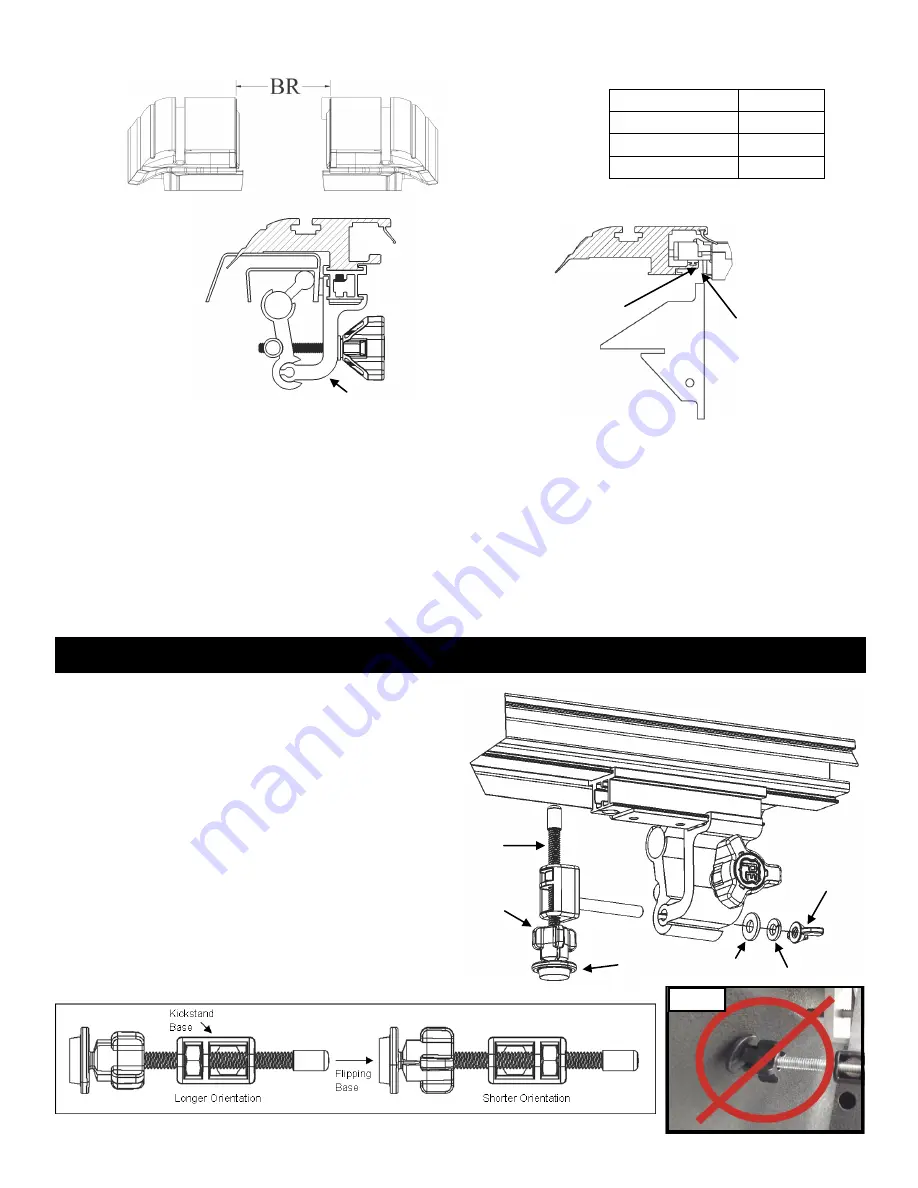
 STEP 8:   INSTALLING KICKSTANDS 

Install  the  kickstands  at  the  tailgate  ends  of  the  rails. 
Loosely  fasten  the  kickstand  assembly  to  the  clamp 
grip, on the side of the grip where the pivot foot will land 
on the flattest section of bed wall. Rotate the assembly 
so that it  will  push  as squarely as possible on the  bed 
wall,  then  tighten  the  wing  nut.  If  the  assembly  is  not 
positioned squarely against the bed wall, the assembly 
will  rotate  out  of  position,  or  the  foot  or  knob  can 
dislodge when the rail is flexed or loaded 

(FIG. 8C). 

Run  the  adjusting  bolt  inward  toward  the  bed  wall, 
putting  some  pressure  on  the  foot,  then  continue 
running  the  bolt  inward  using  the  knob  until  the  rail  is 
visually  level.  The  adjusting  bolt  can  be  removed  and 
the  base  flipped  180  degrees  to  adjust  for  varying 
clearance  with  the  bed  wall 

(FIG.  8B). 

Verify  the  BR 

dimension after the rails are leveled. 

FIG. 8C 

FIG. 8B 

FIG. 8A 

Turn-To-Adjust 
Knob 

Pivot Foot 

Adjusting 
Bolt 

Flat 
Washer 

Lock 
Washer 

Wing Nut 

Short Clamp 
Grip 

FIG. 7D 

PART  

BETWEEN 

NUMBER 

RAILS (BR) 

KR and KM 2124 

58-3/16 

KR and KM 2125 

58-3/16 

Summary of Contents for UltraGroove

Page 1: ...ions 5 STEP 7 Installing Clamps 6 STEP 8 Installing Kickstands 7 STEP 9 Installing Tailgate Drain Tubes 8 STEP 10 Lubricating Sweep Seals 8 STEP 11 Installing Canister Drain Tubes 9 STEP 12 Attaching the Pull Strap 9 Operating Instructions 9 Maintenance 10 Warranty 11 KRD2 1805 INSTALLATION INSTRUCTIONS DODGE RAM TABLE OF CONTENTS Retractable Tonneau Covers UltraGroove and UltraGroove Metal 800 33...

Page 2: ...r box Remove the rails from the rail box see caution below Perform a quick inventory of the packaging contents to ensure all parts are there TOOLS REQUIRED FOR ASSEMBLY BEFORE YOU START CANISTER DRAIN HOLE LOCATIONS STEP 1 REMOVE FROM PACKAGING AND REVIEW CONTENTS Tape Measure Side Cut or Needle Nose Pliers Masking tape 7 16 Nut Driver 2 Phillips Screwdriver Utility Knife 5 32 Allen Wrench Note Th...

Page 3: ...allon buckets Note Ensuring that the canister is centered in the bed will help assemble the rails to canister in the next step STEP 2 POSITIONING CANISTER STEP 3 COVERING STAKE POCKET FIG 2A FIG 2B Elevating Objects Canister needs to be high enough to have rail install clearance HARDWARE USED STAKE POCKET Included with your tonneau cover is a stake pocket cover This helps to trim the outside seal ...

Page 4: ...nally you can install the Rail Screw Flat and Lock Washer securing the rail to the canister FIG 4G FIG 4C FIG 4D FIG 4B 3rd Rib 4th Rib Rail Sill Outside Rail Guide Rotate Down while remaining in Rail Guide Rail Remove the protective paper from the foam on the underside of the Rail flanges This is for packaging purposes only Next identify the left and right side rails FIG 4A The rail flange and fo...

Page 5: ...r Rail Screw Canister FIG 4G BLACK TOP COVER SCREW x 2 6FT OF FOAM INSTALLATION TOOL x 1 FIG 5C Another way to set the tailgate cap seals is to use the Tailgate Seal Gauge as shown in figure 5B 5C You should be able to just slide the Tailgate Seal Gauge in between the Tailgate Cap Seal and the Bottom Cap WARNING Proper Tailgate Cap Seal Engagement is important for getting the best possible water r...

Page 6: ... 5D Now pull the cover back until there is room to apply the foam Lay the foam on the front sill of the truck from rail to rail trimming the excess with a utility knife FIG 5E Now scoot the rails and canister back on the foam and double check that your tailgate seal engagement is good You can now install your top cover with the two included screws while making sure it aligns with the front of your...

Page 7: ... measurement at the canister and the tailgate end of the rails The measurements should be equal to or less than those in Figure 7C The Clamp Extensions have been pre installed with brackets and shims to achieve the proper Between the Rail dimension BR when placed on an average factory truck bed However not all truck beds are average dimensionally and some have optional plastic caps or over the rai...

Page 8: ...r label in the upper left corner of the canister looking from tailgate Rail Metal Handle Stop FIG 7E STEP 8 INSTALLING KICKSTANDS Install the kickstands at the tailgate ends of the rails Loosely fasten the kickstand assembly to the clamp grip on the side of the grip where the pivot foot will land on the flattest section of bed wall Rotate the assembly so that it will push as squarely as possible o...

Page 9: ...NG PLACING THE SWEEP SEALS Rail Cover Fabric Panel Wearstrip Sweep Seal FIG 10A STEP 9 INSTALLING TAILGATE DRAINTUBES To install the tailgate drain tubes you need to find suitable holes in the rear stiffener of you truck bed Figure 9C shows possible hole locations Next you will screw the drain tube into the drain fitting and slide it on the tailgate cap as shown in Figure 9B There is an interferen...

Page 10: ...Trim the end that will be inserted through the truck bed using the wire cutters or a utility knife With the cover opened insert the drain tube fittings into the pre drilled holes on the underside of the canister by pushing them in place from under the canister Drain Fitting should click into place Place the other end of the drain tube through the plastic rubber access port or through the pre drill...

Page 11: ...begins squeaking or sticking during use FIG 10A Alcohol petroleum based or silicon based cleaners such as Armor All should be avoided and ARE NOT recommended for our covers It is important to open and close the cover regularly the spring that operates the cover is self lubricated and regular use assures that it stays in proper working condition Periodically remove the Top Cover and clean out the i...

Page 12: ...ife Feedback from Jack Rabbit XR by Pace Edwards Retractable tonneau owners helps us design products that better fit your needs REGISTER TODAY AT www pace edwards com Pace Warranty Any part of a Pace Edwards UltraGrooveTM Retractable tonneau that is found to be defective under the terms of this warranty will be repaired or replaced using either new or reconditioned parts at the discretion of the M...

Reviews: