background image

-


-


-


-


-


-


-


-


-


-


-


-


-


-


-


-


-


-


-


-


-


-


-


-


-


-


-


-


-


-


-


-


-


-


-


-


-


-


-


-


-


-


-


-


-


-


-


-


-


-

  ▲           

I

NSTRUCTION 

M

ANUAL


MEGA

-

T300A


Abrasive Cutter


3601 E. 34th St. Tucson, AZ  85713  USA  Tel. +1

-

520

-

882

-

6598  Fax +1

-

520

-

882

-

6599  email: pace@metallographic.com    Web: https://www.metallographic.com


Please read this instruction manual carefully and follow all installation, operating and safety guidelines.


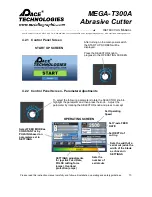
4.2.1   Control Panel Screen 


START UP SCREEN


After turning on the main power switch 

the START UP SCREEN will be 

displayed.


Press the SELECTOR knob to 

progress to the OPERATING SCREEN


To select the following parameters rotate the SELECTOR knob to 

highlight the parameter and then press the knob.   Adjust the 

parameter by rotating the SELECTOR knob and press to accept


OPERATING SCREEN


Set Operating 

Speed


Sets the 

number of 

serial cuts 


Set Y

-

axis FEED 

RATE


Set DEPTH of 

cut in y

-

Sets the width of a 

serial cut (adds the 

width of the blade 

as chosen in 

SETTINGS


Select FEED MODE as 

CONSTANT or by 

PULSING based on 

parameters set in 

SETTINGS


SETTINGS adjustments 

for joystick Feed Rate, 

PULSE cutting force 

(amps), Overload 

protection (amps)


4.2.2   Control Panel Screen 

-

 Parameter Adjustments


13


Summary of Contents for MEGA-T300A

Page 1: ...struction manual carefully and follow all installation operating and safety guidelines Equipment Type 300 mm 12 inch Automated Abrasive Cut off Machine Model MEGA T300A Electrical Requirements 208Y 380 Volts 3 phase Frequency 50 60 Hz Motor Horsepower 10 3 hp 7 7 KW 21 Nm maximum 380V 3 phase Manual Revision Date March 25 2022 This instruction manual is provided with each piece of delivered equipm...

Page 2: ...ter 3601 E 34th St Tucson AZ 85713 USA Tel 1 520 882 6598 Fax 1 520 882 6599 email pace metallographic com Web https www metallographic com Please read this instruction manual carefully and follow all installation operating and safety guidelines ...

Page 3: ...uding any reference to Buyer s specifications and any description in catalogs circulars and other written material published by PACE Technologies is the sole purpose of identifying such goods and shall not create an express warranty that the goods shall conform to such description THIS WARRANTY IS EXPRESSLY IN LIEU OF ALL OTHER WARRANTIES EXPRESSED OR IMPLIED THERE ARE NO IMPLIED WARRANTIES OF MER...

Page 4: ...ded during any period of such default and the original warranty period will not be extended beyond its original expiration date despite such suspension of warranty rights 7 MISCELLANEOUS PROVISIONS This agreement has been made in and shall be governed by the laws of the State of Arizona These terms and conditions and the description of the Products on the reverse side hereof or in any proposal sub...

Page 5: ... com Please read this instruction manual carefully and follow all installation operating and safety guidelines Contents PAGE Nameplate i Warranty ii 1 0 Product Description 1 2 0 Shipping Unpacking and Installation 6 3 0 Safety Guidelines 9 4 0 Start Up and Operation 12 5 0 Maintenance 23 6 0 Trouble Shooting 24 7 0 Cutting Basics 25 8 0 Electrical and Mechanical Drawings 28 v ...

Page 6: ...and durable with its cast aluminum alloy and stainless steel construction Featuring a corrosion free T slot table the MEGA T300A is a very versatile wheel table feed bench top model metallographic cutter 1 Control Screen Manual wheel feed Cutting chamber Table manual wheel feed Blade Height Locking Screw Safety Lock out Emergency Stop Control knobs Powerful motor The MEGA T300A is equipped with a ...

Page 7: ...his instruction manual carefully and follow all installation operating and safety guidelines 2 T slot table Rinse hose LED light Removable side port for longer feed through samples Removable side port for longer feed through samples Pass through side panels for long sample access Safety lock out for protecting user against moving blade Red flashing overload light when current setting is exceeded ...

Page 8: ...1 520 882 6599 email pace metallographic com Web https www metallographic com Please read this instruction manual carefully and follow all installation operating and safety guidelines Coolant applied directly to the blade Flexible coolant hose for positioning coolant to the cutting area Easy to use vises 3 ...

Page 9: ...ds Cut off wheels 12 inch mm 300 mm diameter Wheel arbor 32 mm 1 25 inch diameter Maximum sample diameter 4 inch 100 mm diameter 3 x 8 inches 75 x 200 mm HxD Wheel feed Manual Table feed Automatic Manual Vertical movement 7 inch 180 mm Table feed movement y axis 7 5 inch 190 mm Weight Approx 500 lbs 120 kg Dimensions WxDxH Hood Closed 42 x 42 x 30 inch 1070 cm x 1070 cm x 760 cm Hood Open 42 x 42 ...

Page 10: ... 6599 email pace metallographic com Web https www metallographic com Please read this instruction manual carefully and follow all installation operating and safety guidelines 1 3 Mechanical Schematic Note Installation of the MEGA T300A should be on a flat sturdy surface with easy access to electrical connections 5 ...

Page 11: ...0 Unpacking Shipping and Installation 2 1 Unpacking Unit is delivered in a crate Unpack and check for completeness of parts Measures WxHxD Approx 38 x 48 x 44 inch Weight Approximately 550 lbs 2 2 Shipping When moving crate lift from bottom To move MEGA T300A use lifting handles provided with the machine The MEGA T300A is constructed of sensitive electronic and mechanical components DO NOT DROP Ca...

Page 12: ...lant tank supply drain and electrical connections Electrical connections The standard saw is designed to operate at 208 220V 3 phase 120V 120V 120V ground optional 380V Warning if not connected properly to 3 phase power damage may occur to the motor and void the warranty Verify voltage on nameplate Verify the direction of rotation of the cut off wheel The wheel should turn from top to bottom as vi...

Page 13: ...Pump Tank drain valve External coolant supply Attach 5 8 inch 17 mm tube between pump and cutter Drain Hose 1 5 inch 38 mm hose Electrical connections Connect electrical power cable to source Note Inspect the operating voltage on the name plate Electrical connection for external coolant supply Power for recirculation system comes from the MEGA T300S Recommended Coolant To minimize corrosion a cool...

Page 14: ...oper operator training is required for the safe operation of the MEGA T300A Any unauthorized mechanical and electrical change as well as improper operation voids all warranty claims All service issues need to be reported to the manufacturer supplier Before operating cutting chamber hood must be closed After cutting the safety latch will not open for approximately 2 8 seconds after pressing the eme...

Page 15: ...ating and safety guidelines Recirculation tank The MEGA T300A is equipped with a coarse filter to remove large particulate and broken blades Note Dispose of the old coolant in accordance with federal state and local regulations Electrical connection Pressure line After cutting it is recommended that the cutting chamber be rinsed dried and the hood left open to prevent debris and corrosion build up...

Page 16: ...gency stop switch Magnetic Safety switch 11 Test Activate main switch and close hood depress emergency stop switch Proper Response Machine powers down and motor stops in 2 8 seconds Malfunction Machine does not lose power Corrective measure If system does not power down disconnect power supply cord and call service technician Magnetic safety lock out switch Test Activate main switch and close hood...

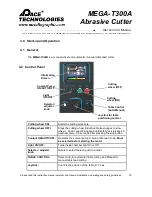
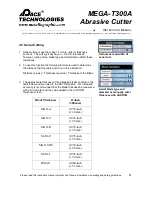
Page 17: ...el OFF Stops the cutting wheel inductive brake engages to slow wheel Hood cannot be opened until safety lock releases in approximately 2 8 seconds after pressing the stop button Coolant ON AUTO OFF Operates the coolant pump in Auto or Manual mode Must be selected before starting the motor Light ON OFF Turns inside chamber light On or Off Selector adjuster knob Rotate to select feature push to acce...

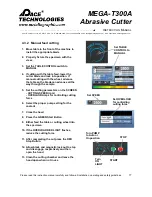
Page 18: ...to progress to the OPERATING SCREEN To select the following parameters rotate the SELECTOR knob to highlight the parameter and then press the knob Adjust the parameter by rotating the SELECTOR knob and press to accept OPERATING SCREEN Set Operating Speed Sets the number of serial cuts Set Y axis FEED RATE Set DEPTH of cut in y Sets the width of a serial cut adds the width of the blade as chosen in...

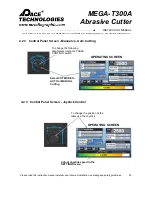
Page 19: ... manual carefully and follow all installation operating and safety guidelines To change the following parameters rotate the TABLE CONTROL switch OPERATING SCREEN Select CUT MODE to AUTO or MANUAL Cutting To change the position of the table use the Joystick OPERATING SCREEN Adjust Joystick speed in the SETTINGS menu 4 2 3 Control Panel Screen Manual vs Auto Cutting 4 2 3 Control Panel Screen Joysti...

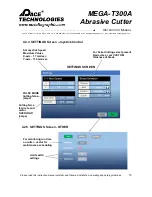
Page 20: ...nstallation operating and safety guidelines SETTINGS SCREEN For Serial Cutting select present blade size or set CUSTOM thickness of blade Set Joystick Speed Maximum Values X axis 1 7 mm sec Y axis 11 2 mm sec 4 2 4 SETTINGS Screen Joystick Control Cutting force feed rate and motor OVERLOAD amps PULSE MODE Cutting force amps For monitoring run time on cutter useful for maintenance scheduling 4 2 5 ...

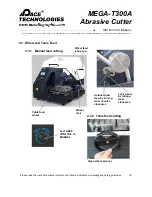
Page 21: ...ic com Please read this instruction manual carefully and follow all installation operating and safety guidelines 4 3 Wheel and Table Feed Wheel feed chop cut Unlock wheel feed by turning lever counter clockwise 4 3 1 Manual feed cutting 4 3 2 Table feed cutting Open wheel spinner Table feed wheel Lock wheel by turning lever clockwise 16 Wheel lock Set TABLE CONTROL to MANUAL ...

Page 22: ... advance the table so the blade can advance all the way through the sample 5 Set the cutting parameters on the SCREEN CUTTING SPEED rpm OVERLAOD Amps for controlling cutting force 6 Select the proper pump setting for the coolant 7 Close the hood 8 Press the GREEN Start Button 9 Either feed the table or cutting wheel into the specimen 10 If the OVERLOAD RED LIGHT flashes reduce the cutting force 11...

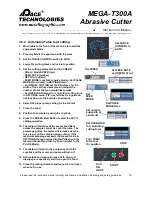
Page 23: ...ock down so the sample can advance 6 Select the proper pump setting for the coolant 7 Close the hood 8 Position the sample by using the Joystick 9 Press the GREEN Start Button to start the AUTO cutting operation 10 The table will advance at the preset Feed Rate unless the sample cannot be cut at that rate The amperage pull on the motor will increase as more force is put on the sample during cuttin...

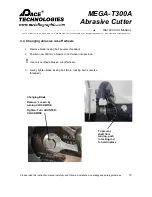
Page 24: ...allation operating and safety guidelines 1 Remove blade locking bolt reverse threaded 2 Position new 300 mm abrasive cut off wheel into position Use only certified abrasive cut off wheels 3 Gently tighten blade locking bolt Note locking bolt is reverse threaded 4 4 Changing abrasive cut off wheels 19 Changing Blade Remove Loosen by turning CLOCKWISE Tighten Turn COUNTER CLOCKWISE To prevent shaft ...

Page 25: ...id 128 oz MAXCUT 1000 128 1 gallon MAXCUT 2 Cutting Fluid with Anticorrosion Additive 32 oz MAXCUT2 1000 32 32 oz MAXCUT 2 Cutting Fluid with Anticorrosion Additive 128 oz MAXCUT2 1000 128 1 gallon 300 mm 12 MAXCUT Abrasive Blades 32mm 1 Arbor Pace Product Name Catalog Number Packaging Soft Non ferrous Materials Aluminum Brass Zinc Etc MAX E300 10 Hard Non ferrous Materials MAX C300 10 Soft Steels...

Page 26: ...ed to determine the distance that the table will move in the x direction Distance x axis Thickness required Thickness of the Blade 3 The approximate thickness of the abrasive blades is listed in the table below and are listed in the SETTING table For increased accuracy is recommended that the blade thickness be measured with a micrometer and the value added to the CUSTOM thickness screen 4 5 Seria...

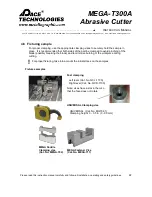
Page 27: ...ce It is recommended that both sides of the part be clamped to avoid pinching of the blade possibly breaking the blade and to minimize burning of the workpiece during cutting For proper fixturing take into account the initial stress on the samples Fixture examples 4 6 Fixturing sample Fast clamping Left lever Cat No QCL 1100 Right lever Cat No QCR 1100 Note vises have a slot in them so that the fa...

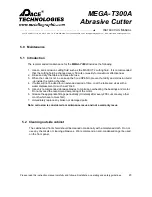
Page 28: ...fter use 3 When the cutter is not in use keep the hood OPEN to prevent humidity and corrosion build up inside the cutting chamber 4 If cutter will not be used for an extended period of time coat the table and vises with a water displacement oil such as WD 40 5 Use only recommended abrasive blades to minimize overheating the bearings and motor Do not exceed the recommend amp rating of the motor 6 G...

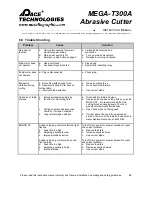
Page 29: ...se cutting force b Move specimen forward c Use correct blade Corrosion of table of vises a Improper cleaning and drying b Incorrect or old cutting fluid c Cutting chamber has become a humidity corrosion chamber d Long term storage oxidation a Rinse and dry table and vises b Use an anti corrosion cutting fluid such as the MAXCUT 2 It is recommended that the cutting fluid be changed every 50 cuts or...

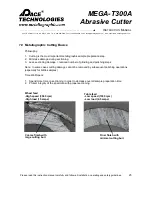
Page 30: ... sample preparation step 2 Minimize damage during sectioning 3 Less sectioning damage reduced number of grinding and polishing steps Note In some cases cutting damage cannot be removed by subsequent polishing operations especially for brittle samples Time Well Spent 1 Spend more time on sectioning in order to decrease overall sample preparation time 2 Protect integrity of the specimen with proper ...

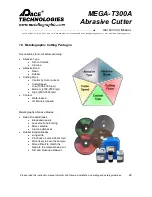
Page 31: ...Silicon Carbide Alumina Abrasive Bond Resin Rubber Cutting Force Control by motor current Cutter Speed Low 1500 2000 rpm Medium 2000 2500 rpm High 2500 3500 rpm Coolant Water based Oil Emulsion based Five variables for successful sectioning Metallographic Abrasive Blades Resin Bonded Blades Breakdown easily Less smell and burning More versatile Alumina abrasives Rubber Bonded Blades Longer life Pr...

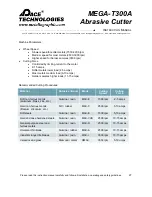
Page 32: ...st metals medium load 6 10 amps Harder samples higher loads 11 15 amps Machine Parameters Material Abrasive Bond Blade Cutting Speed Cutting Force Soft non ferrous metals aluminum brass zinc etc Alumina resin MAX E 1500 rpm 2 5 amps Hard non ferrous metals titanium zirconium etc SiC rubber MAX C 2500 rpm 5 10 amps Soft steels Alumina resin MAX E 1500 rpm 5 10 amps Hard and case hardened steels Alu...

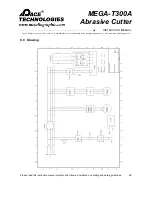
Page 33: ... E 34th St Tucson AZ 85713 USA Tel 1 520 882 6598 Fax 1 520 882 6599 email pace metallographic com Web https www metallographic com Please read this instruction manual carefully and follow all installation operating and safety guidelines 28 8 0 Drawing ...

Page 34: ...r 3601 E 34th St Tucson AZ 85713 USA Tel 1 520 882 6598 Fax 1 520 882 6599 email pace metallographic com Web https www metallographic com Please read this instruction manual carefully and follow all installation operating and safety guidelines 29 ...

Page 35: ...th St Tucson AZ 85713 USA Tel 1 520 882 6598 Fax 1 520 882 6599 email pace metallographic com Web https www metallographic com Please read this instruction manual carefully and follow all installation operating and safety guidelines 30 9 0 Exploded Drawings ...

Page 36: ...r 3601 E 34th St Tucson AZ 85713 USA Tel 1 520 882 6598 Fax 1 520 882 6599 email pace metallographic com Web https www metallographic com Please read this instruction manual carefully and follow all installation operating and safety guidelines 31 ...

Page 37: ...r 3601 E 34th St Tucson AZ 85713 USA Tel 1 520 882 6598 Fax 1 520 882 6599 email pace metallographic com Web https www metallographic com Please read this instruction manual carefully and follow all installation operating and safety guidelines 32 ...

Page 38: ...r 3601 E 34th St Tucson AZ 85713 USA Tel 1 520 882 6598 Fax 1 520 882 6599 email pace metallographic com Web https www metallographic com Please read this instruction manual carefully and follow all installation operating and safety guidelines 33 ...

Page 39: ...r 3601 E 34th St Tucson AZ 85713 USA Tel 1 520 882 6598 Fax 1 520 882 6599 email pace metallographic com Web https www metallographic com Please read this instruction manual carefully and follow all installation operating and safety guidelines 34 ...

Page 40: ...r 3601 E 34th St Tucson AZ 85713 USA Tel 1 520 882 6598 Fax 1 520 882 6599 email pace metallographic com Web https www metallographic com Please read this instruction manual carefully and follow all installation operating and safety guidelines 35 ...

Page 41: ...r 3601 E 34th St Tucson AZ 85713 USA Tel 1 520 882 6598 Fax 1 520 882 6599 email pace metallographic com Web https www metallographic com Please read this instruction manual carefully and follow all installation operating and safety guidelines 36 ...

Page 42: ...r 3601 E 34th St Tucson AZ 85713 USA Tel 1 520 882 6598 Fax 1 520 882 6599 email pace metallographic com Web https www metallographic com Please read this instruction manual carefully and follow all installation operating and safety guidelines 37 ...

Page 43: ...r 3601 E 34th St Tucson AZ 85713 USA Tel 1 520 882 6598 Fax 1 520 882 6599 email pace metallographic com Web https www metallographic com Please read this instruction manual carefully and follow all installation operating and safety guidelines 38 ...

Page 44: ...r 3601 E 34th St Tucson AZ 85713 USA Tel 1 520 882 6598 Fax 1 520 882 6599 email pace metallographic com Web https www metallographic com Please read this instruction manual carefully and follow all installation operating and safety guidelines 39 ...

Page 45: ...r 3601 E 34th St Tucson AZ 85713 USA Tel 1 520 882 6598 Fax 1 520 882 6599 email pace metallographic com Web https www metallographic com Please read this instruction manual carefully and follow all installation operating and safety guidelines 40 ...

Page 46: ...r 3601 E 34th St Tucson AZ 85713 USA Tel 1 520 882 6598 Fax 1 520 882 6599 email pace metallographic com Web https www metallographic com Please read this instruction manual carefully and follow all installation operating and safety guidelines 41 ...

Page 47: ...r 3601 E 34th St Tucson AZ 85713 USA Tel 1 520 882 6598 Fax 1 520 882 6599 email pace metallographic com Web https www metallographic com Please read this instruction manual carefully and follow all installation operating and safety guidelines 42 ...

Page 48: ...r 3601 E 34th St Tucson AZ 85713 USA Tel 1 520 882 6598 Fax 1 520 882 6599 email pace metallographic com Web https www metallographic com Please read this instruction manual carefully and follow all installation operating and safety guidelines 43 ...

Page 49: ...r 3601 E 34th St Tucson AZ 85713 USA Tel 1 520 882 6598 Fax 1 520 882 6599 email pace metallographic com Web https www metallographic com Please read this instruction manual carefully and follow all installation operating and safety guidelines 44 ...

Page 50: ...r 3601 E 34th St Tucson AZ 85713 USA Tel 1 520 882 6598 Fax 1 520 882 6599 email pace metallographic com Web https www metallographic com Please read this instruction manual carefully and follow all installation operating and safety guidelines 45 ...

Page 51: ...r 3601 E 34th St Tucson AZ 85713 USA Tel 1 520 882 6598 Fax 1 520 882 6599 email pace metallographic com Web https www metallographic com Please read this instruction manual carefully and follow all installation operating and safety guidelines 46 ...

Page 52: ...r 3601 E 34th St Tucson AZ 85713 USA Tel 1 520 882 6598 Fax 1 520 882 6599 email pace metallographic com Web https www metallographic com Please read this instruction manual carefully and follow all installation operating and safety guidelines 47 ...

Page 53: ...r 3601 E 34th St Tucson AZ 85713 USA Tel 1 520 882 6598 Fax 1 520 882 6599 email pace metallographic com Web https www metallographic com Please read this instruction manual carefully and follow all installation operating and safety guidelines 48 ...

Page 54: ...r 3601 E 34th St Tucson AZ 85713 USA Tel 1 520 882 6598 Fax 1 520 882 6599 email pace metallographic com Web https www metallographic com Please read this instruction manual carefully and follow all installation operating and safety guidelines 49 ...

Page 55: ...r 3601 E 34th St Tucson AZ 85713 USA Tel 1 520 882 6598 Fax 1 520 882 6599 email pace metallographic com Web https www metallographic com Please read this instruction manual carefully and follow all installation operating and safety guidelines 50 ...

Page 56: ...r 3601 E 34th St Tucson AZ 85713 USA Tel 1 520 882 6598 Fax 1 520 882 6599 email pace metallographic com Web https www metallographic com Please read this instruction manual carefully and follow all installation operating and safety guidelines 51 ...

Page 57: ...r 3601 E 34th St Tucson AZ 85713 USA Tel 1 520 882 6598 Fax 1 520 882 6599 email pace metallographic com Web https www metallographic com Please read this instruction manual carefully and follow all installation operating and safety guidelines 52 ...

Page 58: ...r 3601 E 34th St Tucson AZ 85713 USA Tel 1 520 882 6598 Fax 1 520 882 6599 email pace metallographic com Web https www metallographic com Please read this instruction manual carefully and follow all installation operating and safety guidelines 53 ...

Page 59: ...r 3601 E 34th St Tucson AZ 85713 USA Tel 1 520 882 6598 Fax 1 520 882 6599 email pace metallographic com Web https www metallographic com Please read this instruction manual carefully and follow all installation operating and safety guidelines 54 ...

Page 60: ...r 3601 E 34th St Tucson AZ 85713 USA Tel 1 520 882 6598 Fax 1 520 882 6599 email pace metallographic com Web https www metallographic com Please read this instruction manual carefully and follow all installation operating and safety guidelines 55 ...

Page 61: ...ter 3601 E 34th St Tucson AZ 85713 USA Tel 1 520 882 6598 Fax 1 520 882 6599 email pace metallographic com Web https www metallographic com Please read this instruction manual carefully and follow all installation operating and safety guidelines ...

Reviews: