background image

14

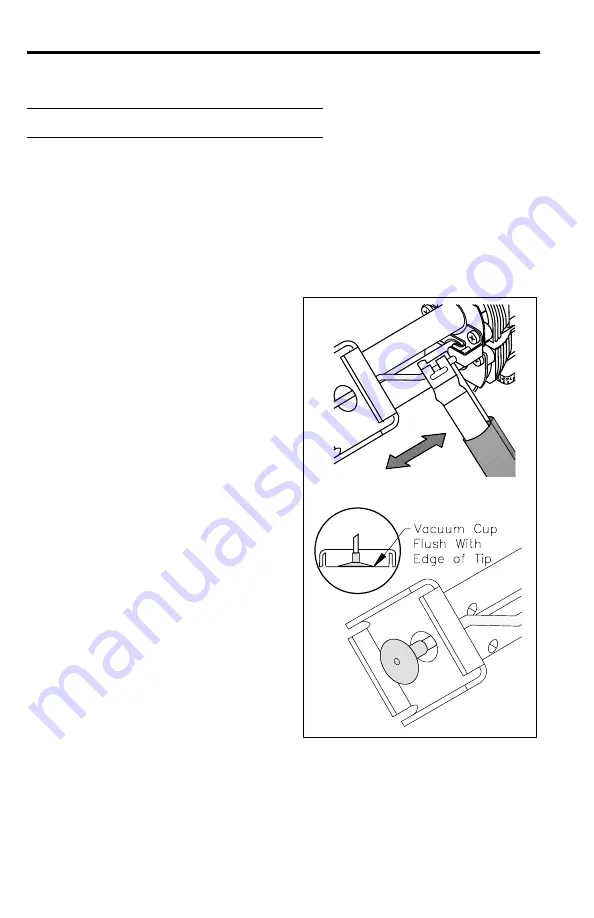
VACUUM PICK ADJUSTMENT

Proper vacuum must be maintained to lift and hold the component during a removal
operation.  The Vacuum Pick Assembly within the DTP-80 handpiece adjusts
quickly and easily to provide an optimum setting where the vacuum cup makes
contact with the component body as the tip makes contact with the component leads.

To adjust the Vacuum Pick Assembly, perform the following procedure:

1. Ensure that the proper tip and vacuum cup are installed on the DTP-80.

2. Using the Tip & Vacuum Cup Tool,

grasp the Vacuum Pick as shown in
the illustration.

3. Adjust the Vacuum Pick position to a

point where the end of the Vacuum
Cup is flush (even) with the bottom
edges of the tip.

IMPORTANT - 

The Vacuum Pick is now in a proper position for initial operation.

During the first component removal operation, the vacuum cup will contact the
component body as the tip is lowered over the component.  As the tip moves down
to contact the component leads, the vacuum pick  slides into position.  Readjustment
will not be required until the component removal application changes (e.g., different
component, tip, vacuum cup).

Summary of Contents for DUAL THERMOPIK DTP-80

Page 1: ...OPERATION MAINTENANCE MANUAL DTP 80 DTP 80 Dual ThermoPik Handpiece...

Page 2: ...Sodr X Tractor SR 3 SR 4 ST StripTweez SwaPlater ThermoBand Thermo Drive ThermoJet ThermoPart ThermoPik ThermoTweez Tip Evac VisiFilter The following are trademarks and or servicemarks of PACE Incorpo...

Page 3: ...TENANCE MANUAL MANUAL NUMBER 5050 0403 REV A For any questions regarding the following instructions contact your local authorized PACE dealer or contact PACE directly at Telephone 301 490 9860 Fax 301...

Page 4: ...remove BGAs Ball Grid Arrays The Dual ThermoPik is a member of the PACE SensaTemp family of advanced handpieces CAUTION Always return heated handpieces to the appropriate Tip Tool Stand when not in us...

Page 5: ...mb Screw If the heater ends are even with each other go to Power Source Connection If the ends are not even go to step 3 3 Loosen the handpiece Hinge Screw 1 2 turn 4 Holding the handpiece in a vertic...

Page 6: ...one of the front panel power receptacles on your PACE power source PACE recommends that air handpieces utilize the power receptacles closest to the AUTO SNAP VAC or SNAP VAC Port to minimize cord tang...

Page 7: ...e rapid yet controlled solder reflow Lower temperatures extend tip and heater life allow solder to remain on the lower surfaces of the tip to improve thermal linkage between the tip and the component...

Page 8: ...ration perform the following steps 1 Connect the 152 cm 60 inch length of black silicone air hose to the Vacuum Pick tube metal tube in the middle of the handpiece 2 Attach the male quick connect hose...

Page 9: ...licone air hose to this end of the VisiFilter and the DTP 80 handpiece 5 To the other air hose end on VisiFilter attach a male quick connect hose mount fitting P N 1259 0087 6 Attach the male quick co...

Page 10: ...p heater hot and clean both heater bores using the supplied 3 16 diameter wire brush prior to the installation of a new tip 1 Select the proper tip for your application Refer to Table 1 2 Insert the t...

Page 11: ...1 17 x 1 17 29 7mm x 29 7mm 1121 0557 PQFP 160 208 1 21 x 1 21 30 7mm x 30 7mm 1121 0552 Application PQFP 240 1 33 x 1 33 33 8mm x 33 8mm 1121 0558 PQFP 196 1 42 x 1 42 36 1mm x 36 1mm 1121 0554 PQFP...

Page 12: ...owing instructions to remove or install the vacuum cup WARNING Do NOT install or remove a Vacuum Cup with bare hands Always use the Tip Vacuum Cup Tool Installation by any other means may cause burns...

Page 13: ...o the Vacuum Pick 6 Remove the Tip Vacuum Cup Tool REMOVAL 1 Place the open slotted end of the Tip Vacuum Cup Tool around the Vacuum Pick and behind the Vacuum Cup as shown 2 Press the vacuum hose aga...

Page 14: ...installed on the DTP 80 2 Using the Tip Vacuum Cup Tool grasp the Vacuum Pick as shown in the illustration 3 Adjust the Vacuum Pick position to a point where the end of the Vacuum Cup is flush even wi...

Page 15: ...aces of oxidation and solder from the heated tip If oxidation is present clean the tip until no oxidation spots remain Immediately tin the tip surfaces and keep them tinned at all times Prepare the in...

Page 16: ...our company guidelines 1 Remove any protective coatings and clean the component leads and land areas using an approved solvent or cleaner 2 Ensure that the PCB is free of moisture You may wish to gent...

Page 17: ...piece tip to PQFP component lead land connections PACE recommends adding bridgefill solder wrap or flux to maximize heat transfer across all connections When removing BGA components the use of flux is...

Page 18: ...and steady 2 Clean the tip and apply a fresh bead of solder to its bottom edges 3 Position the handpiece directly over the component to be removed 4 Bring the handpiece down over the component The va...

Page 19: ...tool and allow the board and component to cool before a second attempt b BGA components should make contact with the package Dwell times may be longer than one minute will vary depending on your parti...

Page 20: ...and handpiece itself for evidence of physical damage Do not use a handpiece with a damaged power cable Refer to Table II and the illustration following for information on troubleshooting most handpie...

Page 21: ...Pin 3 to Pin 6 Resistance should be 110 ohms If circuit reads less than 105 ohms Shorte Sensor Replace Heater Assembly A Heat on only 1 heater Check resistance Pin 2 to Pin 5 If resistance equals 12 o...

Page 22: ...Cup Tool 1100 0239 Vacuum Tubing 1342 0027 Holder Tube to Wire hose clamps 1321 0274 P6 Vacuum Cup Kit 6993 0153 P1 DTP Tip Tool Stand 6019 0047 Replacement Pads For Cushion Grips 1317 0029 P2 Tip Red...

Reviews: