MAINTENA
N
C
E
-
-
---------
•
J
n
s
pe
ct Glass Chamber
ra,
p
r
op
e
r se
a.
t
i
ng through and piece parts.
(NOTE:
loss
of vacuum
will resuu 1r not sealed p
r
oJP
1
rJy)
.
•
attach End Cap ,a..ssem
b
l
y b'f pus
i
n
g
and turning to leek into
p
l
ac.e
.
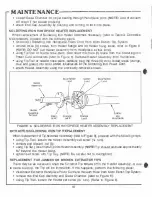
SOLDERING IRON HANDIPIECE HEATER REPLACEMENT
When reo aceme111 of Soldering Iron H
e
a
t
e
r
:::iecomes necessary
(re
fe
r
to Tab
l
e 3. Cor ecl]ve
� ainrenanc }. proceed ·mh 1he
lo
l
l
�
11i
11
g
steps.
•
d
'
sc
o
n
n
ec, Soldering
Iron
Handpiece Po.-.e COn:.1
fro
m
Micro Bench Top Sys
t
e
m
.
•
1
remove
t
h
r
e
e (3) s-crB'i.'-'S from Heater flange and
l
e
t
Hearer hang loose, re ·er to Figure 8.
( OTE: 00 NOT pull Healer Asse
m
c
l
y
r
mm Handpiece al this time).
•
using
Tip T
oo
l
or n
e�
l
e nose
p
ri
ers
.
d
'
s
connet
l
the hree (3} leads from the Soldering
Iron
�O'Ner Cord connectors (refer to Flgure B,.
R
e
mov
e
He
a
t
e
r
Assembly rrom H
a
ndp
c
e
ce
1
1
usmg Tip Too or needle nose
pl
i
ers
.
carefully plug the three (3)
c
o
l
o
r
coded
l
e
ads (orange,
blue and gre-en} Into r;o
t
o
r
coded receptac es cf he S
o
l
de
r
i
ng Iron
PcJ
y,
'er Cord.
•
a ach Healer A.;sembly using
t
e previously
r
emovet:l
screws.
Hea
t
a,
/
Aa:.-embly
Sc.nl
w
s
G rae-n
Ls,att
Orange
Lad
Seide
Iron
Handp•ei::e
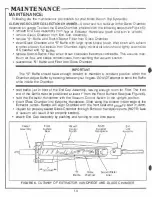
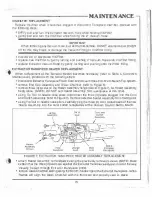
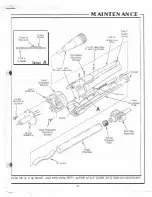
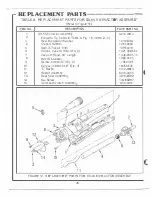
FIGURE 8. SO
L
DEA
I
G IRON HA DPIECE HEATER ASSEMB
L
Y REPLACEt\ ENT
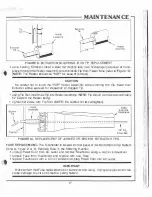
EXTRACTORISOLOEAING IRON TIP REPLACEMENT
When
re
p
l
acemen
t
of TIµ becomes necessary (�er to Figure 9). proceed with t a
f
o
ll
ow
i
n
g s
t
e
p
s
:
•
using
Tip
T
oo
l
,
loosen
t
he Heater A;s.embly sel screw (V" turn
)
.
• remove and discard old Tip.
•
usu,g
T
i
p
Tool
1
Insert
nev,
1
Tip
i
n
tc
H
e
a
t
e
r
Assembly.
tNOTE:
T
i
p s
h
o
ul
d protrude
aoproximatety
�· beyond
t
h
e Heater body).
•
tighten set screw
wi,
hi
Tip
T
oo
l
.
(NOTE:
Se
ca
refu
l
nol lo overngh
t
en
J
.
�EPLACEMENT FOiR JAMMED OR aROKEN EXTRACT01R TIPS
There may
be
an occ-assian when lhe
&t
r
acto
r
lip breaks oH
fn
the
H
e
a
t
er Assembly, or due
•
to o
x
i
d
e bul
l
d
-u
p
,
tne
Tip will
be immO\iaOle.
Ir
th
i
s
happens,
perform lhe
fo
l
l
owi
n
g
steps�
• disconnect Ext
r
actor Handpiece
Powe
r C<Jrd and vacuum Hose from M
i
cro Bench Top System.
• remova tho E.nd Cap Asembly and G
l
a
ss Chamber (refer to Figure 6).
• using Tip Tool
1
loosen the
Heat.er
se
t
screw (¼ turn,. (Refer ta F
i
g
u
r
a
8
)
.
16
l


