background image

- 8 - 

Device Settings continued… 


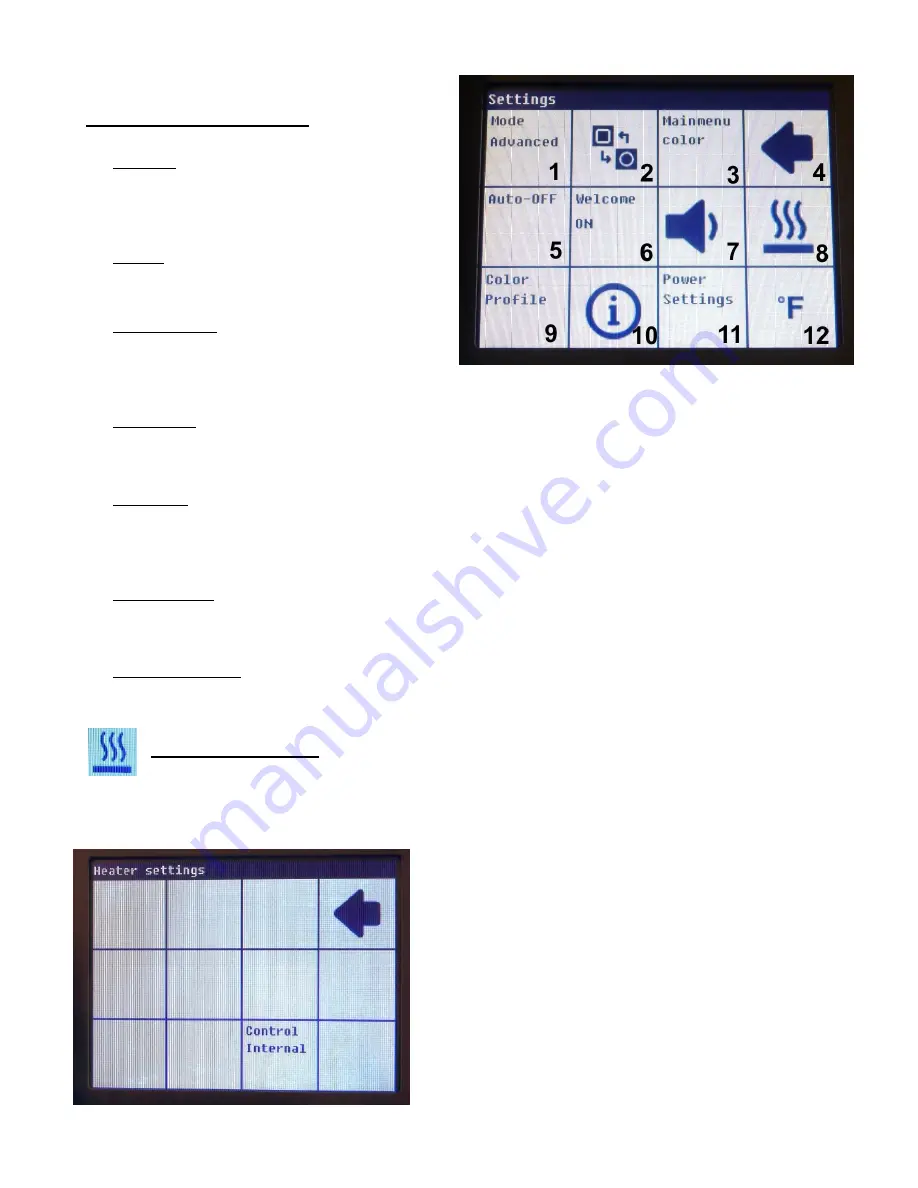
6.  Welcome -- Tapping this button will toggle on/off 

the PACE splash screen and safety precautions 

that come up when the unit is first turned on. 

 
7.  Volume 

– This square is used to cycle through the 

three sound levels; low, high, or off. 

 
8.  Heater Settings 

– This button opens the heater 

settings menu. See the following section for more 

information.  This button is also present on the main menu screen and appears again here for convenience.  

 
9.  Color Profile --  The PH 100 has 9 preset color profiles to choose from.  Each profile is fully adjustable and 

will also remember any specific changes made to the Main Menu using the Main Menu Color option. 


10.  Information --  This is where you can find out which version of software is currently installed on your PH 100.  

This screen also provides a reset button which will restore the factory default settings for the currenttly 

installed software version. 

 
11.  Power Settings 

– This square provides the same function as tapping the power meter on the Main Menu, it 

provides access to the power limiting function.  Options are 1600 watts or 800 watts. 


12.  Temperature Scale 

– Tapping here will switch the PH 100 between Celsius and Fahrenheit. 


Heater Settings Menu 
 

There are two heater settings menus, selectable in the Device Settings as Mode: User and Mode: Advanced.  
User mode is very straight forward and only allows selection of input sensor for the closed loop temperature 
monitoring. 
 

To the left is the Heater Settings Menu with the PH 100 set to 
User Mode. Tapping the arrow goes back to the previous 
screen.  Tapping the Control button will cycle through the 
three available settings; Internal, External Top Sensor and  
External Bottom Sensor. 
 
The PH 100 will actively monitor the selected sensor and will 
continuously adjust power to the heaters, bringing the 
temperature at the sensor location up to the Set 
Temperature.   
 
Sensor selection and placement are important for safe and 
accurate heating!  

Summary of Contents for PH 100

Page 1: ...1 PH 100 Low Profile IR Pre heater Operations Manual Manual Number 5050 0587 Rev C Applies to 8007 0572 PH 100 115 120VAC 50 60Hz 8007 0573 PH 100E 230VAC 50 60Hz With Program Version 2 4...

Page 2: ...tions 2 Safety Precautions 3 Board Holder Set up 4 Preheating Basics 4 System Operation 5 Main Menu 5 Icon Bar Explanations 6 Device Settings Menu 6 Heater Settings Menu 8 Preheat Cycles 9 Tips and Tr...

Page 3: ...istive Touch Screen Control Panel 5 Ceramic Glass Heat Diffuser 1 Power Switch 2 Fuse Socket 6 3x32 mm 3 USB 2 0 Port 4 Top Sensor K type Thermocouple connector 5 Bottom Sensor K type Thermocouple con...

Page 4: ...mber Domestic 8007 0572 Export 8007 0573 Dimensions 3 in H w board holder no feet x 17 in W x 14 in D 76 2 mm x 381 mm x 457 2 mm Weight 18 05 lbs 8 2 kg Power Requirements 115 VAC Domestic 14 Amps 16...

Page 5: ...able materials near the device ALWAYS consult the MSDS Material Safety Data Sheet of materials to check their flammability 13 DO NOT attempt to modify or repair the device yourself If a fault develops...

Page 6: ...ave been included To prevent damage to the glass ceramic plate it is best to remove the aluminum board holder rails completely before adding the feet underneath the steel support rails Each foot is no...

Page 7: ...use will display N C Not Connected 6 Icon Bar Displays key operational information icons during use See page 6 for icon explanations 7 Password Screen Lock Button Tap this button to lock the screen O...

Page 8: ...active when this icon is displayed Indicates the Top Sensor is active This icon only shows up when the power limiter has been activated and designates the unit as currently operating at half its norma...

Page 9: ...brings us to the following screen The color is changed using the RGB color model We can change the color of the button at idle the color when it s pressed as well as the color of the icon Tapping the...

Page 10: ...currenttly installed software version 11 Power Settings This square provides the same function as tapping the power meter on the Main Menu it provides access to the power limiting function Options ar...

Page 11: ...number pad for entering a time anywhere from 0 to 60 minutes After entering a time press the checkmark to exit and start the timer To change an incorrect number press the arrow button to backspace Co...

Page 12: ...own Use only Slo Blo fuses in this unit 15A for 120V units 10A for 230V units Replacement Parts 10A Time Lag Fuse for 230v 1159 0281 P3 15A Time Lag Fuse for 115v 1159 0282 P3 Thermal Fuse Harness 115...

Page 13: ...o PACE without a Service Authorization SA Number Any warranty or other claim with respect to the products must be made in writing delivered to PACE or local Authorized PACE distributor for Buyers outs...

Reviews: