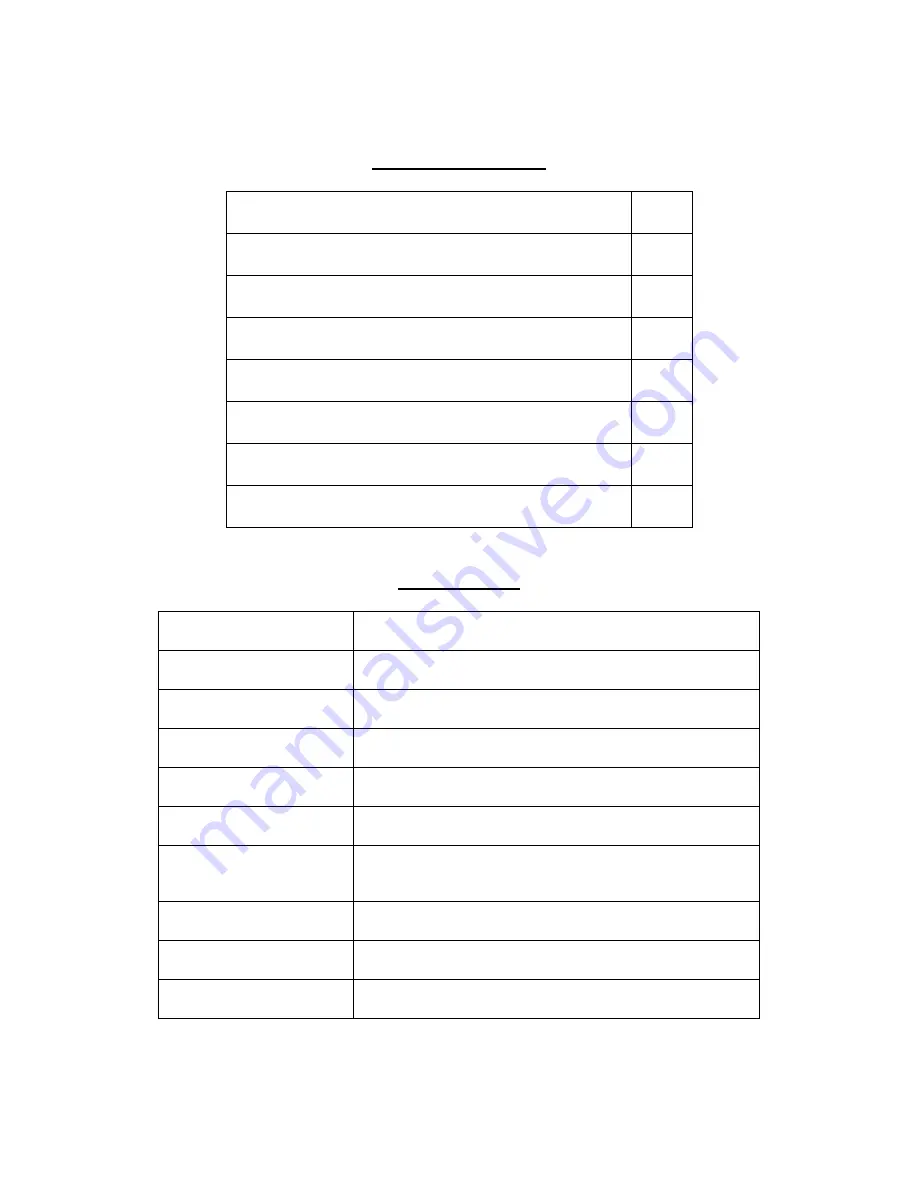
background image

- 2 - 


Packaging Contents 


Description 

Qty. 

PH 100 Preheater 

Power Cord 

K-type Thermocouple 

Aluminum bars, notched for holding board 

13 in. (330 mm) long 

Steel bars, board holder support rails, 

12.125 in (307 mm) long 

Small magnetic feet 

Large magnetic feet 


Specifications 


Part Number 

(Domestic)- 8007-0572 
(Export)- 8007-0573 

Dimensions 

3 in. H (w/ board holder, no feet) x 17 in. W x 14 in. D 
(76.2 mm x 381 mm x 457.2 mm) 

Weight 

18.05 lbs (8.2 kg) 

Power Requirements 

115 VAC, (Domestic), 14 Amps (1600W) 
230 VAC, (Export), 7 Amps (1600W) 

Pre-Heaters 

4 x Ceramic Infrared (IR) Heaters in 2 zones 

Control 

Resistive Touchscreen 

PC Board Size 

11.75 in (298.45 mm) D x  11.75 in (298.45) W  
(width is open ended when using single sided pcb) 

RoHs 

YES 

Calibration 

NO 

Temp Range 

20°C - 200°C or 68°F - 392°F 


Summary of Contents for PH 100

Page 1: ...1 PH 100 Low Profile IR Pre heater Operations Manual Manual Number 5050 0587 Rev C Applies to 8007 0572 PH 100 115 120VAC 50 60Hz 8007 0573 PH 100E 230VAC 50 60Hz With Program Version 2 4...

Page 2: ...tions 2 Safety Precautions 3 Board Holder Set up 4 Preheating Basics 4 System Operation 5 Main Menu 5 Icon Bar Explanations 6 Device Settings Menu 6 Heater Settings Menu 8 Preheat Cycles 9 Tips and Tr...

Page 3: ...istive Touch Screen Control Panel 5 Ceramic Glass Heat Diffuser 1 Power Switch 2 Fuse Socket 6 3x32 mm 3 USB 2 0 Port 4 Top Sensor K type Thermocouple connector 5 Bottom Sensor K type Thermocouple con...

Page 4: ...mber Domestic 8007 0572 Export 8007 0573 Dimensions 3 in H w board holder no feet x 17 in W x 14 in D 76 2 mm x 381 mm x 457 2 mm Weight 18 05 lbs 8 2 kg Power Requirements 115 VAC Domestic 14 Amps 16...

Page 5: ...able materials near the device ALWAYS consult the MSDS Material Safety Data Sheet of materials to check their flammability 13 DO NOT attempt to modify or repair the device yourself If a fault develops...

Page 6: ...ave been included To prevent damage to the glass ceramic plate it is best to remove the aluminum board holder rails completely before adding the feet underneath the steel support rails Each foot is no...

Page 7: ...use will display N C Not Connected 6 Icon Bar Displays key operational information icons during use See page 6 for icon explanations 7 Password Screen Lock Button Tap this button to lock the screen O...

Page 8: ...active when this icon is displayed Indicates the Top Sensor is active This icon only shows up when the power limiter has been activated and designates the unit as currently operating at half its norma...

Page 9: ...brings us to the following screen The color is changed using the RGB color model We can change the color of the button at idle the color when it s pressed as well as the color of the icon Tapping the...

Page 10: ...currenttly installed software version 11 Power Settings This square provides the same function as tapping the power meter on the Main Menu it provides access to the power limiting function Options ar...

Page 11: ...number pad for entering a time anywhere from 0 to 60 minutes After entering a time press the checkmark to exit and start the timer To change an incorrect number press the arrow button to backspace Co...

Page 12: ...own Use only Slo Blo fuses in this unit 15A for 120V units 10A for 230V units Replacement Parts 10A Time Lag Fuse for 230v 1159 0281 P3 15A Time Lag Fuse for 115v 1159 0282 P3 Thermal Fuse Harness 115...

Page 13: ...o PACE without a Service Authorization SA Number Any warranty or other claim with respect to the products must be made in writing delivered to PACE or local Authorized PACE distributor for Buyers outs...

Reviews: