background image

- 7 - 

Device Settings continued… 

 
1.  Mode -- There are two options; User 

and Advanced. Change modes by 

tapping this square. See the following 

section Heater Settings Menu for 

additional information.  

 
2.  Swap -- This icon will allow you to 

rearrange items on the Main Menu 

screen.  Tapping this block brings up 

the main display, then select the item 

you wish to move followed by the 

square you want it to move to. 

 
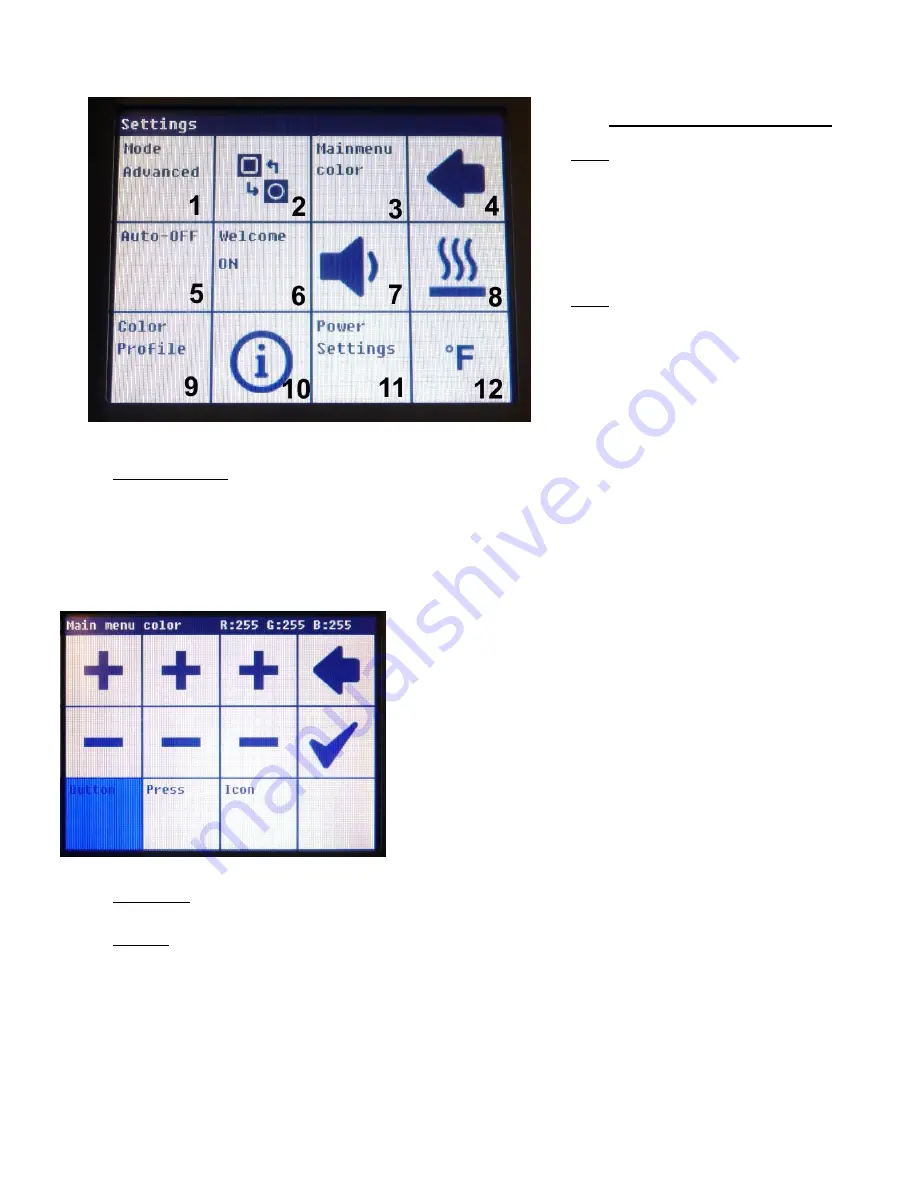
3.  Main Menu Color -- The PH 100 touch screen display offers many color variations with lots of adjustability.  

This option allows the user total control over individual buttons on the main menu.  Touching this button 

brings up the Main Menu again, but notice the icon bar is replaced with “Main Menu Color Settings”.  

Tapping a button in the Main Menu Color Settings screen brings us to the following screen.     


The color is changed using the RGB color model.  We can change the color of the button at idle, the color 

when it’s pressed, as well as the color of the icon. 

 
Tapping the plus or minus in each column adjusts the amount of 

red, green, or blue (in that order) for the chosen item.  The empty 

square in the lower right corner will display the resulting color.  

 
Tapping the arrow returns to the Device Settings menu without 

making any changes. 

 
Tapping the check mark saves the changes and returns to the 

settings menu. 

 
4.  Back Arrow -- Tapping this icon returns to the Main Menu 

 
5.  Auto-Off -- The auto-off screen presents three options.  Tap the Shutdown Timer button to turn the Auto-Off 

function on or off.  How long the unit will remain on by default is 2 hours.  This can quickly be increased to 

preset times of 4 or 8 hours.  The timer can be set to a custom value anywhere between 1 to 24 hours in 1 

hour increments by tapping the NumPad option. 

Summary of Contents for PH 100

Page 1: ...1 PH 100 Low Profile IR Pre heater Operations Manual Manual Number 5050 0587 Rev C Applies to 8007 0572 PH 100 115 120VAC 50 60Hz 8007 0573 PH 100E 230VAC 50 60Hz With Program Version 2 4...

Page 2: ...tions 2 Safety Precautions 3 Board Holder Set up 4 Preheating Basics 4 System Operation 5 Main Menu 5 Icon Bar Explanations 6 Device Settings Menu 6 Heater Settings Menu 8 Preheat Cycles 9 Tips and Tr...

Page 3: ...istive Touch Screen Control Panel 5 Ceramic Glass Heat Diffuser 1 Power Switch 2 Fuse Socket 6 3x32 mm 3 USB 2 0 Port 4 Top Sensor K type Thermocouple connector 5 Bottom Sensor K type Thermocouple con...

Page 4: ...mber Domestic 8007 0572 Export 8007 0573 Dimensions 3 in H w board holder no feet x 17 in W x 14 in D 76 2 mm x 381 mm x 457 2 mm Weight 18 05 lbs 8 2 kg Power Requirements 115 VAC Domestic 14 Amps 16...

Page 5: ...able materials near the device ALWAYS consult the MSDS Material Safety Data Sheet of materials to check their flammability 13 DO NOT attempt to modify or repair the device yourself If a fault develops...

Page 6: ...ave been included To prevent damage to the glass ceramic plate it is best to remove the aluminum board holder rails completely before adding the feet underneath the steel support rails Each foot is no...

Page 7: ...use will display N C Not Connected 6 Icon Bar Displays key operational information icons during use See page 6 for icon explanations 7 Password Screen Lock Button Tap this button to lock the screen O...

Page 8: ...active when this icon is displayed Indicates the Top Sensor is active This icon only shows up when the power limiter has been activated and designates the unit as currently operating at half its norma...

Page 9: ...brings us to the following screen The color is changed using the RGB color model We can change the color of the button at idle the color when it s pressed as well as the color of the icon Tapping the...

Page 10: ...currenttly installed software version 11 Power Settings This square provides the same function as tapping the power meter on the Main Menu it provides access to the power limiting function Options ar...

Page 11: ...number pad for entering a time anywhere from 0 to 60 minutes After entering a time press the checkmark to exit and start the timer To change an incorrect number press the arrow button to backspace Co...

Page 12: ...own Use only Slo Blo fuses in this unit 15A for 120V units 10A for 230V units Replacement Parts 10A Time Lag Fuse for 230v 1159 0281 P3 15A Time Lag Fuse for 115v 1159 0282 P3 Thermal Fuse Harness 115...

Page 13: ...o PACE without a Service Authorization SA Number Any warranty or other claim with respect to the products must be made in writing delivered to PACE or local Authorized PACE distributor for Buyers outs...

Reviews: