background image


- 5 - 

§


Anyone using medicine that may cause sleepiness (e.g., sleeping pills, 
cold medicine, etc.), impaired by alcohol, or extremely fatigued. 

3.


If you do not use the tank containing products for an extended period of time, 
close  the  inlet  valve  and  release  the  water  stored  in  the  product.  Once  done, 
remove  power  to  the  product.  The  next  time  you  use  the  product,  run  water 
through the product thoroughly before use. 

4.


If  the  product  is  in  a  place  where  it  may  encounter  freezing  temperatures, 
measures should be taken to avoid damage.  


      Warning 


1.


Failure to operate this product according to the following statements may cause 
fire or electric shock: 

o


Do not use with an electrical socket with power stronger than AC110V or 
use a loose electrical socket. 

o


Never dissemble, repair or modify the product. 

o


Never use wet hands when inserting the plug into the socket. 

o


Never insert a needle or other metal object into the socket. 

o


Do not pull, heat, or forcibly bend the power cord or place heavy objects on 
the power cord. 

2.


Do not use any source other than tap water with this product, as it may cause 
skin irritation and/or other issues. 

3.


Do not carry the product by the seat or top cover only; carry the toilet’s body 
during transport. 

4.


Do not place heavy objects on the seat or stand on the cover or face of the body, 
or it may cause the body to be fractured, leaking, and/or damaged. 

5.


Do not put your fingers or other objects into or block the exit of heated air. 

6.


If you do not operate according to the following, it may cause the body or cover 
to be damaged, scratched, or the toilet to malfunction and trigger to fail: 

o


Do not modify the main body or the nozzle with using a child seat. Children’s 
seats should be placed on the toilet’s seat when in use, and removed after 
use. 

o


Avoid  direct  sunlight  as  this  may  cause  discoloration  and  uneven 
temperature dispersion on the seat. 

o


Disconnect product from the outlet during lightning storms. 

o


Do not wipe the product body, seat, or cover with a dry cloth or paper towel. 

o


Don’t cover the sitting sensors or lean backwards on the opened cover. 

Summary of Contents for CASCADIA PB-TS03

Page 1: ...INSTALLATION GUIDE CASCADIA SMART TOILET SEAT Automatic Open Close Instant Heating with Remote Control PB TS03...

Page 2: ...ecautions section making sure you have read it thoroughly before you use the product so that you can safely operate everything After reading please keep this installation guide for use in the event th...

Page 3: ...Maintenance 10 Routine Maintenance 12 Preventing Damage Due to Frozen Water Pipes 13 and when not in use for Long Periods Troubleshooting 14 Before Installation 17 Parts in Packaging 17 Product Specif...

Page 4: ...200W Standard Daily Power Consumption 0 415kWh Toilet Seat Surface Cover Automatic Open Close Heated Seat Surface Temperature Temperature adjustment range 86 100 F Automatic Power Savings at About 79...

Page 5: ...aximum 1200W Safety Device Leakage Protection Temperature Fuse High Temperature Protective Dry Heating Prevention Backflow Prevention Device Reflux Valve Drying Device Drying Airflow 0 52m3 min Temper...

Page 6: ...u use the product correctly The precautions listed here are important security related concerns that must be obeyed Annotation and meanings are described below CAUTION MUST COMPLY WITH WARNING If igno...

Page 7: ...ng needs to be installed to maintain good air circulation in the bathroom Do not spill water or detergent on the body of the product or the power plug o When cleaning the product be sure the power is...

Page 8: ...cibly bend the power cord or place heavy objects on the power cord 2 Do not use any source other than tap water with this product as it may cause skin irritation and or other issues 3 Do not carry the...

Page 9: ...ge problems CAUTIONS BEFORE INSTALLATION Do not put the leakage protection plug into an electrical outlet before completing installation Otherwise it may cause the toilet seat to break down Pressure r...

Page 10: ...7 PARTS AND FEATURES...

Page 11: ...8 CONTROL PANEL OPERATION...

Page 12: ...le using the spray function 2 Sitting sensor will activate deodorizer will begin and all functions may be used 3 Once finished using the toilet clean using preferred spray function and dry using the d...

Page 13: ...r cleaners on the plastic parts e g toilet chemicals household detergents bleach benzene paint thinner decontamination powder or cresol Turn off the power and make sure the power light is off before c...

Page 14: ...ents Strong Alkaline Detergents Detergents that Contain Abradants Metal Brush or Nylon Brush Water Valve Brush Nylon Brush Cleansers Abrasive Powders Detergents that Contain Coarse Particles Diluent G...

Page 15: ...Wipe again with a wet soft cloth Wand cleaning and maintenance 1 To clean nozzle simply pull it out 2 Once out wipe with a soft cloth o Please do not apply force when pushing or pulling the wand and d...

Page 16: ...e drain the toilet when freezing temperatures are anticipated or when not using for long periods of time Please drain the toilet water tank in the following situations The water in the toilet might be...

Page 17: ...e is set to Off or is too low Push the ON or HIGH buttons on the main unit controls Cold water sprays out first Due to low temperature of the main water supply and washing room the front of the spraye...

Page 18: ...ated The Deodorizer Filter is blocked Clean the filter The Deodorizer Turns on Automatically Under the following conditions the seat sensor will detect something and activate the deodorizer This is no...

Page 19: ...remote is covered Remove any foreign objects on the remote The seat sensor is not functioning Refer to the Seat Sensor instructions The battery alarm light is on Replace the batteries in the remote Se...

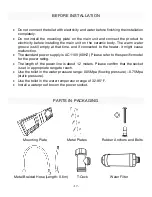
Page 20: ...t cause malfunction The standard power supply is AC 110V 60HZ Please refer to the specific model for the power rating The length of the power line is about 1 2 meters Please confirm that the socket is...

Page 21: ...UR SMART TOILET SEAT 1 Remove Current Toilet Seat and Prepare Toilet for Installation Remove the previously installed toilet seat by loosening the bolts and dismantling Once done clean the toilet in p...

Page 22: ...the rubber anchor to make installation easier 3 Position and Attach Mounting Plate With the rubber anchors securely in place you are ready to attach the mounting plate Place the mounting plate on the...

Page 23: ...ation button of the toilet found on the right side and sliding it off of the toilet Once removed reposition the mounting plate and reattach 5 Connect Water Supplies to Toilet Body Your Smart Toilet Se...

Page 24: ...er hose attach the hoses to the T Cock and Smart Toilet Seat Note Plumbers tape may be used to help prevent leaks 7 Turn on Water and Test Smart Toilet Seat Now that you ve finished installing your Sm...

Page 25: ...is both convenient to use and close enough to reach while sitting on the toilet 2 Secure Controller Hanger Once you ve determined where you want the controller remove the plastic covering for the dou...

Page 26: ...23 3 Add Batteries to Controller The controller requires 2 AAA batteries to function Once inserted you re Smart Toilet Seat is ready to use...

Page 27: ...toilet seat is down a Cover the sensor with a wet cloth or sit on the toilet b Confirm that deodorizer activates i Check that the air blows is blowing out correctly c Verify cleaning functions i Press...

Page 28: ...e main unit of the toilet there will be a series of beeps confirming that the unit has received a signal Beep When pressing the switch to turn on the toilet and the main unit has received the signal B...

Page 29: ...sen temperatures are displayed on the LCD screen Press on each of the two buttons until the screen reads that the temperature is off Once done the seat and water temperature will return to normal Swit...

Page 30: ...ntil the screen of the remote flashes 2 Press on the DRYER TEMP button until you hear the remote beep 3 Press the STOP button again After you finish cleaning the nozzle press the STOP button to retrac...

Page 31: ...Light Seat Temperature Indicator Light Induction Distance Level 0 1 2 3 4 5 6 4 After setting the distance you want press the FLUSH button to save the settings Friendly Tips The 0 level represents the...

Page 32: ...conds or until the screen of the remote flashes 2 Press on the SEAT TEMP button until you hear the remote beep 3 Press the STOP button again The toilet can be used when the automatic energy saving fun...

Page 33: ...ton for 10 seconds or until the screen on the remote flashes Once done press the SEAT TEMP button to adjust the induction distance The distance level will be displayed on the LED screen of the main un...

Page 34: ...e extends out press the button again 3 Remove the water filter and wipe off any visible dirt a You may use a cotton swab to clean any visible dirt on the water filter 4 Reinstall the water filter with...

Page 35: ...32 CAUTIONS Back flush or change the filter if you find that the water pressure has fallen significantly Filter can be easily damaged and so it is therefore not guaranteed as part of the warranty...

Page 36: ...come and install an outlet near your toilet in the bathroom This will enable you to power your smart toilet seat without using an extension cord or other method If you have a GFCI outlet already in yo...

Page 37: ...oss resulting from any accident unreasonable use misuse abuse negligence or improper care cleaning or maintenance of the smart toilet seat Damage or loss resulting from sediments or foreign matter con...

Reviews: